目录
本文文章从0到1带你手写Vue3运行时。依次深入讲解以下内容
h函数的实现 --> 支持组件 --> 支持class属性render渲染器骨架 --> 设置属性 --> 节点更新render渲染无状态组件 --> 渲染有状态组件 --> 生命周期钩子 -->setup函数支持diff算法 --> 思路 --> 最长递增子序列算法 -->diff实现
运行时的大致流程
h(tagName, props, children)函数 可类比react的createElement生成VNode节点render(vnode, container)渲染VNode并挂载
位运算符
因为,h函数中用到了位运算符,所以我们先熟悉一下位运算符。
通常我们都是使用是进值运算,然而在Vue3源码中出现了很多位运算(二进制运算)符 比如 | & >>。
为什么要使用位运算符?
因为计算机运算的本质是采用二进制运算,位运算要比十进制运算效率高很多。
如下二分查找示例
jsfunction find(nums, it) {
  const len = nums.length;
  let st = 0, end = len-1;
  let center;
  while(st < end) {
    // center = Math.floor((st + end) / 2);
    center = (st + end) >> 1
    if(num[center] == it) return center;
    if(it > num[center]) {
       st = center+1;
    } else {
      end = center
    }
  }
  return -1;
}
| 是 按位或运算符。
比如
3|9的结果是11
0000011即3
|
0001001即9
=
0001011即11
同理&是 按位与运算符, 不解释了,其他还有
>>左移运算符 即Math.floor(num/2)<<右移运算符<<<、>>>无符号右移运算符、无符号左移运算符|=比如a|=b即a = a|b&=不解释了
如何理解这里位运算符,它们有什么用呢?
- 二进制只有两个数字
0或1代表false或true, 可以理解为标志。 - 我们可以把它理解为跑道,假设右边开始为第一个跑道
a = 2即a占据第二个跑道b = 3即b占据占据第一个和第二个跑道if(b & 1)即b是否占据跑道一
- 有了位标志一个变量可以表示多个状态了。 比如是否是文本节点用跑道
1表示(1不是文本节点0是文本节点),子节点用跑道2和跑道3表示(跑道2b表示是子节点是不是文本节点,跑道3表示子节点是否是数组 1 << 3表示占据第4个跑道, 这里就不要关心它转换为十进制数字的值了。
h函数
h函数可类比react的createElement生成VNode节点,它的用法很灵活
代码实现
shared/src/shapeFlags.ts
tsexport const enum ShapeFlags {
  ELEMENT = 1,
  // 函数组件
  FUNCTIONAL_COMPONENT = 1 << 1,
  // 有状态(响应数据)组件
  STATEFUL_COMPONENT = 1 << 2,
  TEXT_CHILDREN = 1 << 3,
  ARRAY_CHILDREN = 1 << 4,
  SLOTS_CHILDREN = 1 << 5,
  COMPONENT = ShapeFlags.STATEFUL_COMPONENT | ShapeFlags.FUNCTIONAL_COMPONENT
}
runtime-core/src/h.ts
tsimport { isObject } from '@vue/shared'
import { VNode, createVNode, isVNode } from './vnode'

/**
 * h函数只做了参数标准化的事情
 * 其他工作都交给了createVNode函数
 */
export function h(type: any, propsOrChildren?: any, children?: any): VNode {
  const l = arguments.length
  if (l === 2) {
    if (isObject(propsOrChildren) && !Array.isArray(propsOrChildren)) {
      if (isVNode(propsOrChildren)) {
        return createVNode(type, null, [propsOrChildren])
      }
      return createVNode(type, propsOrChildren)
    }
    return createVNode(type, null, propsOrChildren)
  } else {
    if (l > 3) {
      children = Array.prototype.slice.call(arguments, 2)
    } else if (l === 3 && isVNode(children)) {
      children = [children]
    }
    return createVNode(type, propsOrChildren, children)
  }
}
runtime-core/src/vnode.ts
tsimport { ShapeFlags } from 'packages/shared/src/shapeFlags'
export interface VNode {
__v_isVNode: true
key: any
type: any
props: any
children: any
shapeFlag: number
}
export function isVNode(value: any): value is VNode {
return value ? value.__v_isVNode === true : false
}
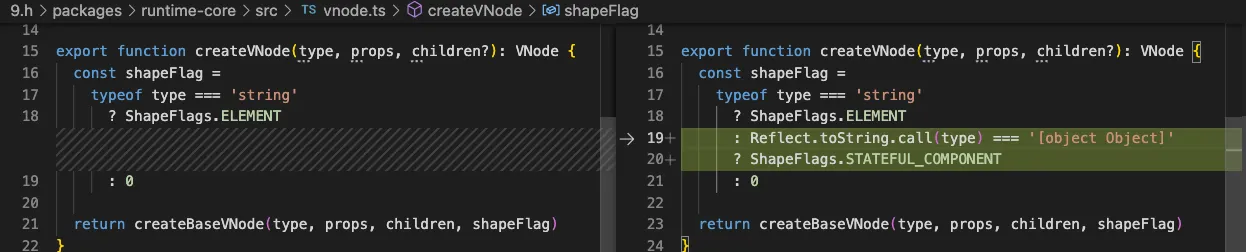
export function createVNode(type, props, children?): VNode {
const shapeFlag = typeof type === 'string' ? ShapeFlags.ELEMENT : 0
return createBaseVNode(type, props, children, shapeFlag)
}
export { createVNode as createElementVNode }
function createBaseVNode(type, props, children, shapeFlag) {
const vnode = {
__v_isVNode: true,
type,
props,
shapeFlag,
key: props?.key || null
} as VNode
normalizeChildren(vnode, children)
return vnode
}
export function normalizeChildren(vnode: VNode, children: unknown) {
let type = 0
if (children == null) {
children = null
} else if (Array.isArray(children)) {
type = ShapeFlags.ARRAY_CHILDREN
} else if (typeof children === 'object') {
// TODO
} else if (typeof children === 'function') {
// TODO
} else {
children = String(children)
type = ShapeFlags.TEXT_CHILDREN
}
vnode.children = children
vnode.shapeFlag |= type // 从父节点就能推断出子节点的类型
}
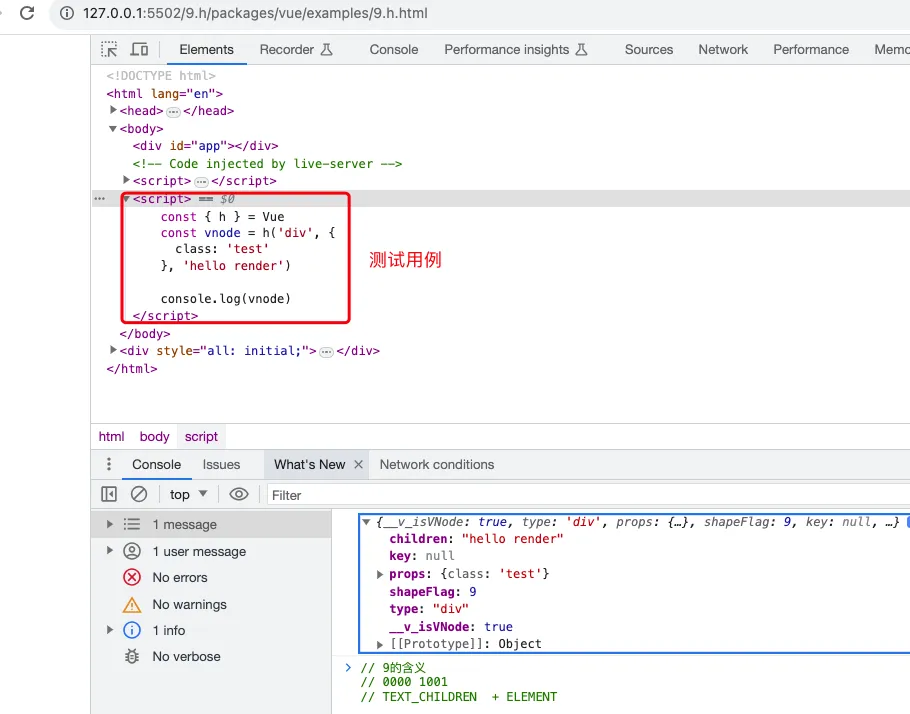
测试用例1
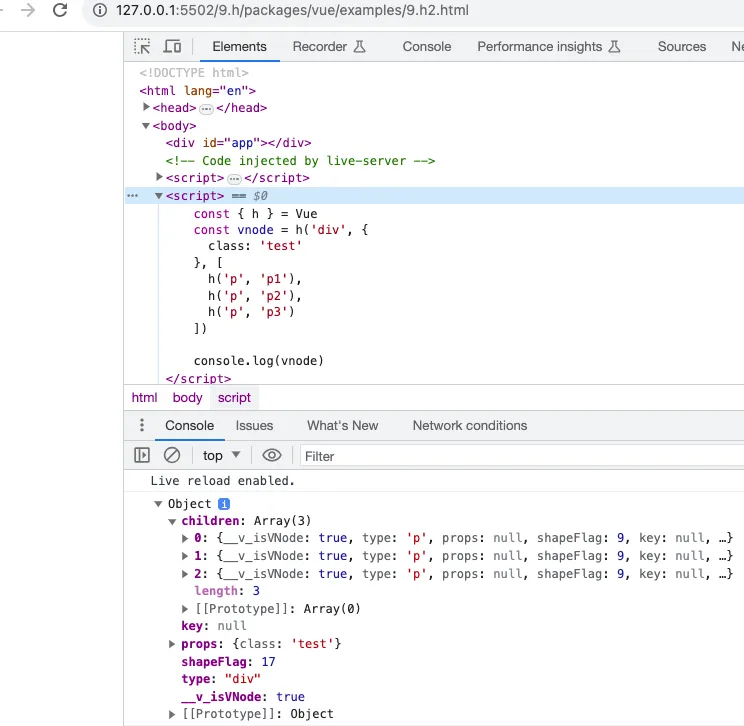
测试用例2
支持组件
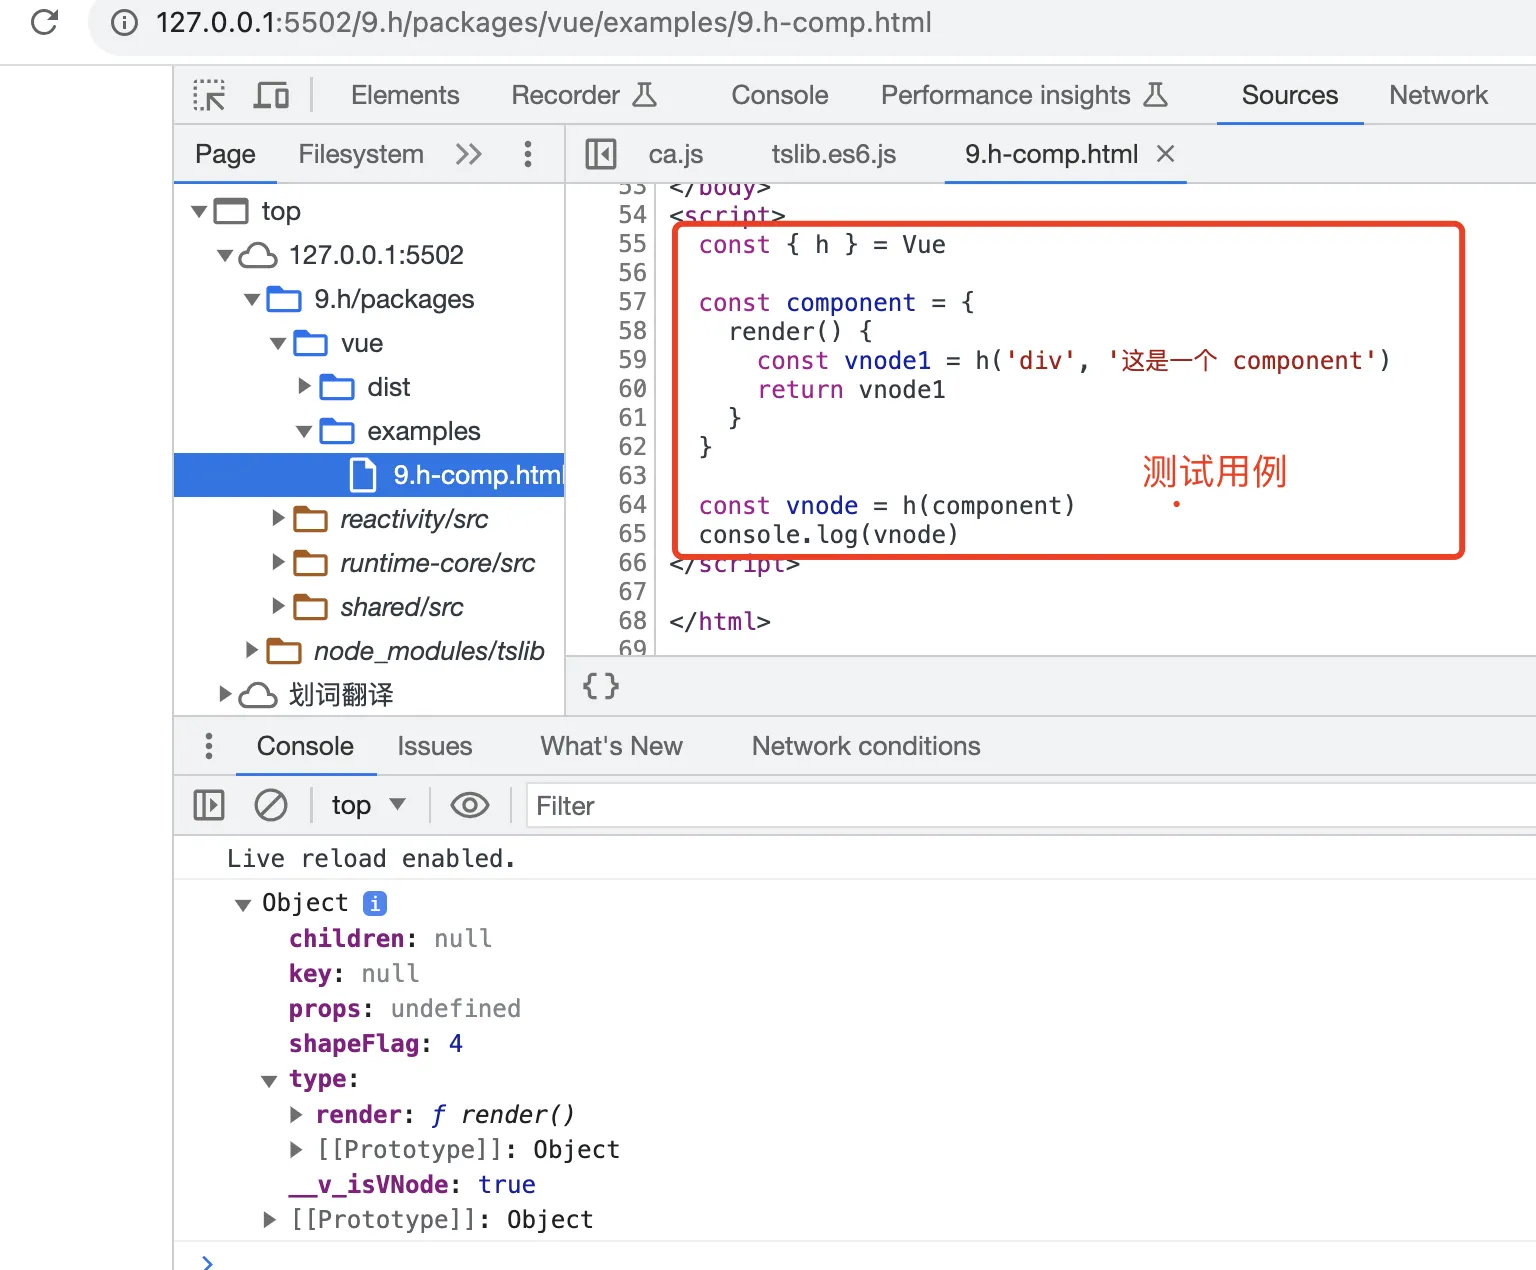
测试用例
class支持

- 新增文件
shared/src/normalizeProp.ts
tsexport function normalizeClass(value: unknown): string {
  let res = ''
  if (typeof value === 'string') {
    res = value
  }
  else if (Array.isArray(value)) {
    for (let i = 0; i < value.length; i++) {
      const normalized = normalizeClass(value[i])
      if (normalized) {
        res += normalized + ' '
      }
    }
  }
  else if (Reflect.toString.call(value) === '[object Object]') {
    for (const name in value as object) {
      if ((value as object)[name]) {
        res += name + ' '
      }
    }
  }
  return res.trim()
}
测试用例
render渲染器
这里说一下Vue为什么分
runtime-core和runtime-dom两个包。
runtime-core是运行时的核心,与平台无关runtime-dom是浏览器渲染相关的- 如果将来想把
vue3运行在其他客户端,如小程序环境,只需更换runtime-dom包即可,
构建render基本架构
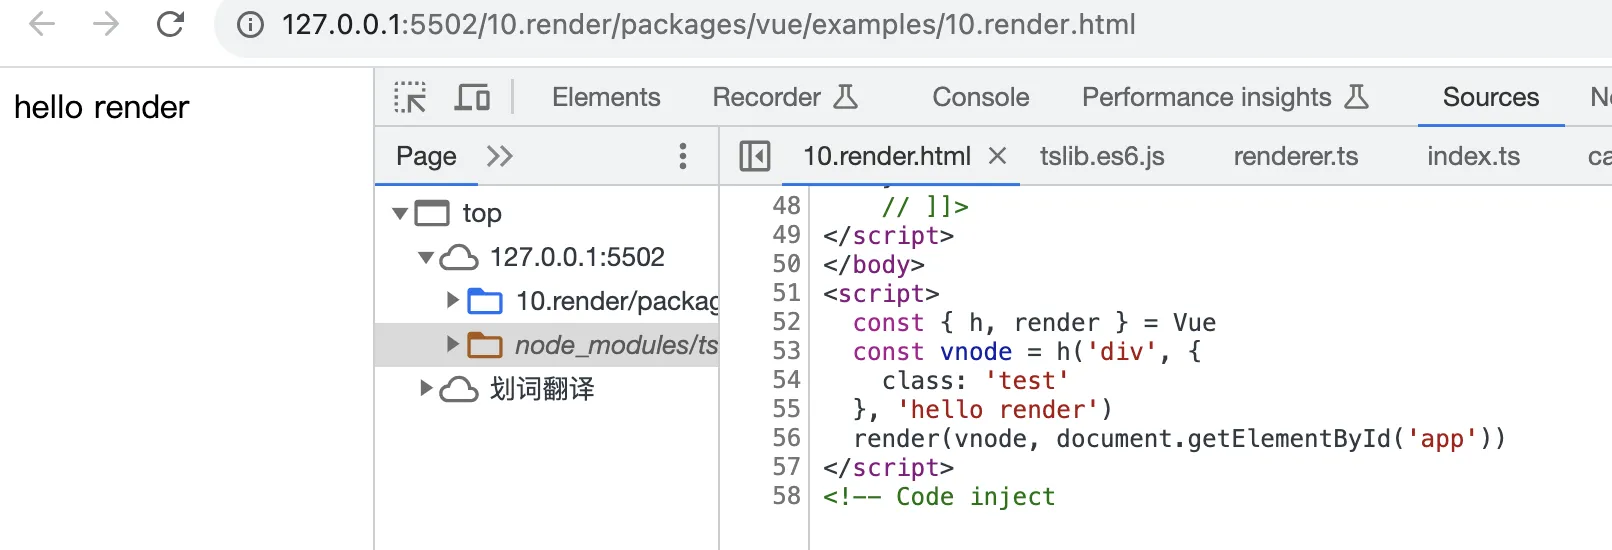
先看测试用例
10.render.html
html<body>
  <div id="app"></div>
</body>
<script>
  const { h, render } = Vue
  const vnode = h('div', {
    class: 'test'
  }, 'hello render')
  render(vnode, document.getElementById('app'))
</script>
- render 函数在
runtime-dom包中
runtime-dom/src/index.ts
tsimport { createRenderer } from '@vue/runtime-core'
import { nodeOps } from './nodeOps'

let renderer
const rendererOptions = Object.assign({}, nodeOps)
// 这里是一种设计模式 **依赖注入**,通过参数的形式注入依赖
export function render(...args) {
  // 缓存renderer实例
  renderer ??= createRenderer(rendererOptions)
  return renderer.render(...args)
}
runtime-dom/src/nodeOps.ts是dom操作相关的方法
tsexport const nodeOps = {
  insert: (child, parent, anchor) => {
    parent.insertBefore(child, anchor || null)
  },
  createElement: (tag): Element => {
    const el = document.createElement(tag)
    return el
  },
  setElementText: (el, text) => {
    el.textContent = text;
  }
}
- 剩下的核心代码就在
createRenderer里了, 这里我们只填充挂载逻辑
runtime-core/src/renderer.ts
tsimport { ShapeFlags } from 'packages/shared/src/shapeFlags'
import { Text, Fragment } from './vnode'

export interface RendererOptions {
  setElementText(node: Element, text: string): void
  insert(el, parent: Element, anchor?): void
  createElement(type: string): Element
}

export function createRenderer(options?: RendererOptions) {
  const {
    insert: hostInsert,
    createElement: hostCreateElement,
    setElementText: hostSetElementText
  } = options!

  return {
    render
  }
  function render(vnode, container) {
    if (vnode === null) {
      // TODO 卸载
    } else {
      // 打补丁
      patch(container._vnode, vnode, container)
    }
    // 更新旧节点
    container._vnode = vnode
  }
  function patch(oldVNode, newVNode, container, anchor = null) {
    if (oldVNode === newVNode) return
    const { type, shapeFlag } = newVNode
    switch (type) {
      case Text:
        // TODO
        break
      case Fragment:
        // TODO
        break
      default:
        if (shapeFlag & ShapeFlags.ELEMENT) {
          processElement(oldVNode, newVNode, container, anchor)
        } else if (shapeFlag & shapeFlag.COMPONENT) {
          // TODO
        }
    }
  }
  function processElement(oldVNode, newVNode, container, anchor) {
    if (oldVNode == null) {
      mountElement(newVNode, container, anchor)
    } else {
      // TODO 更新
    }
  }
  function mountElement(vnode, container, anchor) {
    const { type, shapeFlag, props } = vnode
    // 1. 创建元素
    const el = (vnode.el = hostCreateElement(type))
    if (shapeFlag & ShapeFlags.TEXT_CHILDREN) {
      // 2. 设置文本
      hostSetElementText(el, vnode.children)
    } else if (shapeFlag & ShapeFlags.ARRAY_CHILDREN) {
      // todo
    }
    // 3. 设置props
    if (props) {
      for (const key in props) {
        // TODO
      }
    }
    // 4. 插入
    hostInsert(el, container, anchor)
  }
}
我调整了代码结构,上面能清晰的看出调用顺序
createRenderer() ==> render() ==> patch() ==> processElement() ==> mountElement()
mountElement()方法中四步操作很清晰,这里我们只做了 创建元素、设置文本、插入dom,完成最小页面显示的雏形。
shapeFlags.ts 和 vnode.ts 都是只定义一些常量, 这里直接copy源码
shared/src/shapeFlags.ts
tsexport const enum ShapeFlags {
  ELEMENT = 1,
  // 函数组件
  FUNCTIONAL_COMPONENT = 1 << 1,
  // 有状态(响应数据)组件
  STATEFUL_COMPONENT = 1 << 2,
  TEXT_CHILDREN = 1 << 3,
  ARRAY_CHILDREN = 1 << 4,
  SLOTS_CHILDREN = 1 << 5,
  COMPONENT = ShapeFlags.STATEFUL_COMPONENT | ShapeFlags.FUNCTIONAL_COMPONENT
}
runtime-core/src/vnode.ts
运行测试用例
注: 这一步很关键,代码也比较多, 但逻辑还是很清晰的,建议跟着敲一遍代码,再断点调试一遍,只要这一步迈过去,整个渲染器章节没有难点了。
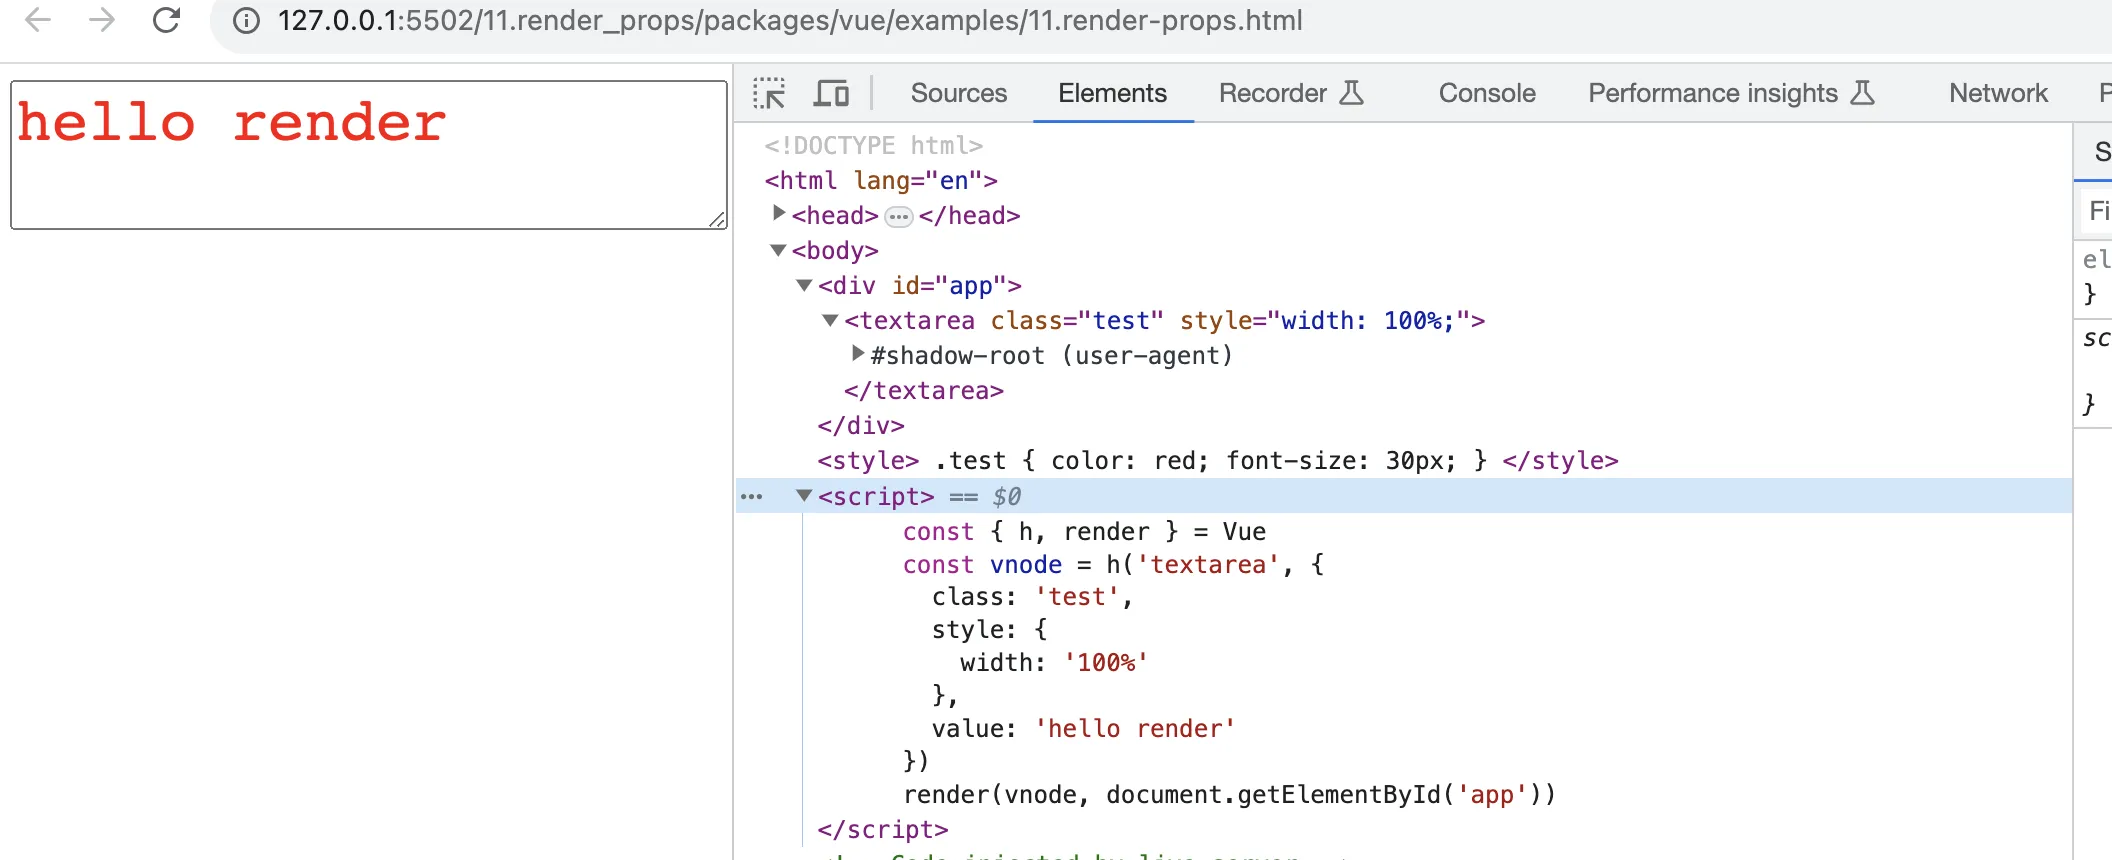
设置属性
- 先准备测试用例
html<body>
  <div id="app"></div>
  <style>
    .test {
      color: red;
      font-size: 30px;
    }
  </style>
  <script>
    const { h, render } = Vue
    const vnode = h('textarea', {
      class: 'test',
      style: {
        width: '100%'
      },
      value: 'hello render'
    })
    render(vnode, document.getElementById('app'))
  </script>
</body>
- 实现浏览器方法
runtime-dom/src/patchProp.ts
tsimport { isOn } from '@vue/shared'
import { patchClass } from './modules/class'
import { patchStyle } from './modules/style'
import { patchDOMProp } from './modules/props'
import { patchAttr } from './modules/attrs'

export const patchProp = (el, key, prevValue, nextValue) => {
  if (key === 'class') {
    patchClass(el, nextValue)
  } else if (key === 'style') {
    patchStyle(el, prevValue, nextValue)
  } else if (isOn(key)) {
    // TODO patchEvent
  } else if (shouldSetAsProp(el, key)) {
    // 通过 DOM Properties 指定
    patchDOMProp(el, key, nextValue)
  } else {
    patchAttr(el, key, nextValue)
  }
}

/**
 * 判断指定元素的指定属性是否可以通过 DOM Properties 指定
 * 从源码中copy过来, 了解即可不用背
 */
function shouldSetAsProp(el: Element, key: string) {
  // 各种边缘情况处理
  if (['spellcheck', 'draggable', 'translate'].includes(key)) {
    return false
  }
  // #1787, #2840 表单元素的表单属性是只读的,必须设置为属性 attribute
  if (key === 'form') {
    return false
  }
  // #1526 <input list> 必须设置为属性 attribute
  if (key === 'list' && el.tagName === 'INPUT') {
    return false
  }
  // #2766 <textarea type> 必须设置为属性 attribute
  if (key === 'type' && el.tagName === 'TEXTAREA') {
    return false
  }
  return key in el
}

// isOn shared/src/index.ts
export const isOn = (key: string) => /^on[^a-z]/.test(key)

// ./modules/class.ts
export function patchClass(el: Element, value: string | null) {
  if (value === null) {
    el.removeAttribute('class')
  } else {
    el.className = value
  }
}

// ./modules/style.ts
import { isString } from '@vue/shared'

export function patchStyle(el: Element, prev, next) {
  const style = (el as HTMLElement).style
  const isCssString = isString(next)
  if (next && !isCssString) {
    for (const key in next) {
      // 设置新样式
      setStyle(style, key, next[key])
    }
    // TODO 清理旧样式
  }
}

function setStyle(
  style: CSSStyleDeclaration,
  name: string,
  val: string | string[]
) {
  style[name] = val
}

// ./modules/props.ts
export function patchDOMProp(el: any, key: string, value: any) {
  try {
    el[key] = value
  } catch (e: any) {}
}

// ./modules/attrs.ts
export function patchAttr(el: Element, key: string, value: any) {
  if (value == null) {
    el.removeAttribute(key)
  } else {
    el.setAttribute(key, value)
  }
}
runtime-core改造
runtime-core/src/index.ts改造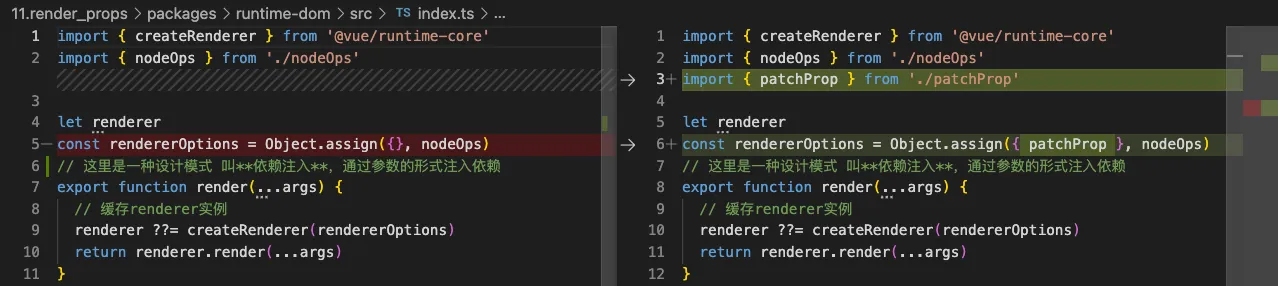
runtime-core/src/renderer.ts改造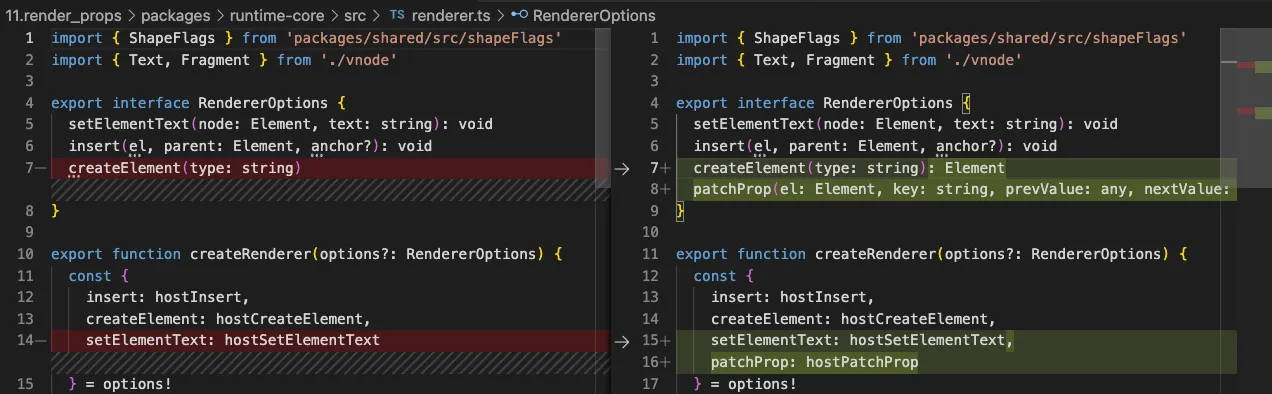

- 验证
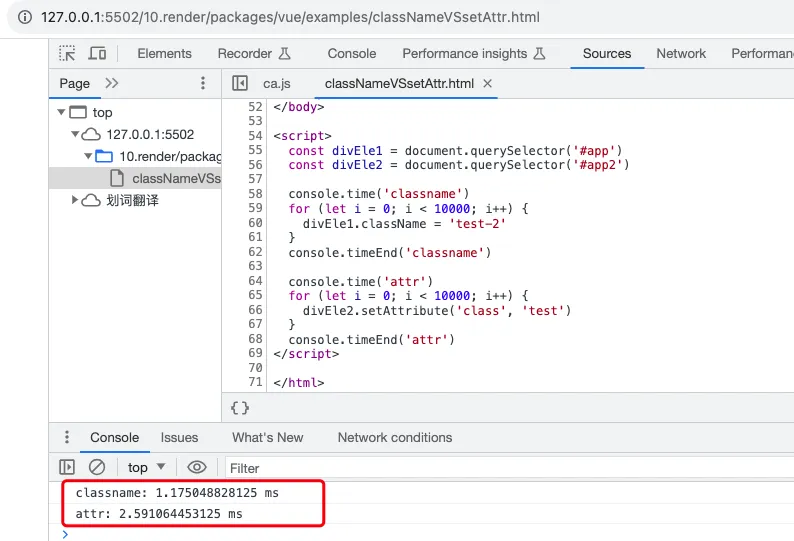
补充知识点: 为什么要修改class不用setAttribute ?
Element节点更新
- 先看测试用例
html<body>
  <div id="app"></div>
  <style>
    .active {
      color: red;
      font-size: 30px;
    }
  </style>
  <script>
    const { h, render } = Vue
    const vnode = h('div', {
      class: 'test'
    }, 'hello render')

    render(vnode, document.querySelector('#app'))

    setTimeout(() => {
      const vnode2 = h('div', {
        class: 'active'
      }, 'update')
      render(vnode2, document.querySelector('#app'))
    }, 2000);
  </script>
</body>
runtime-core/src/renderer.ts修改如下
 后面代码如下
ts  function patchElement(oldVNode, newVNode) {
    const el = (newVNode.el = oldVNode.el)
    const oldProps = oldVNode.props || {}
    const newProps = newVNode.props || {}
    patchChildren(oldVNode, newVNode, el, null)
    patchProps(el, newVNode, oldProps, newProps)
  }
  function patchChildren(oldVNode, newVNode, container, anchor) {
    const c1 = oldVNode?.children
    const c2 = newVNode?.children
    const prevShapeFlag = oldVNode?.shapeFlag || 0
    const shapeFlag = newVNode.shapeFlag
    // 子节点有三种情况 文本节点、多节点、无子节点
    if (shapeFlag & ShapeFlags.TEXT_CHILDREN) {
      // 新Node的子节点是文本
      if (prevShapeFlag & prevShapeFlag.ARRAY_CHILDREN) {
        // TODO卸载旧节点
      }
      if (c2 !== c1) {
        hostSetElementText(container, c2)
      }
    } else {
      // 新Node的子节点是多节点 或 无子节点
      if (prevShapeFlag & ShapeFlags.ARRAY_CHILDREN) {
        // 旧Node有多个子节点
        if (shapeFlag & ShapeFlags.ARRAY_CHILDREN) {
          // TODO diff
        } else {
          // TODO 卸载
        }
      } else {
        // 旧Node的子节点是文本节点 或 无子节点
        if (prevShapeFlag & ShapeFlags.TEXT_CHILDREN) {
          // 旧Node的子节点是文本节点
          hostSetElementText(container, '')
        } /* else {
          // 旧Node 无子节点 什么都不做
        } */
        if (shapeFlag & ShapeFlags.ARRAY_CHILDREN) {
          // TODO 单独挂载新子节点操作
        } /* else {
          // 新Node 无子节点 什么都不做
        } */
      }
    }
  }
  function patchProps(el: Element, vnode, oldProps, newProps) {
    if (oldProps !== newProps) {
      for (const key in newProps) {
        const prev = oldProps[key]
        const next = newProps[key]
        if (next !== prev) {
          hostPatchProp(el, key, prev, next)
        }
      }
    }
    if (oldProps) {
      for (const key in oldProps) {
        if (!(key in newProps)) {
          hostPatchProp(el, key, oldProps[key], null)
        }
      }
    }
  }
运行效果
不同节点的更新
先卸载,再挂载(复用)
- 测试用例准备
html<body>
  <div id="app"></div>
  <style>
    .active {
      color: red;
      font-size: 30px;
    }
  </style>
  <script>
    const { h, render } = Vue
    const vnode = h('div', {
      class: 'test'
    }, 'hello render')

    render(vnode, document.querySelector('#app'))

    setTimeout(() => {
      const vnode2 = h('h1', {
        class: 'active'
      }, 'update')
      render(vnode2, document.querySelector('#app'))
    }, 2000);
  </script>
</body>
- 代码修改如下
-
runtime-core/src/renderer.ts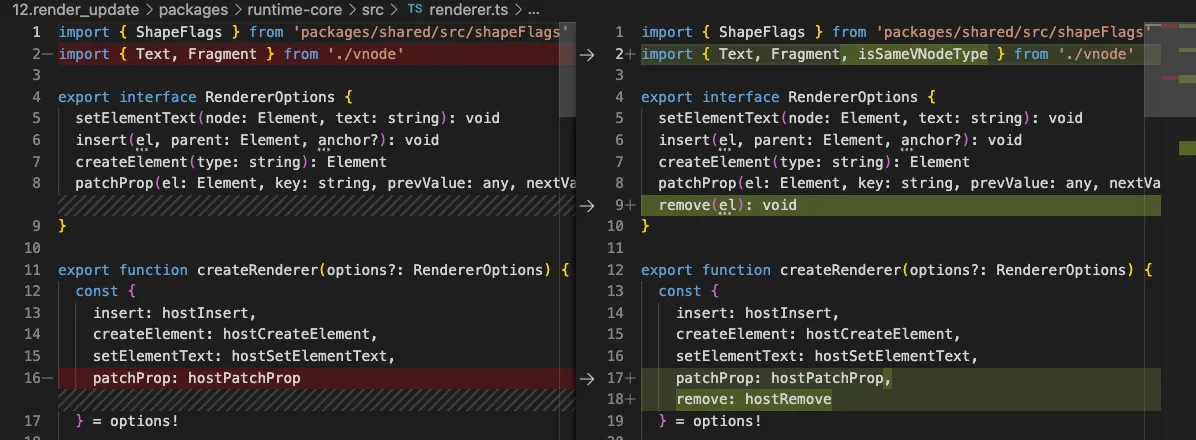

-
runtime-dom/src/nodeOps.ts新增remove方法
运行效果
节点删除
runtime-core/src/renderer.ts再调整一行代码即可实现节点删除功能 测试用例如下
html<body>
  <div id="app"></div>
  <script>
    const { h, render } = Vue
    const vnode = h('div', {
      class: 'test'
    }, 'hello render')

    render(vnode, document.querySelector('#app'))

    setTimeout(() => {
      render(null, document.querySelector('#app'))
    }, 2000);
  </script>
</body>
有兴趣试试看, 这里偷懒不做GIF图了
事件的挂载和更新
Vue3事件优化
jsconst btn = document.getElementById('btn');
function handleClick() {
  console.log(123);
}
btn.addEventListener('click', handleClick);

// 假设事件发生变更,正常做法如下
function handleClick2() {
  console.log(123);
}
btn.removeEventListener('click', handleClick);
btn.addEventListener('click', handleClick2);

// 如果频繁切换事件会很消耗行动
// Vue3已经做了优化,思路如下
function invoker() {
  invoker.value();
}
invoker.value = handleClick;
btn.addEventListener('click', invoker);

// 当事件发生切换
invoker.value = handleClick2
// 是不是很精妙?
代码实现
- 先上测试用例
html<body>
  <div id="app"></div>
  <script>
    const { h, render } = Vue

    const vnode = h('button', {
      onClick() {
        alert('点击')
      },
    }, '点击')
    render(vnode, document.querySelector('#app'))

    setTimeout(() => {
      const vnode2 = h('button', {
        onDblclick() {
          alert('双击')
        },
      }, '双击')
      render(vnode2, document.querySelector('#app'))
    }, 3000);
  </script>
</body>
- 代码调整如下
-
runtime-dom/src/patchProp.ts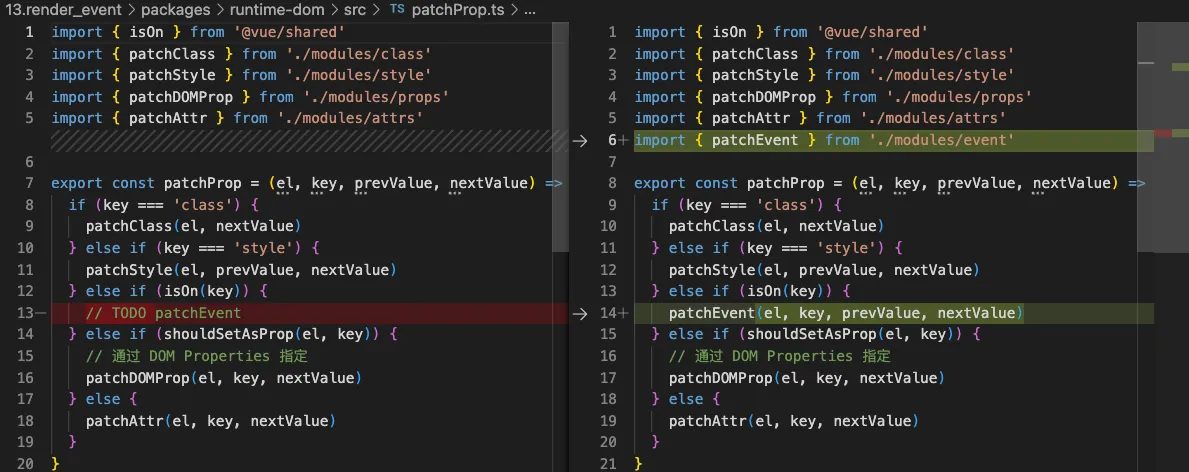
-
runtime-dom/src/modules/event.ts
tsexport function patchEvent(
  el: Element & { _vei?: Object },
  rawName: string,
  prevValue,
  nextValue
) {
  const invokers = el._vei || (el._vei = {})
  const existingInvoker = invokers[rawName]
  if (nextValue && existingInvoker) {
    existingInvoker.value = nextValue
  } else {
    const name = rawName.slice(2).toLowerCase()
    if (nextValue) {
      const invoker = (invokers[rawName] = createInvoker(nextValue))
      el.addEventListener(name, invoker)
    } else if (existingInvoker) {
      el.removeEventListener(name, existingInvoker)
      invokers[rawName] = undefined
    }
  }
}

function createInvoker(initialVal) {
  const invoker = (...args) => {
    invoker.value?.(...args)
  }
  invoker.value = initialVal
  return invoker
}
运行效果如下
children节点的更新
- 测试用例
html<body>
  <div id="app"></div>
  <script>
    const { h, render } = Vue
    const vnode = h('div', 'hello render')
    render(vnode, document.querySelector('#app'))

    setTimeout(() => {
      const vnode2 = h('div', {}, [
        h('li', {key: 1}, 'p1'),
        h('li', {key: 2}, 'p2'),
      ])
      render(vnode2, document.querySelector('#app'))
    }, 2000);
  </script>
</body>
- 代码改动
- 修改renderer.ts 的 patchChilren方法
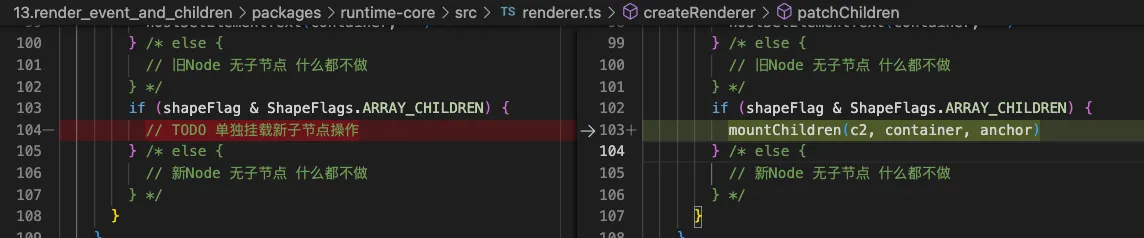 上面是 单节点 更新为多节点
还有一处是初始挂载多节点时

mountChildren方法如下
tsfunction mountChildren(children, container, anchor) {
  children.forEach((child, index) => {
    if (!isVNode(child)) {
      children[index] = createVNode(Text, null, String(child))
    }
    patch(null, children[index], container, anchor)
  })
}
运行效果
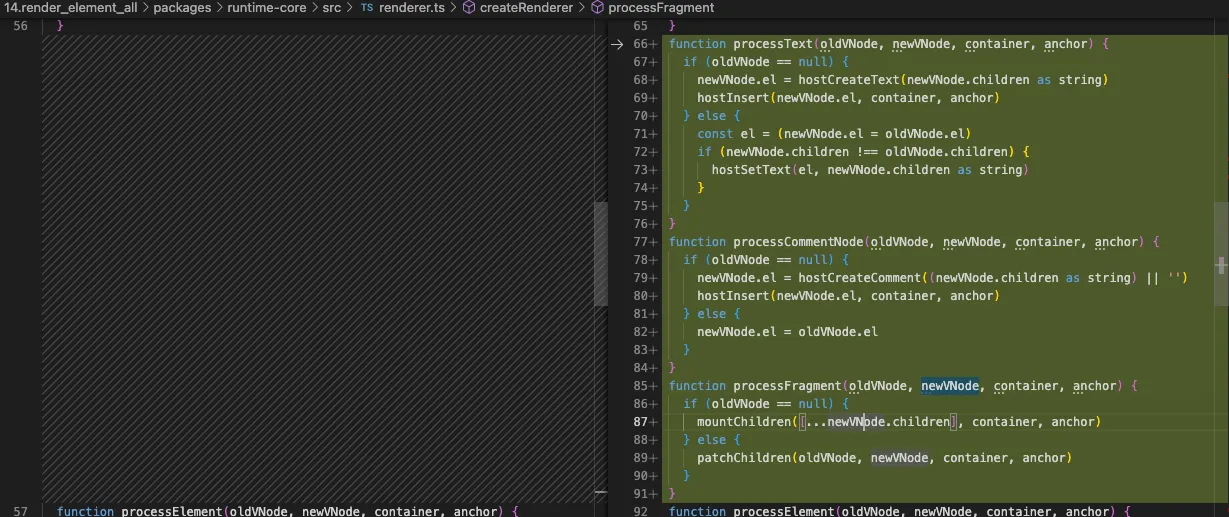
其他节点Text/Comment/Fragment的实现
这里没有没有难点, 我直接贴代码改动吧(测试用例项目里有)
runtime-dom/src/nodeOpt.ts
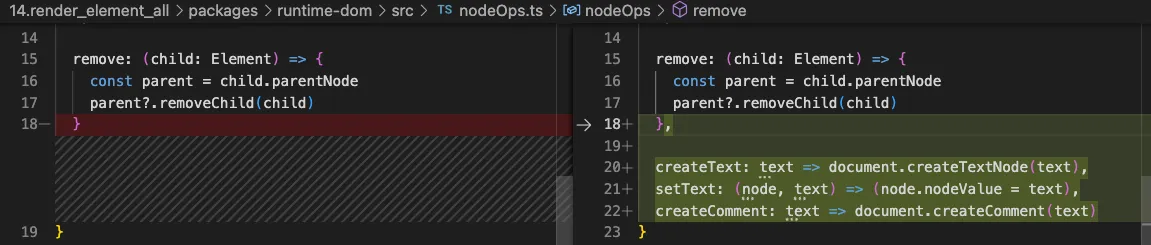
runtime-core/src/renderer.ts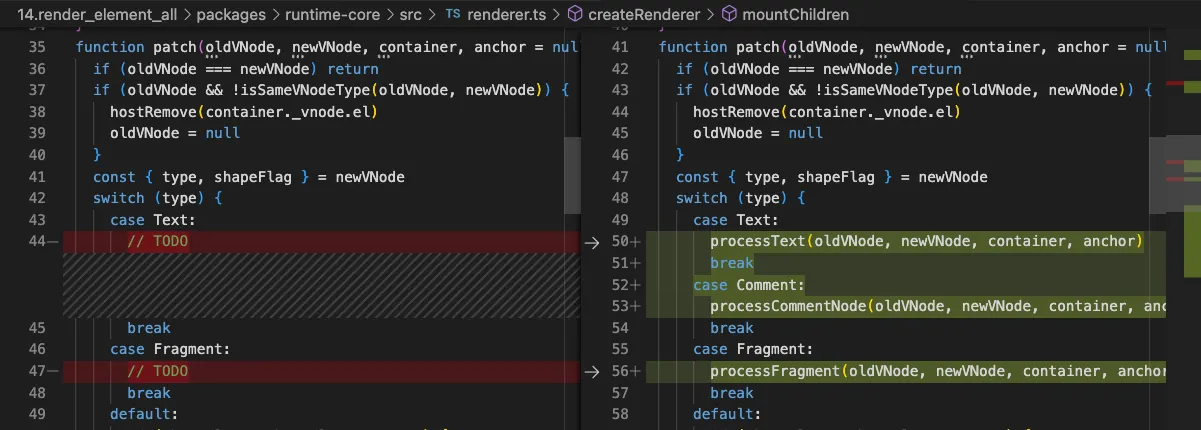
这里有面试题 dom更新是何时进行的?是同步还是异步?
- 首先在在
render()内部会调用patch()方法,patch内部有一堆逻辑,有直接或间接调用hostXXX相关的方法, Dom更新肯定是异步(微任务中),不然不就是强制布局了?严重点就成了布局抖动了。上面的代码运行后是同步更新,这里只是为了更好的学习理解Vue源码,其实变成微任务很简单,把hostXXX相关方法使用queuePostFlushCb(hostXXX)包裹一下即可。
render渲染组件
注:再学习本篇章前,建议先把前一篇文章 Vue3的响应式复习一遍
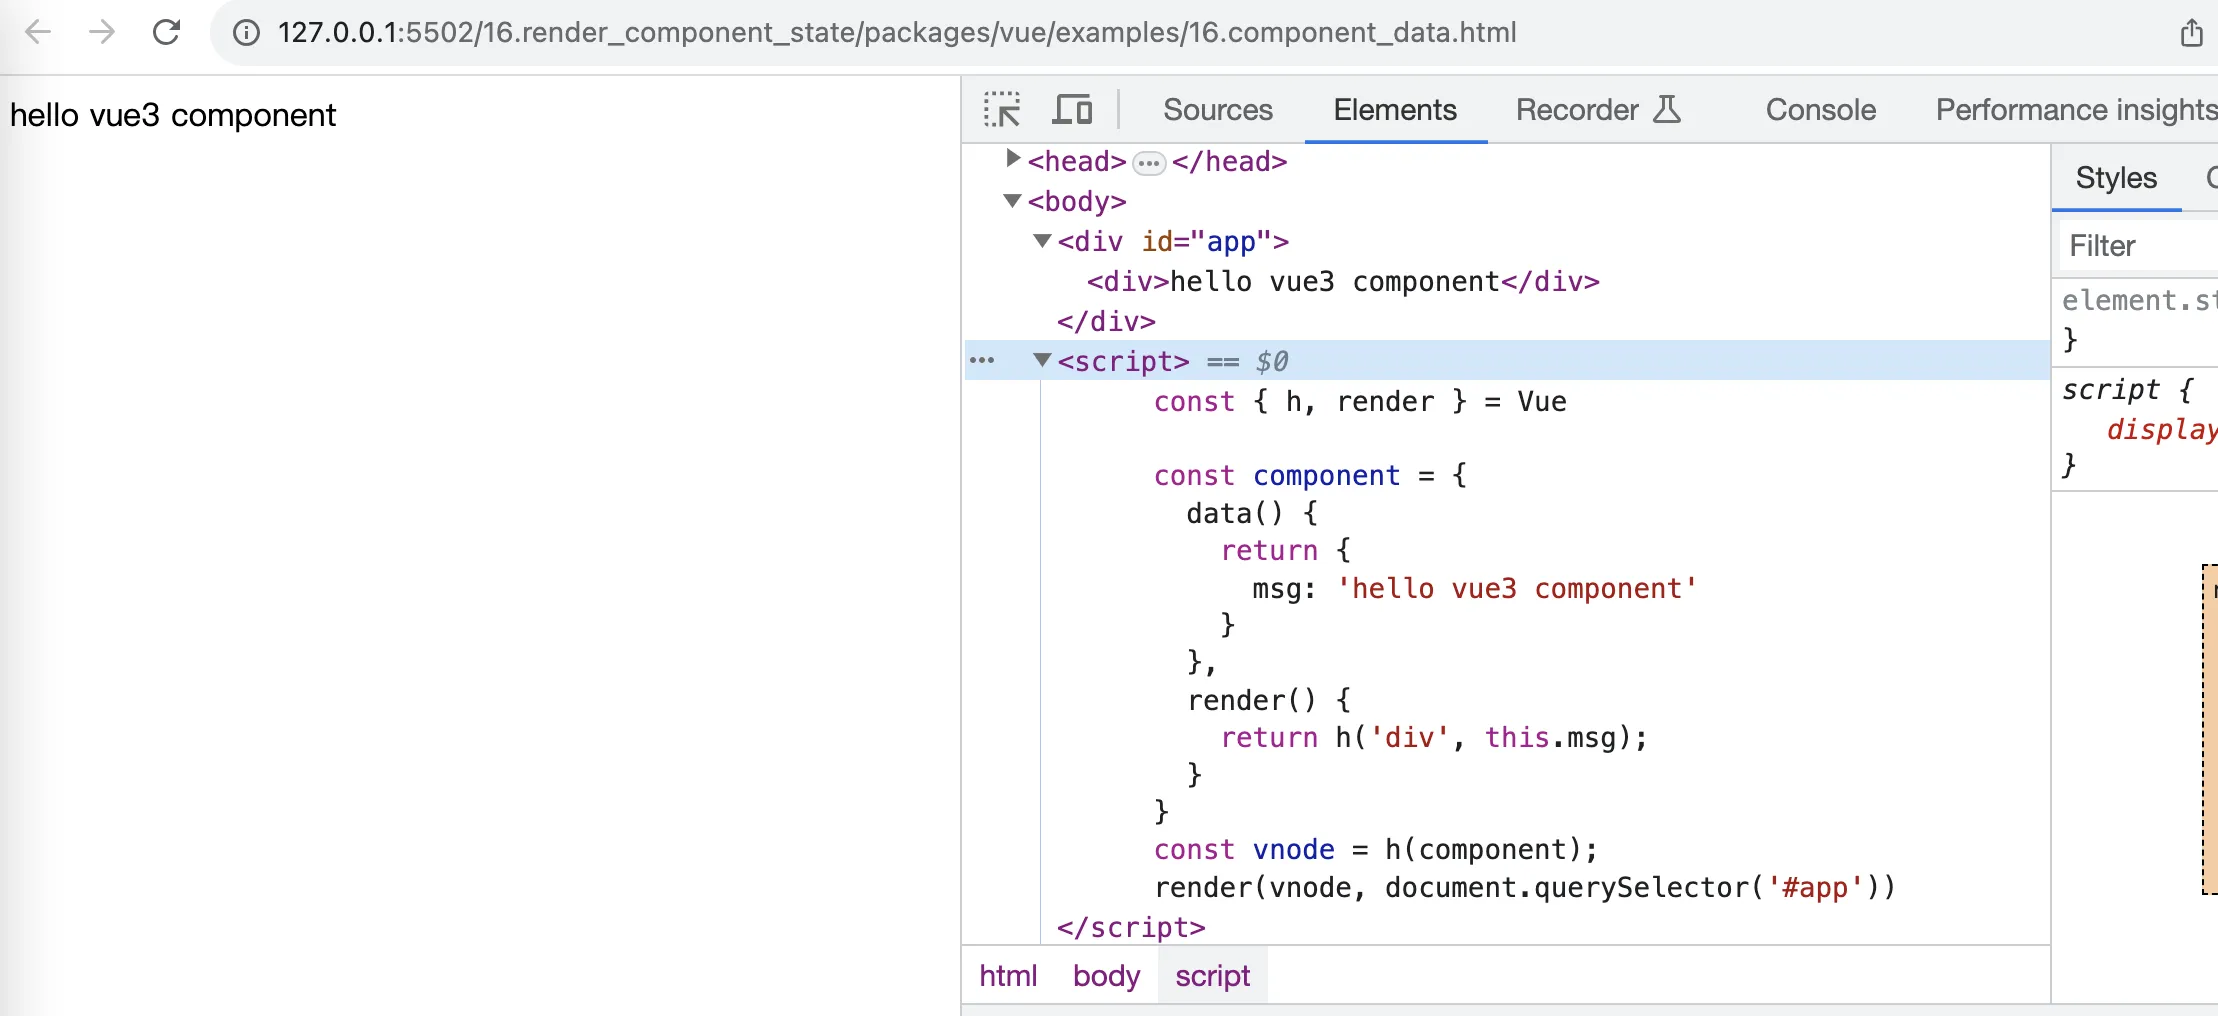
无状态组件挂载
- 先看一下测试用例
html<body>
  <div id="app"></div>
  <script>
    const { h, render } = Vue

    const component = {
      render() {
        return h('div', 'hello vue3 component');
      }
    }
    const vnode = h(component);
    render(vnode, document.querySelector('#app'))
  </script>
</body>
- 代码改动
runtime-core/src/renderer.ts createRenderer方法内部render方法改造
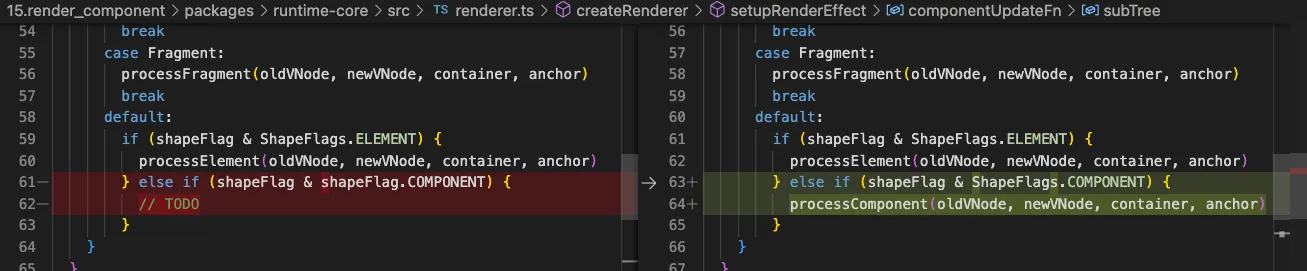 createRenderer方法内部再新增
processComponent方法的实现
ts  function processComponent(oldVNode, newVNode, container, anchor) {
    if (oldVNode == null) {
      mountComponent(newVNode, container, anchor)
    }
  }
  function mountComponent(initialVNode, container, anchor) {
    initialVNode.component = createComponentInstance(initialVNode)
    const instance = initialVNode.component
    const Component = initialVNode.type
    instance.render = Component.render
    // 设置组件渲染
    setupRenderEffect(instance, initialVNode, container, anchor)
  }
  function setupRenderEffect(
    instance: ComponentInstance,
    initialVNode,
    container,
    anchor
  ) {
    const componentUpdateFn = () => {
      if (!instance.isMounted) {
        const { render } = instance
        const subTree = (instance.subTree = render?.())
        patch(null, subTree, container, anchor)
        initialVNode.el = subTree.el
        instance.isMounted = true
      } else {
        // TODO
      }
    }
    const effect = (instance.effect = new ReactiveEffect(componentUpdateFn))
    const update = (instance.update = () => effect.run())
    update()
  }
runtime-core/src/component.ts
tsimport { ShapeFlags } from 'packages/shared/src/shapeFlags'
import { VNode } from './vnode'
import { ReactiveEffect } from '@vue/reactivity'

let uid = 0
export function createComponentInstance(vnode): ComponentInstance {
  const instance = {
    uid: uid++,
    vnode,
    type: vnode.type,
    /**
     * subTree  render函数的返回值
     * 对应要渲染的DOM节点
     **/
    subTree: null,
    effect: null, // ReactiveEffect 实例
    update: null, // update 函数,触发 effect.run
    render: null, // 组件内的 render 函数
    isMounted: false,
    data: null
  }
  return instance
}

export interface ComponentInstance {
  uid: number
  vnode: VNode
  subTree: null | Element
  type: any
  effect: null | ReactiveEffect
  update: null | Function
  render: null | Function
  isMounted: boolean
  data: any
}
运行结果
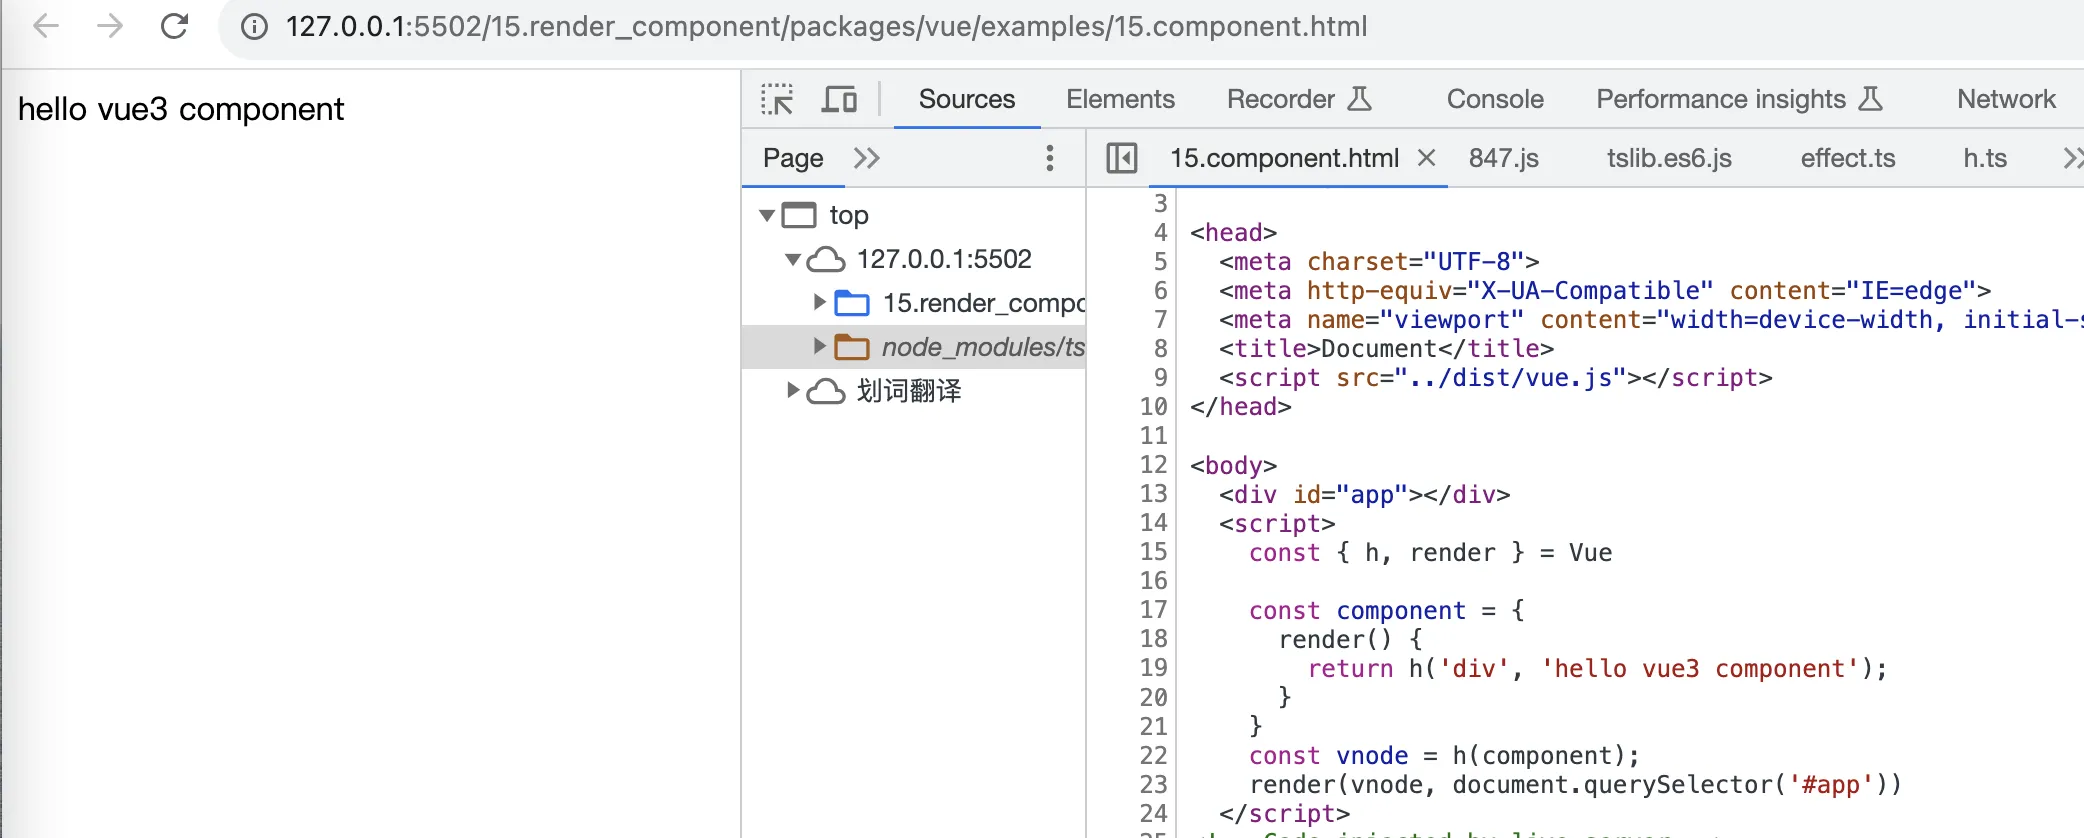
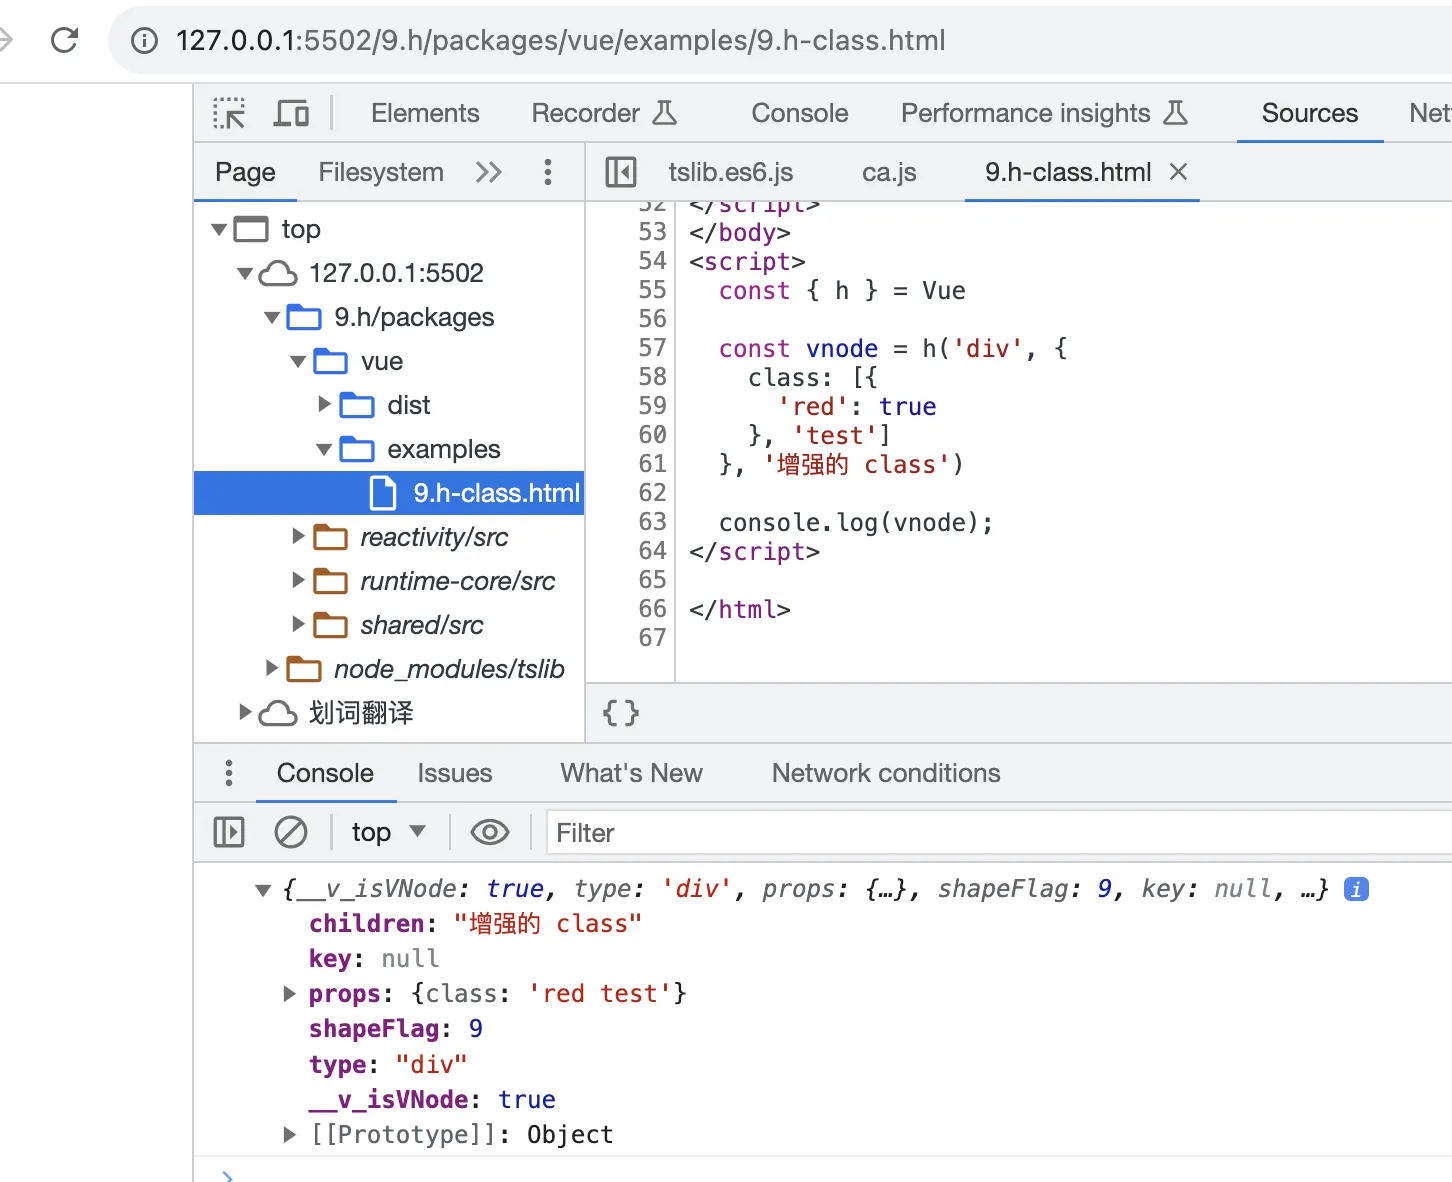
为了理解, 我们打印一下组件对应的vnode
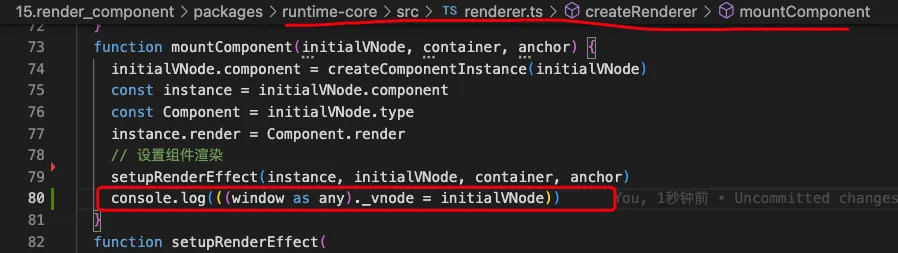
打印结果

梳理下关系


- 组件的
VNode比元素的VNode多了component属性,对应的就是生成组件实例,此外组件实例再通过vnode属性指向组件的VNode - 组件的
VNode的type就是我们业务代码中定义的组件对象 - 组件实例(这里的
vnode.component)的数据结构属性,在runtime-core/src/component.ts中。
有状态组件挂载
- 先看测试用例
html<body>
  <div id="app"></div>
  <script>
    const { h, render } = Vue

    const component = {
      data() {
        return {
          msg: 'hello vue3 component'
        }
      },
      render() {
        return h('div', this.msg);
      }
    }
    const vnode = h(component);
    render(vnode, document.querySelector('#app'))
  </script>
</body>
- 代码改动
runtime-core/src/renderer.ts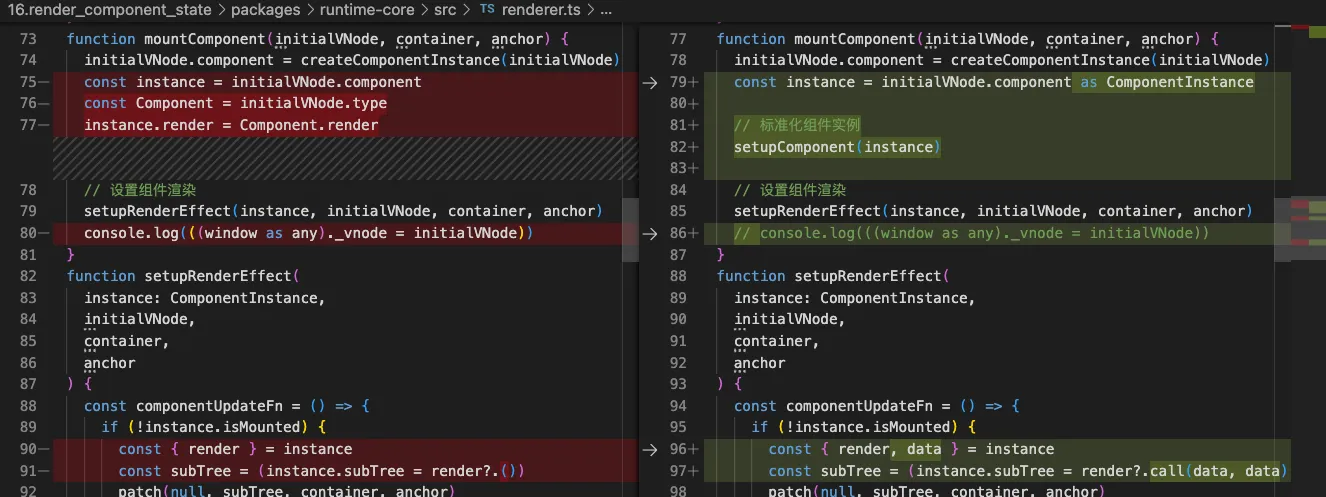
setupComponent方法放到了component.ts文件中
runtime-core/src/component.ts新增内容
tsexport function setupComponent(instance: ComponentInstance) {
  if (!instance.render) {
    instance.render = instance.type.render
  }
  applyOptions(instance)
}

function applyOptions(instance: ComponentInstance) {
  const { data: dataOptions } = instance.type
  if (dataOptions) {
    const data = dataOptions()
    if (data && typeof data === 'object') {
      instance.data = reactive(data)
    }
  }
}
运行效果
组件生命周期
- 先看测试用例
html<body>
  <div id="app"></div>
  <script>
    const { h, render } = Vue

    const component = {
      data() {
        return {
          msg: 'hello lifecycle'
        }
      },
      render() {
        return h('div', this.msg);
      },
      // 组件初始化完成之后
      beforeCreate() {
        alert('beforeCreate')
      },
      // 组件实例处理完所有与状态相关的选项之后
      created() {
        alert(`created: ${this.msg}`)
      },
      // 组件被挂载之前
      beforeMount() {
        alert(`beforeMount: ${this.msg}`)
      },
      // 组件被挂载之后
      mounted() {
        alert(`mounted: ${this.msg}`)
      },
    }
    const vnode = h(component);
    render(vnode, document.querySelector('#app'))
  </script>
</body>
- 代码改动如下
runtime-core/src/component.ts

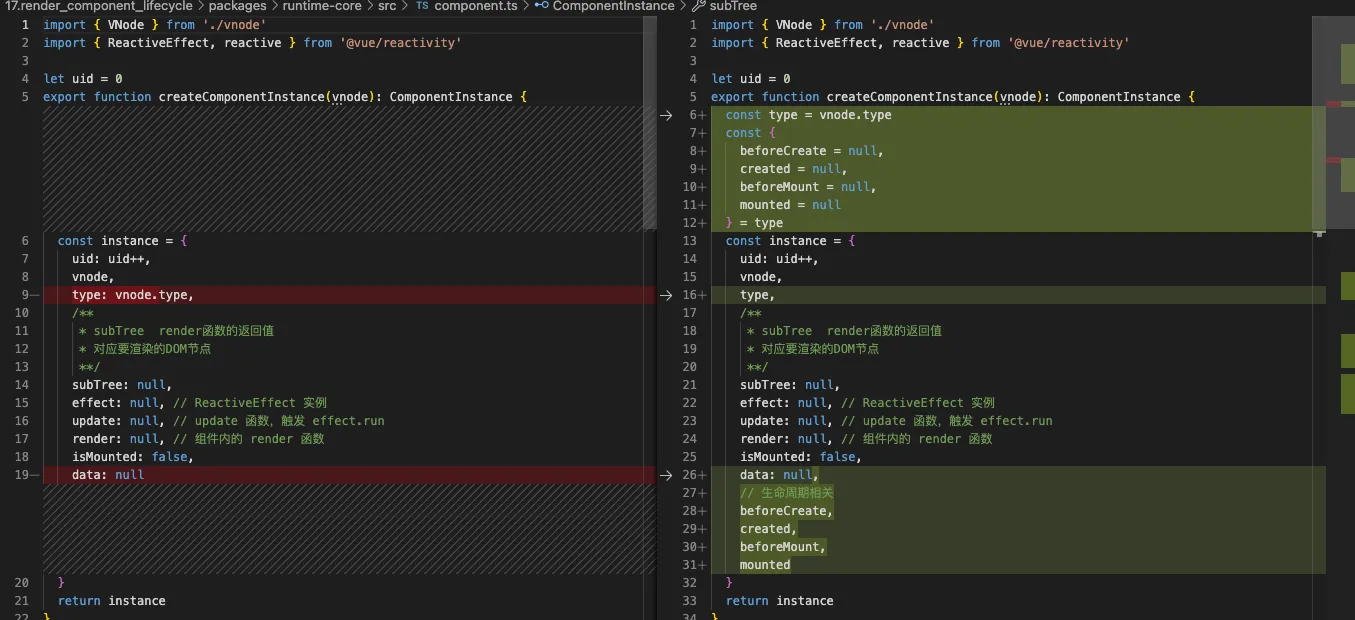
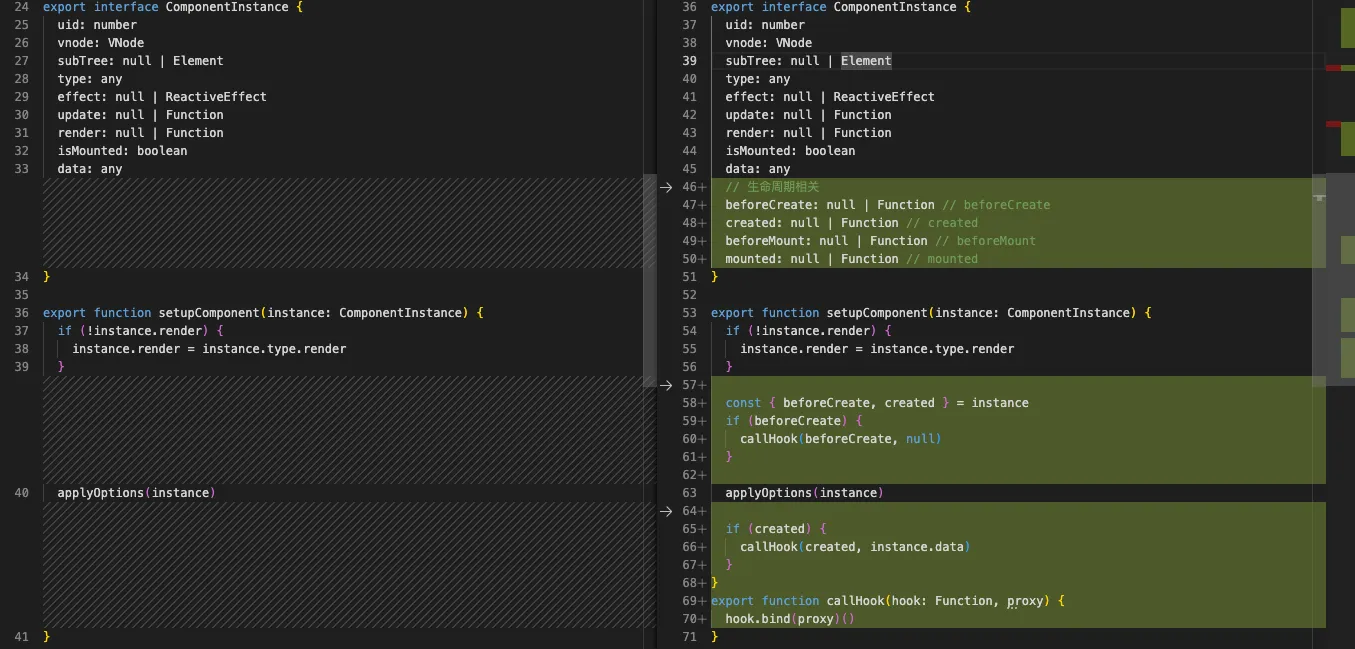
运行效果
生命周期支持依赖收集
- 测试用例
html<body>
  <div id="app"></div>
  <script>
    const { h, render } = Vue

    const component = {
      data() {
        return {
          msg: 'hello lifecycle'
        }
      },
      render() {
        return h('div', this.msg);
      },

      created() {
        setTimeout(() => {
          this.msg = '你好,世界'
        }, 2000);
      },
    }
    const vnode = h(component);
    render(vnode, document.querySelector('#app'))
  </script>
</body>
- 代码改动
runtime-core/src/renderer.ts
setup函数实现
- 先看测试用例
html<body>
  <div id="app"></div>
  <script>
    const { h, reactive, render } = Vue

    const component = {
      setup() {
        const obj = reactive({
          name: '张三'
        })

        setTimeout(() => {
          obj.name = '李四'
        }, 2000);
        return () => h('div', obj.name)
      }
    }
    const vnode = h(component);
    render(vnode, document.querySelector('#app'))
  </script>
</body>
- 代码改动
需要对
runtime-core/src/renderer.ts中的setupComponent函数进行包装一层,区分OptionsAPI还是CompositionAPI

运行效果

diff算法
前面说 Element节点更新的时候留了个TODO diff
当新旧VNode都是多子节点时触发diff
diff思路
Vue3 将diff分为5种情况
tsexport function patchKeyedChildren(oldChildren, newChildren, container, anchor) {
  let i = 0
  const newChildrenLength = newChildren.length
  let oldChildrenEnd = oldChildren.length - 1
  let newChildrenEnd = newChildrenLength - 1

  // 1. 自前向后比对
  // (a b) c
  // (a b) d e
  while (i <= oldChildrenEnd && i <= newChildrenEnd) {
    // TODO
  }

  // 2. 自后向前比对
  // a (b c)
  // d e (b c)
  while (i <= oldChildrenEnd && i <= newChildrenEnd) {
    // TODO
  }

  // 3. 新节点多于旧节点时的 diff 比对。
  if (i > oldChildrenEnd && i <= newChildrenEnd) {
    // TODO 添加剩余新节点
    // 这里也分两种情况
    // (a b) c
    // c (a b)
  }

  // 4. 旧节点多于新节点时的 diff 比对。
  else if (i > newChildrenEnd && i <= oldChildrenEnd) {
    // TODO 删除旧节点
  }

  // 5. 乱序的 diff 比对
  else {
    // TODO 这一块最复杂, 后面说
  }
}
前四种场景
- 这次先看代码实现吧
- 在
runtime-core/src/renderer.ts的createRenderer里面改造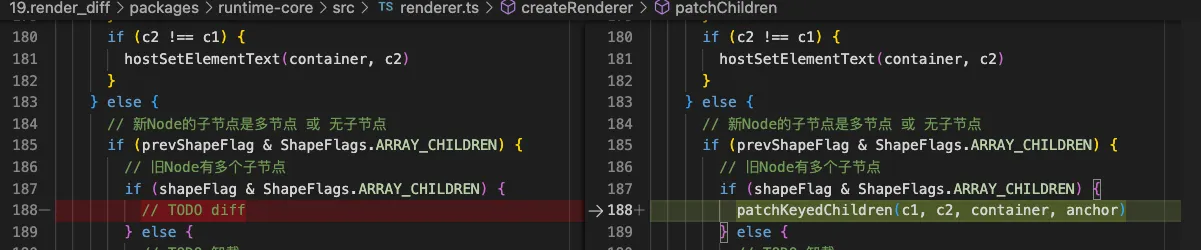 增加代码如下
tsfunction patchKeyedChildren(
    oldChildren,
    newChildren,
    container,
    parentAnchor
  ) {
    let i = 0
    const newChildrenLength = newChildren.length
    let oldChildrenEnd = oldChildren.length - 1
    let newChildrenEnd = newChildrenLength - 1
    const normalizeVNode = child =>
      typeof child === 'object' ? child : createVNode(Text, null, String(child))

    // 1. 自前向后比对
    // (a b) c
    // (a b) d e
    while (i <= oldChildrenEnd && i <= newChildrenEnd) {
      const oldVNode = oldChildren[i]
      const newVNode = normalizeVNode(newChildren[i])
      if (isSameVNodeType(oldVNode, newVNode)) {
        patch(oldVNode, newVNode, container, null)
      } else {
        break
      }
      i++
    }

    // 2. 自后向前比对
    // a (b c)
    // d e (b c)
    while (i <= oldChildrenEnd && i <= newChildrenEnd) {
      const oldVNode = oldChildren[oldChildrenEnd]
      const newVNode = normalizeVNode(newChildren[newChildrenEnd])
      if (isSameVNodeType(oldVNode, newVNode)) {
        patch(oldVNode, newVNode, container, null)
      } else {
        break
      }
      oldChildrenEnd--
      newChildrenEnd--
    }

    // 3. 新节点多于旧节点时的 diff 比对。
    if (i > oldChildrenEnd && i <= newChildrenEnd) {
      const nextPos = newChildrenEnd + 1
      const anchor =
        nextPos < newChildrenLength ? newChildren[nextPos].el : parentAnchor
      while (i <= newChildrenEnd) {
        patch(null, normalizeVNode(newChildren[i]), container, anchor)
        i++
      }
    }

    // 4. 旧节点多于新节点时的 diff 比对。
    else if (i > newChildrenEnd && i <= oldChildrenEnd) {
      while (i <= oldChildrenEnd) {
        hostRemove(oldChildren[i].el!)
        i++
      }
    }

    // 5. 乱序的 diff 比对
    else {
      // TODO 这一块最复杂, 后面说
    }
  }
- 测试用例
- 用例1
html<body>
  <div id="app"></div>
  <script>
    // 验证场景1、场景4 新节点多于旧节点时
    const { h, render } = Vue

    const vnode = h('ul', [
      h('li', {key: 1}, 'a'),
      h('li', {key: 2}, 'b'),
    ])
    // 挂载
    render(vnode, document.querySelector('#app'))

    // 延迟两秒,生成新的 vnode,进行更新操作
    setTimeout(() => {
      const vnode2 = h('ul', [
        h('li', {key: 1}, 'a'),
        h('li', {key: 2}, 'b'),
        h('li', {key: 3}, 'c')
      ])
      render(vnode2, document.querySelector('#app'))
    }, 2000);
  </script>
</body>
- 用例2
html<body>
  <div id="app"></div>
  <script>
    // 验证场景2、场景4 新节点多于旧节点时
    const { h, render } = Vue
    const vnode = h('ul', [
      h('li', {key: 3}, 'c'),
      h('li', {key: 1}, 'a'),
      h('li', {key: 2}, 'b'),
    ])
    // 挂载
    render(vnode, document.querySelector('#app'))

    // 延迟两秒,生成新的 vnode,进行更新操作
    setTimeout(() => {
      const vnode2 = h('ul', [
        h('li', {key: 1}, 'a'),
        h('li', {key: 2}, 'b'),
      ])
      render(vnode2, document.querySelector('#app'))
    }, 2000);
  </script>
</body>
渲染的过程需要断点调试,文章太长了,偷懒不做GIF图了, 有兴趣自行调试吧,
最长递增子序列
最长递增子序列是一种算法,用来确定对最大不需要移动的元素
建议: 先看一下youtube的这个视频
假设你已经熟悉了 最长递增子序列 的三种算法
- 暴力 + 剪枝
- 动态规划 复杂度
- 贪心 + 二分查找 复杂度
这里是我的实现,供参考
Vue3中的diff算法使用是第三种方案(因为复杂度最低性能最好)
但是Vue求出的是最大是上升子序列的数组下标,
相当于 在方案三的基础上 再通过一个回溯(复杂度 )得到数组下标
以下是我的实现思路
js/**
 * 假设你已经熟悉了前面的算法题
 * 我们先考虑一个简单场景
 * 求  [1    3    2    4    6    5]  的最大上升子序列
 *     1
 *     1    3
 *     1    2
 *     1    2    4
 *     1    2    4    6
 *     1    2    4    5
 */

const arr = [1, 3, 2, 4, 6, 5];
// 最大上升子序列为 [1,2,4,5]
// 对应的下标为    [0,2,3,5]
// console.log(getSequence(arr)); // [0, ]
function getSequence(arr) {
  let i, j, start, end, center;
  const len = arr.length;

  // result存放的是最大上升子序列的下表
  const result = [0];
  for (i = 0; i < len; i++) {
    const arrI = arr[i];
    const lastIndex = result.at(-1);
    if (arrI > arr[lastIndex]) {
      result.push(i);
      continue;
    }

    start = 0;
    end = result.length;
    while (start < end) {
      //  >> 右移运算符
      // 等于 Math.floor((u+v)/2);
      // 使用二进制运算可以大幅提高计算效率
      center = (start + end) >> 1;
      if (arrI > arr[result[center]]) {
        start = center + 1;
      } else {
        end = center;
      }
    }
    result[start] = i;
  }
  return result;
}

// console.log(getSequence([1, 3, 2, 4, 6, 0]));
/**
 * 假设我们再换一个例子
 * 求  [1    3    2    4    6    0]  的最大上升子序列
 * 很明显是  [0, 2, 3, 4]
 * 但是运算结果为 [5,2,3,4]
 * 思路没有错,我们需要一个新的数组用来记录它前面的数字
 * 对于本例子该数组为 preIndexs = [0, 1, 1, 2, 3, 0];
 * 我们后往前遍历 修复后的数组为 [0, 2, 3, 4];
 */

console.log(getSequence2([1, 3, 2, 4, 6, 0]));
function getSequence2(arr) {
  if (!arr.length) return [];
  if (arr.length < 2) return [0];

  const preIndexs = arr.slice();
  let i, j, start, end, center;
  const len = arr.length;

  // result存放的是最大上升子序列的下表
  const result = [0];
  for (i = 1; i < len; i++) {
    j = result.at(-1);
    const arrI = arr[i];
    const lastIndex = result.at(-1);
    if (arrI > arr[lastIndex]) {
      preIndexs[i] = j;
      result.push(i);
      continue;
    }

    start = 0;
    end = result.length;
    while (start < end) {
      //  >> 右移运算符
      // 等于 Math.floor((u+v)/2);
      // 使用二进制运算可以大幅提高计算效率
      center = (start + end) >> 1;
      if (arrI > arr[result[center]]) {
        start = center + 1;
      } else {
        end = center;
      }
    }
    if (arrI < arr[result[start]]) {
      if (start > 0) {
        preIndexs[i] = result[start - 1];
      }
    }
    result[start] = i;
  }
  // console.log(preIndexs);

  end = result.length;
  let temp = result[end - 1];
  while (end--) {
    result[end] = temp;
    temp = preIndexs[temp];
  }
  return result;
}
注意: 这个getSequence2与官方getSequence还有一点点差异
官网的getSequence会排出元素0,因为它表示新增的元素
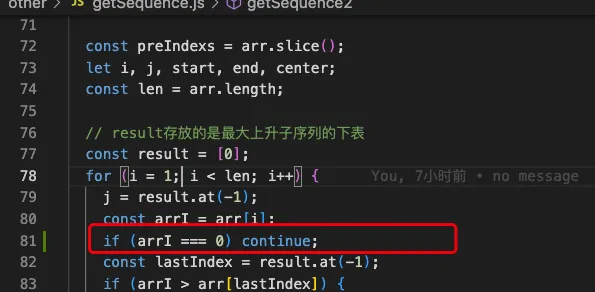
I'm gonna cry! 因为这个问题在调试diff算法,多折腾了几个小时
场景五-乱序场景
场景5又分为三小步
- 创建 keyToNewIndexMap
- 循环oldChildren 并尝试进行 patch(打补丁)或 unmount(删除)旧节点
- 这里有几个变量 已经修复的新节点数量、 新节点待修补的数量
- 针对移动和挂载的处理 - 这里会调用
getSequences方法
- 先来看一个测试用例
html<body>
  <div id="app"></div>
  <script>
    // 验证场景2、场景4 新节点多于旧节点时
    const { h, render } = Vue
    const vnode = h('ul', [
      h('li', {key: 1}, 'a'),
      h('li', {key: 2}, 'b'),
      h('li', {key: 3}, 'c'),
      h('li', {key: 4}, 'd'),
      h('li', {key: 5}, 'e'),
    ])
    // 挂载
    render(vnode, document.querySelector('#app'))

    // 延迟两秒,生成新的 vnode,进行更新操作
    setTimeout(() => {
      const vnode2 = h('ul', [
        h('li', {key: 1}, 'new-a'),
        h('li', {key: 3}, 'new-c'),
        h('li', {key: 2}, 'new-b'),
        h('li', {key: 6}, 'new-f'),
        h('li', {key: 5}, 'new-e'),
      ])
      render(vnode2, document.querySelector('#app'))
    }, 2000);
  </script>
旧子节点: a b c d e
新子节点: new-a new-c new-b new-f new-e
- 代码改动 代码里有详细的注释和推导过程, 这里就不解释了
runtime-core/src/renderer.ts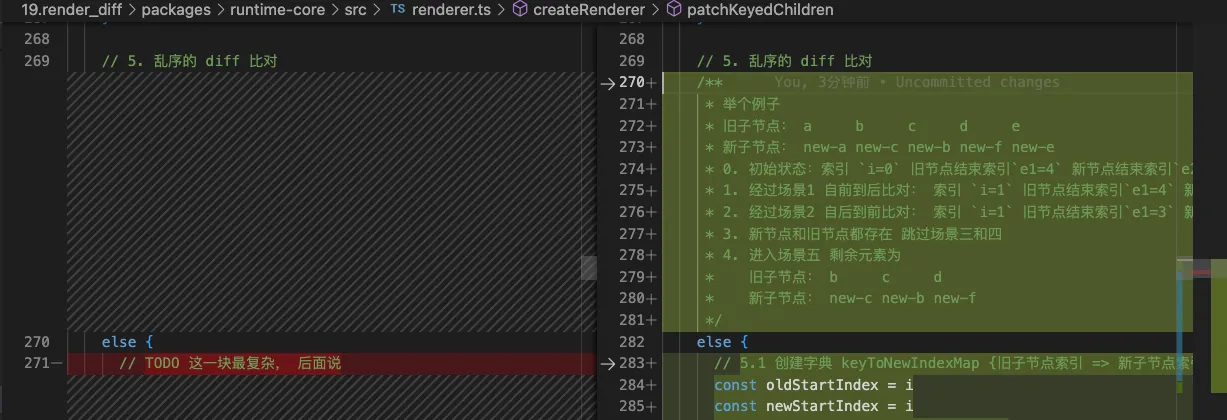
tsfunction patchKeyedChildren(
    oldChildren,
    newChildren,
    container,
    parentAnchor
  ) {
    // 。。。
    // 前面的代码保持不变

    // 5. 乱序的 diff 比对
    /**
     * 举个例子
     * 旧子节点: a     b     c     d     e
     * 新子节点: new-a new-c new-b new-f new-e
     * 0. 初始状态:索引 `i=0` 旧节点结束索引`e1=4` 新节点结束索引`e2=4`
     * 1. 经过场景1 自前到后比对: 索引 `i=1` 旧节点结束索引`e1=4` 新节点结束索引`e2=4`
     * 2. 经过场景2 自后到前比对: 索引 `i=1` 旧节点结束索引`e1=3` 新节点结束索引`e2=3`
     * 3. 新节点和旧节点都存在 跳过场景三和四
     * 4. 进入场景五 剩余元素为
     *    旧子节点: b     c     d
     *    新子节点: new-c new-b new-f
     */
    else {
      // 5.1 创建字典 keyToNewIndexMap {旧子节点索引 => 新子节点索引}
      const oldStartIndex = i
      const newStartIndex = i
      const keyToNewIndexMap = new Map()
      for (i = newStartIndex; i <= newChildrenEnd; i++) {
        const nextChild = normalizeVNode(newChildren[i])
        if (nextChild.key != null) {
          keyToNewIndexMap.set(nextChild.key, i)
        }
      }
      // console.log(keyToNewIndexMap)
      // 这时 keyToNewIndexMap 值为
      // Map(3) {3 => 1, 2 => 2, 6 => 3}

      // 5.2 循环 oldChildren ,并尝试进行 patch(打补丁)或 unmount(删除)旧节点
      let j = 0
      // 已经修复的新节点数量, 有三个新节点需要修复,现在都还没修复
      let patched = 0
      // 新节点待修补的数量 = newChildrenEnd - newChildrenStart + 1
      const toBePatched = newChildrenEnd - newStartIndex + 1
      // 标记位:节点是否需要移动
      let moved = false
      // 配合 moved 进行使用,它始终保存当前最大的 index 值
      let maxNewIndexSoFar = 0
      // map字典 {新子节点索引 => 旧子节点索引}
      // 注意 旧子节点索引不包含已处理的节点
      const newIndexToOldIndexMap = new Array(toBePatched).fill(0)
      for (i = oldStartIndex; i <= oldChildrenEnd; i++) {
        const prevChild = oldChildren[i]
        // 如果当前 已经处理的节点数量 > 待处理的节点数量
        // 那么就说明,所有的节点都已经更新完成
        // 剩余的旧节点全部删除即可
        if (patched >= toBePatched) {
          // 所有的节点都已经更新完成,剩余的旧节点全部删除即可
          hostRemove(prevChild.el!)
          continue
        }
        // 新节点需要存在的位置,需要根据旧节点来进行寻找(包含已处理的节点。即:new-c 被认为是 1)
        let newIndex
        if (prevChild.key != null) {
          // 根据旧节点的 key,从 keyToNewIndexMap 中可以获取到新节点对应的位置
          newIndex = keyToNewIndexMap.get(prevChild.key)
        } else {
          // TODO 寻找旧子节点没有key的进行匹配,暂不考虑
        }
        if (newIndex === undefined) {
          // 说明该旧子节点不存在, 直接删除
          hostRemove(prevChild.el!)
          // 这里会删除 `d`
        } else {
          // 该子节点在新旧VNode中都存在
          // 新子节点索引都不包含已计算的元素,即索引从0开始
          // 旧子节点索引+1 有特殊作用
          newIndexToOldIndexMap[newIndex - newStartIndex] = i + 1
          // maxNewIndexSoFar 会存储当前最大的 newIndex,它应该是一个递增的,如果没有递增,则证明有节点需要移动
          if (newIndex >= maxNewIndexSoFar) {
            // 持续递增
            maxNewIndexSoFar = newIndex
          } else {
            // 没有递增,则需要移动,moved = true
            moved = true
          }
          // 打补丁
          patch(prevChild, newChildren[newIndex], container, null)
          // 自增已处理的节点数量
          patched++
        }
      }
      // 5.2会循环3次 得到的 newIndexToOldIndexMap
      // {  1:2,  0:3,         2:0 } // 依次执行的结果
      // 即  b    c   d被删除   最后一个是初始值
      // moved=true 因为遍历 c 的时候算出来它需要移动位置
      // maxNewIndexSoFar=2  只遍历了 b、c、d 它们在新的VNode中b的索引最大,值为2

      // 5.3 针对移动和挂载的处理
      // 仅当节点需要移动的时候,我们才需要生成最长递增子序列,否则只需要有一个空数组即可
      // increasingNewIndexSequence 最大上升子序列索引,如果元素在该数组中则不需要移动
      const increasingNewIndexSequence = moved
        ? getSequence(newIndexToOldIndexMap)
        : []
      // console.log(increasingNewIndexSequence)
      // 针对当前场景 increasingNewIndexSequence 值为 [2]
      // 也就是说 new-b 元素不需要移动
      // 还剩下 new-c 和 new-f需要处理

      // j >= 0 表示:初始值为 最长递增子序列的最后下标
      // j < 0 表示:《不存在》最长递增子序列。
      j = increasingNewIndexSequence.length - 1
      // 倒序循环,以便我们可以使用最后修补的节点作为锚点
      // 这里是先处理 new-f 再处理 new-c
      for (i = toBePatched - 1; i >= 0; i--) {
        // nextIndex(需要更新的新节点下标) = newChildrenStart + i
        const nextIndex = newStartIndex + i
        // 根据 nextIndex 拿到要处理的 新节点
        const nextChild = newChildren[nextIndex]
        // 获取锚点(是否超过了最长长度)
        // parent.insertBefore(child, anchor) 将 child插入到next前面
        // 如果 anchor为 null 表示插入到parent容器的最下面
        const anchor =
          nextIndex + 1 < newChildrenLength
            ? newChildren[nextIndex + 1].el
            : parentAnchor
        // 如果 newIndexToOldIndexMap 中保存的 value = 0,则表示:新节点没有用对应的旧节点,此时需要挂载新节点
        if (newIndexToOldIndexMap[i] === 0) {
          // 挂载新节点
          patch(null, nextChild, container, anchor)
        } else if (moved) {
          /* if (j >= 0 && nextIndex === increasingNewIndexSequence[j]) {
            // 如果索引在最大上升子序列中,则不需要移动位置
            j--
            console.log('不需要移动的元素', nextChild.el)
          } else {
            hostInsert(nextChild.el!, container, anchor)
          } */

          if (j < 0 || i !== increasingNewIndexSequence[j]) {
            hostInsert(nextChild.el!, container, anchor)
          } else {
            j--
            // console.log('不需要移动的元素', nextChild.el)
          }
        }
      }
    }
    /**
     * 总结 patch过程
     * 旧子节点: a     b     c     d     e
     * 新子节点: new-a new-c new-b new-f new-e
     * 1. 更新 a  为 new-a
     * 2. 更新 e  为 new-e
     * 3. 更新 b  为 new-b
     * 4. 更新 c  为 new-c
     * 5. 删除 d
     * 6. 将 new-f 插入到 new-e 前面
     * 7. new-b 在最大上升子序列中, 不需要移动
     * 8. 将 new-c 插入到 new-b 前面
     */
  }
总结Vue2与Vue3 diff异同
- vue2 思路
- 先进行树更新 --> 节点更新(属性、文本)-->
patch chidren patch chidren使用双指针四个变量,两两比对 结束条件(newStartIndex > newEndIndex || oldStartIndex > newEndIndex)
- vue3 思路
- diff逻辑更符合业务诉求,如插入或排序场景,diff很快
- 对于乱序场景,使用了最大升序子序列的 贪心+二分查找算法优化,尽可能减少元素的移动
至此Vue3运行时源码解析讲完了, 下一遍将讲述Vue3的编译时。
本文作者:郭敬文
本文链接:
版权声明:本博客所有文章除特别声明外,均采用 BY-NC-SA 许可协议。转载请注明出处!