目录
本文将详细讲述Vue的响应式原理、虚拟Dom、DomDiff算法。另外再简单介绍模版编译的原理及Vue源码调试技巧。
MVVM分层设计的理解
分层的目的是职责单一,逻辑更加清晰,代码更易维护
MVC
- 分层设计 源于后端的
MVC思想Model/View/Controller - 早期
BackboneJS正是因为MVC思想迅速流行起来,当时的流程程度不亚于现在的Vue和React。 - 但是
BackboneJS的问题是Controller只做路由(非常薄),View层很厚
MVP
应用于移动端开发的设计模式
主要内容
- 各部分之间的通信都是双向的
View和Model不发生联系,都通过Presenter传递。View非常薄,不部署任何业务逻辑,称为"被动视图"(Passive View),即没有任何主动性,而Presenter非常厚,所有逻辑都部署在那里。
MVVM

MVVM框架的三要素: 数据响应式、模板引擎及其渲染
- 数据响应式: 监听数据变化并在视图中更新
- 模版引擎: 提供描述视图的模版语法
- 渲染: 如何将模板转换为html

VM(ViewModel)层
它不仅解决了M与V之间的耦合问题,还同时解决了维护两者映射关系的大量繁杂代码和DOM操作代码。在提高开发效率、可读性的同时还保持了优越的性能表现
响应式原理
数据劫持
最底层是使用 Object.definePrototype 对数据进行劫持
但是它有以下缺点
- 不能劫持新增的属性
- 也正因为1,不能劫持数组
- 由于一开始就进行数据结构的递归遍历进行依赖收集,大量闭包产生也会产生性能开销
如何解决上述问题呢?
- 通过Vue.set给新增属性添加响应式
js// Vue.set 用法
this.$set(this.info, 'key', 'value');
// 此时 this.info.key 便是响应式了
this.info.key = 123; // 页面会更新

// Vue.set不允许给跟节点添加响应式
this.$set(this, 'key', 'val');
// [Vue warn]: Avoid adding reactive properties
// to a Vue instance or its root $data at runtime**

// Vue.set添加的响应式是浅层的
this.$set(this.info, 'key', {aa: 123});
this.info.key.aa = 234; // 不会触发响应式
this.info.key = {aa: '234'}; // 这样改才有效果

// 正确的做法
const obj = {}
this.$set(obj, 'aa', 23);
this.$set(this.info, 'key', obj);

// Vue.delete  删除响应式
this.$delete(this.info.key, 'aa')
- 重写了数组的7个方法
jsconst arrayProto = Array.prototype;
const arrayMethods = Object.create(arrayProto);
Object.defineProperty(arrayMethods, 'push', {
  value: function(...args) {
    console.log('劫持了数组push方法')
    const result = arrayProto.push.apply(this, args);
    return result
  },
  writable: true,
  configurable: true
});

function observeArray(arr) {
  Object.setPrototypeOf(arr, arrayMethods)
  return arr;
}
var arr = observeArray([12]);
arr.push(123);
Vue3采用Proxy惰性劫持,解决了依赖收集的性能问题。
数据响应式实现
其实数据响应式不难, 一个方法(递归、深度优先遍历)就能搞定,但是代码就要修正下,这样后面写发布订阅模式容易理解切入。
index.html测试代码
html<!DOCTYPE html>
<html lang="en">
<head>
  <meta charset="UTF-8">
  <meta name="viewport" content="width=device-width, initial-scale=1.0">
  <title>Document</title>
</head>
<body>
  <script src="./vue.js"></script>
  <div id="app">
    <p>{{info.count}}</p>
    <p>{{info.count}}</p>
  </div>
  <script>
    var app = new Vue({
      el: '#app',
      data: {
        info: {
          count: 0
        }
      },
    });
    setInterval(() => {
      ++app.info.count;
    }, 1000)
  </script>
</body>
</html>
- vue.js的数据劫持
jsclass Vue {
  constructor(options) {
    this.$options = options;
    this.$data = options.data;
    observe(this.$data);
    proxy(this, '$data');
    // new Compiler(options.el, this);
  }
}

function observe(obj) {
  if(!obj && typeof obj !== "object") {
    return;
  }
  new Observer(obj);
}
class Observer {
  constructor(value) {
    this.value = value;
    const valueType = Reflect.toString.call(value);
    if(valueType === '[object Object]') {
      this.walk(value);
    } else if(valueType === '[object Array]') {
      // todo 数组劫持
    }
  }
  walk(obj) {
    const keys = Object.keys(obj);
    keys.forEach(key => {
      defineReative(obj, key, obj[key]);
    })
  }
}

function proxy(vm, sourceKey) {
  Object.keys(vm[sourceKey]).forEach(key => {
    Object.defineProperty(vm, key, {
      get() {
        return vm[sourceKey][key];
      },
      set(val) {
        vm[sourceKey][key] = val;
      },
      enumerable:true,
      configurable: true,
    })
  });
}

function defineReative(obj, key, val) {
  observe(val)
  Object.defineProperty(obj, key, {
    get () {
      console.log('get', key, val);
      return val;
    },
    set(v) {
      if(val !== v) {
        console.log('set', key, v);
        observe(v);
        val = v;
      }
    },

    enumerable: true,
    configurable: true
  })
}
模版编译
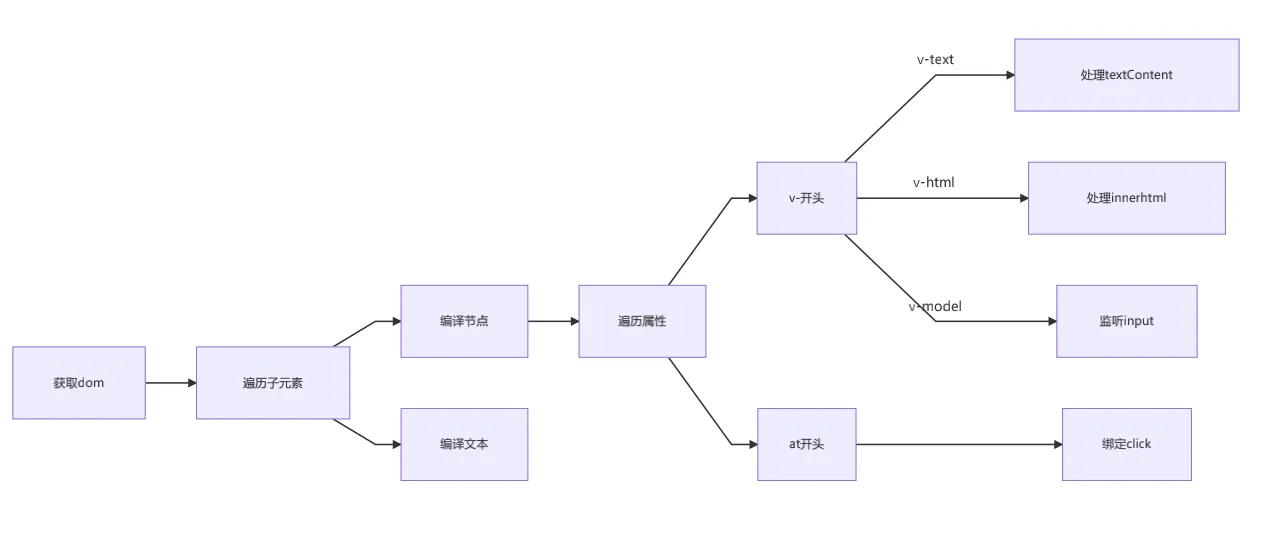
Vue的模版编译 compiler.js
js/**
 * 编译器
 * 递归DOM树
 * 判断节点类型,如果是文本,则判断是否是插值绑定
 * 如果是元素,则遍历其属性判断是否是指令或事件,然后递归子元素
 **/
class Compiler {
  constructor(el, vm){
    this.$vm = vm;
    this.$el = document.querySelector(el);
    if(this.$el) {
      this.compile(this.$el);
    }
  }
  compile(el) {
    Array.from(el.childNodes).forEach(node => {
      // isElement
      if(node.nodeType === 1) {
        // compileElement
        const nodeAttrs = node.attributes;
        Array.from(nodeAttrs).forEach(attr => {
          const attrName = attr.name;
          if(attrName.indexOf('v-') === 0) {
            const dir = attrName.substring(2);
            this.update(node, attr.value, dir)
          }
        })

      }
      // isInter
      else if(node.nodeType === 3 && /\{\{(.*)\}\}/.test(node.textContent)) {
        // compileText
        this.update(node, RegExp.$1, 'text')
      }
      if(node.childNodes) {
        this.compile(node);
      }
    });
  }
  update(node, exp, dir) {
    const fn = this[`${dir}Update`];
    fn?.(node, this.$vm[exp]);
  }
  textUpdate(node, value) {
    node.textContent = value;
  }
  htmlUpdate(node, value) {
    node.innerHTML = value;
  }
}
打开编译
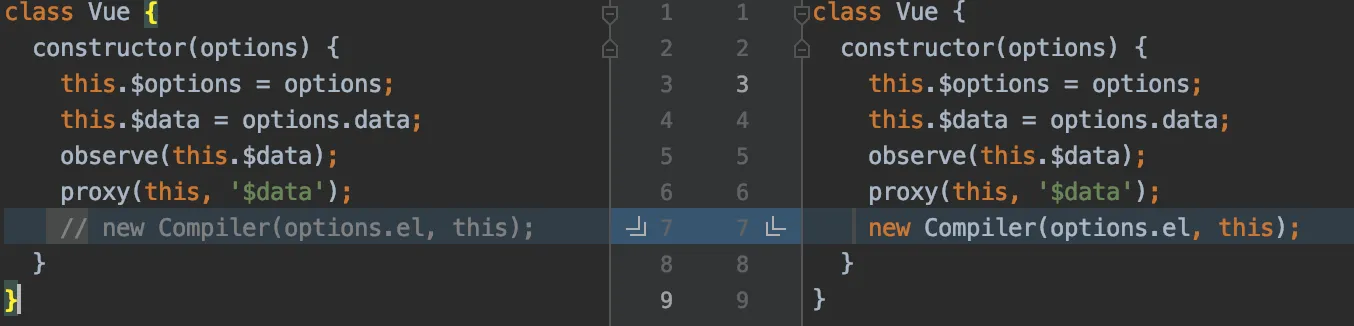
我们再修改一下模版
html<!DOCTYPE html>
<html lang="en">
<body>
  <div id="app">
    <p>{{counter}}</p>
    <p v-text="counter"></p>
    <p v-html="desc"></p>
  </div>

  <script src="./Compiler.js"></script>
  <script src="./Vue.js"></script>
  <script>
    const app = new Vue({
      el:'#app',
      data: {
        counter: 1,
        desc: '<span style="color:red">Compiler可还行?</span>'
      },
    })
    setInterval(() => {
      app.counter++
    }, 1000);
  </script>
</body>
</html>
运行效果
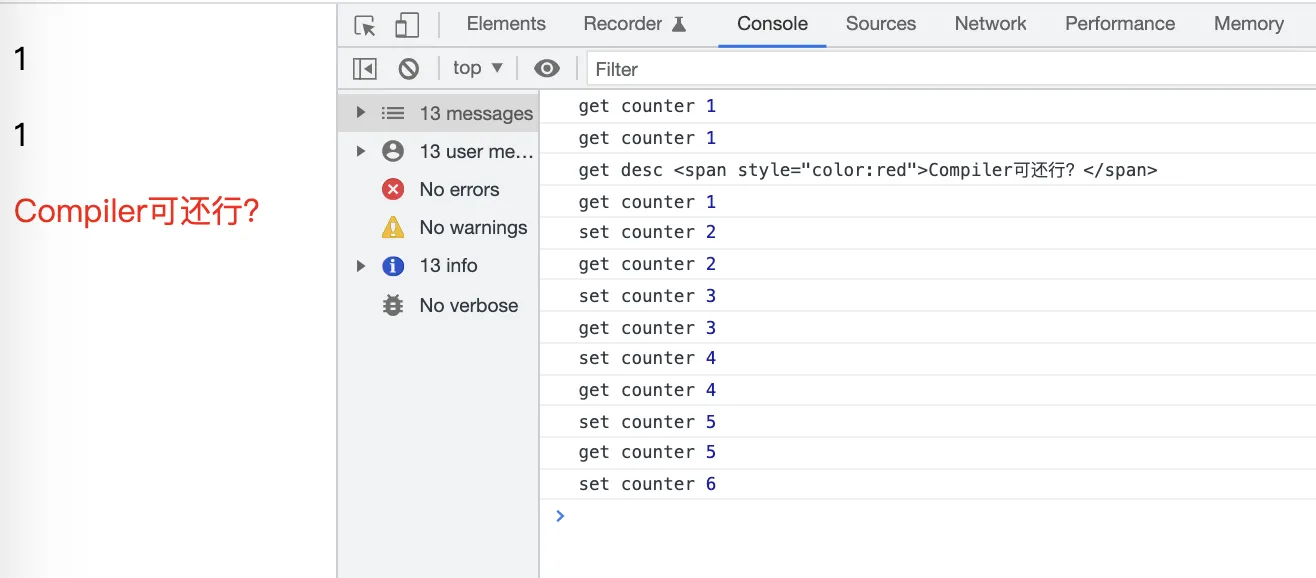
这时候页面已经正常显示,但是修改数据模版没有更新,因为compiler和 observer两者还没打通联系
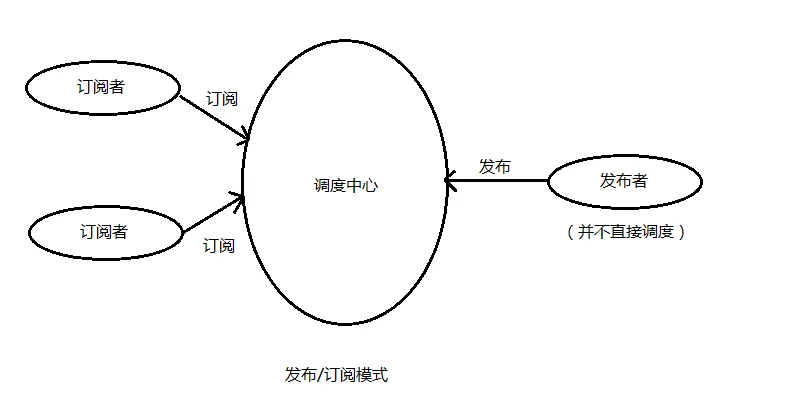
发布订阅模式
设计模式中有一种模式叫做观察者模式,而发布订阅模式是观察者模式的变种(就复杂了那么一点点)。
这里简单说一下观察者模式与发布订阅模式。在观察这模式中有两个类 Observer(观察者)、Subject(主题)。Observer非常简单,提供一个update方法;Subject维护一个数组,提供三个方法,addObserver、removeObserver、notifyAll,notifyAll干的事情就是就是遍历数组执行元素的update方法。
在发布订阅模式中,Subject对应 Publisher(发布者),Observer对应Subscribe(订阅者),不用害怕只是名字换了,五脏六腑完全一样。
此外发布者和订阅者之间多了一个调度中心,为什么要有一个调度中心呢?
举个例子:一个班级有x个老师和y个学生,这里老师都有报刊,学生呢可以选择订阅自己喜欢的报刊,然而一个老师也可能同时教多门课程,这样老师和学生就是多对多的关系,班级里有个学习委员,学习委员负责从各个老师那里拿到报刊发给对应的学生,这个学习委员就是调度中心。
调度中心就是为了实现发布者和订阅者关系的解耦。x个老师和y个学生调度中心都知道,每个学生订阅了什么报刊和每个老师有那些报刊这些都是调度中心做的事情,x个老师和y个学生之间互不接触。
具体发布订阅模式的实现可以看我的这篇文章 设计模式
Vue中的发布订阅模式
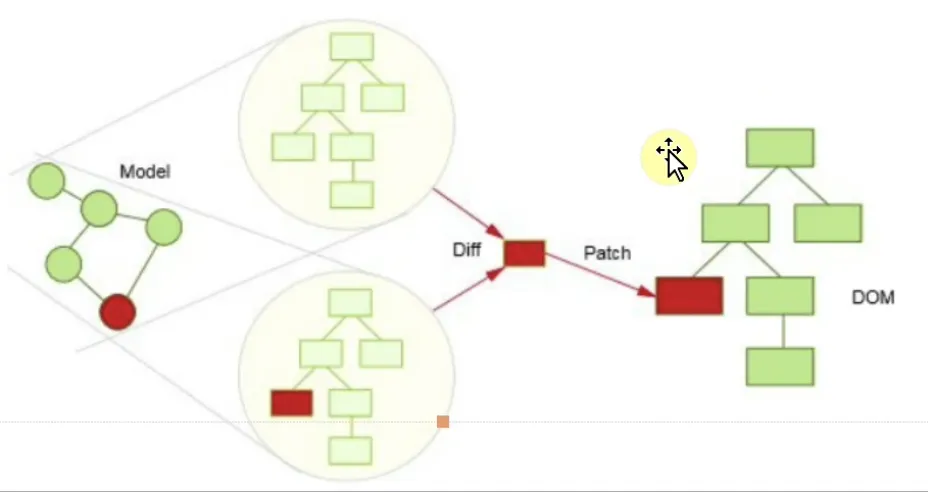
先看一下Vue框架原理图
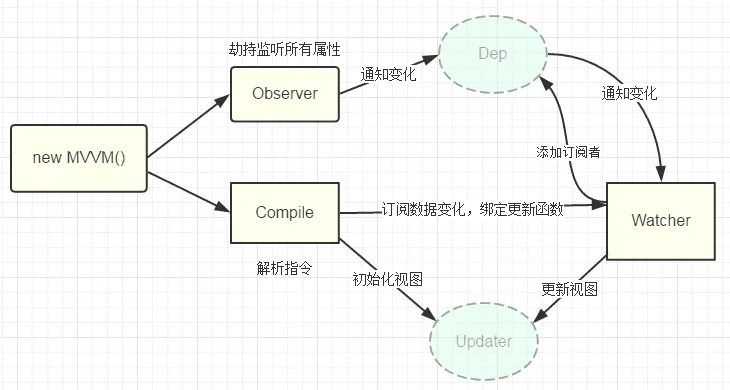
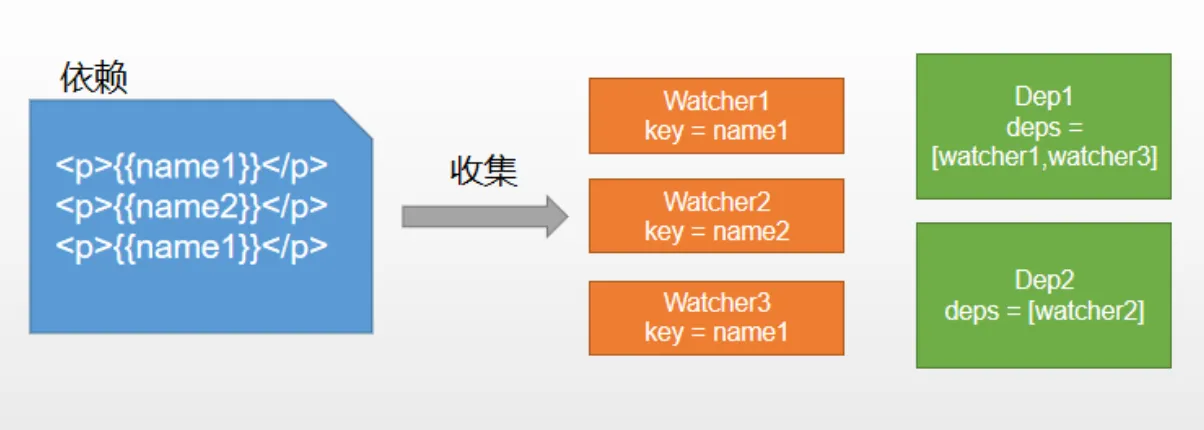
Vue中的依赖收集
- 视图中会用到
data中某key,这称为依赖。同一个key可能出现多次,每次都需要收集出来用一个 Watcher来维护它们,此过程称为依赖收集。data中的数据与Dep一一对应。Dep和Watcher是一对多的关系,一个Dep管理多个(也可以是0个)Watcher,需要更新时由Dep统一通知
与发布订阅模式之间的关系

在Vue中 Watcher 可以理解为观察者,Dep理解为调度中心,Observer理解为发布者,调度中心Dep维护一个数组watchers 即哪些人订阅了哪些内容。
这里的 “哪些人”指的是data中的响应式数据即observers;“哪些内容” 可以理解为由编译模版的update方法。
这个过程可以分为三步。
第一步 “data中的响应式数据” 要告知 “调度中心”
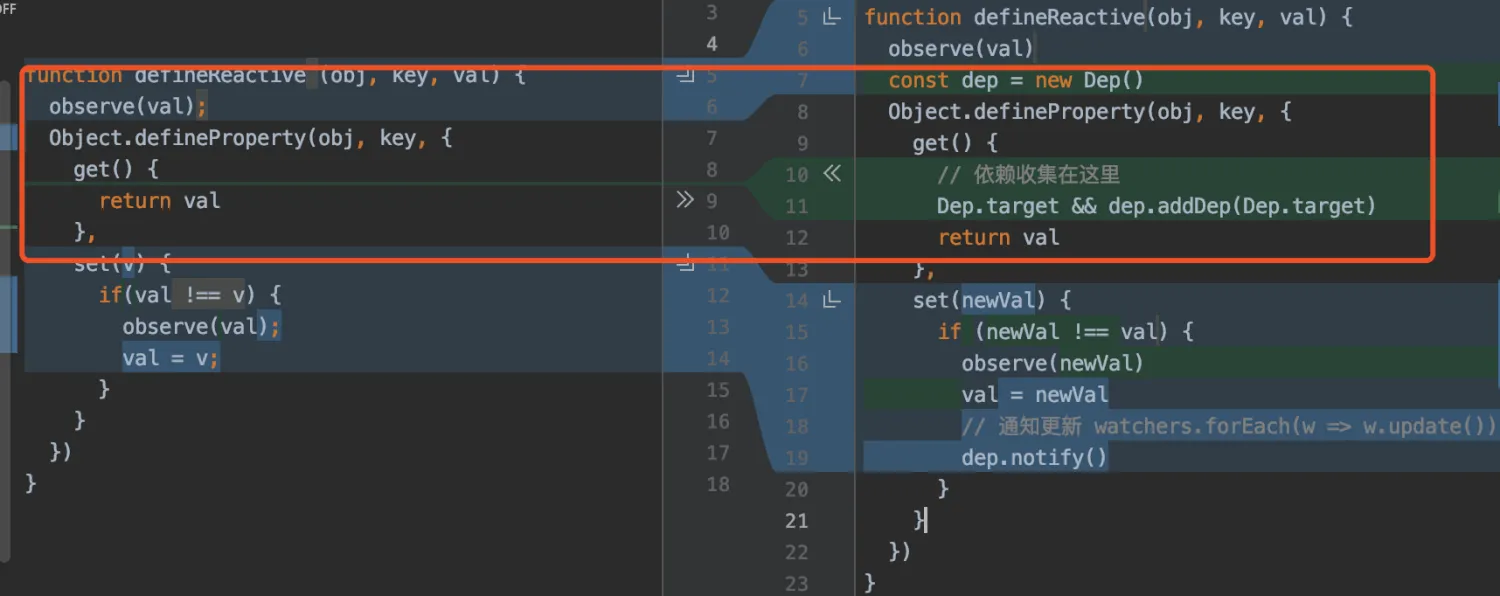
第二步模版编译的时候要创建Watcher
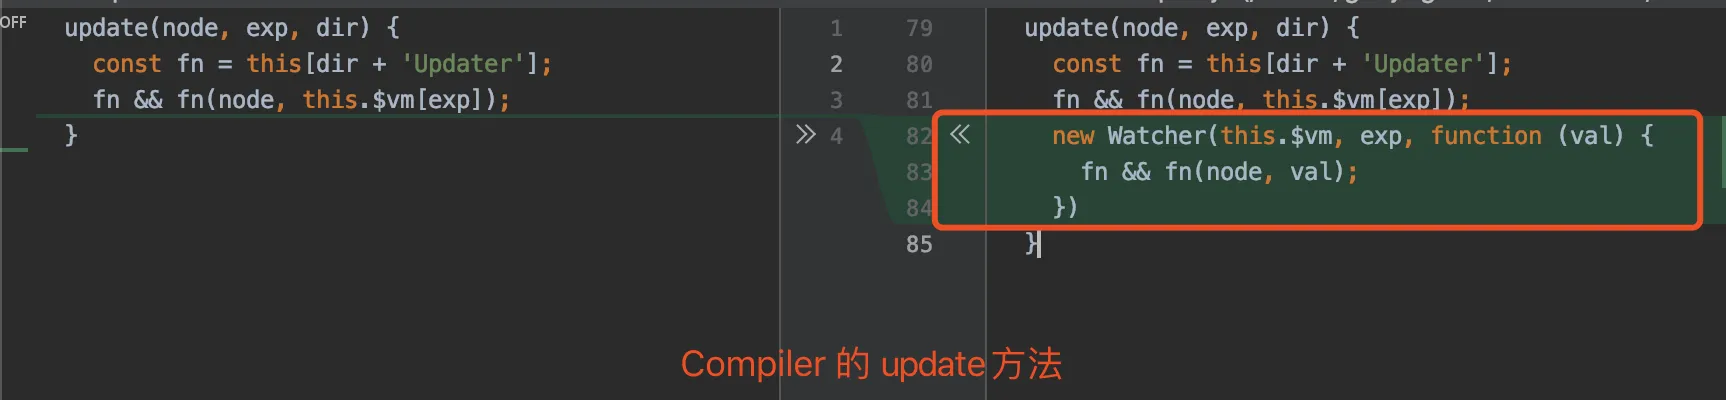
同时进行依赖收集

这里其实调用了defineReactive方法内部的 get(),完成依赖收集
第三步 数据发生变更 “调度中心” 通知订阅者

至此 vue响应式原理已经讲完, 补全代码如下。
- 入口html不变
- Vue.js内容如下
jsclass Vue {
  constructor(options) {
    this.$options = options;
    this.$data = options.data;
    observe(this.$data);
    proxy(this, '$data');
    new Compiler(options.el, this);
  }
}

function observe(obj) {
  if(typeof obj !== 'object' || obj == null) return;
  new Observer(obj);
}
class Observer {
  constructor(value) {
    this.value = value;
    const valueType = Reflect.toString.call(value);
    if(valueType === '[object Object]') {
      this.walk(value);
    } else if (valueType === '[object Array]') {
      // todo 数组的数据劫持
    }
  }
  walk(obj) {
    Object.keys(obj).forEach(key => {
      defineReactive(obj, key, obj[key])
    })
  }
}

function proxy(vm, sourceKey) {
  Object.keys(vm[sourceKey]).map(key => {
    Object.defineProperty(vm, key, {
      get() {
        return vm[sourceKey][key];
      },
      set(newVal) {
        vm[sourceKey][key] = newVal;
      }
    })
  })
}

function defineReactive (obj, key, val) {
  observe(val);
  const dep = new Dep();
  Object.defineProperty(obj, key, {
    get() {
      Dep.target && dep.addWatcher(Dep.target);
      return val
    },
    set(v) {
      if(val !== v) {
        observe(val);
        val = v;
        dep.notify();
      }
    }
  })
}

class Dep {
  constructor() {
    this.watchers = [];
  }
  addWatcher(watcher) {
    this.watchers.push(watcher)
  }
  notify() {
    this.watchers.forEach(watcher => watcher.update())
  }
}

class Watcher {
  constructor(vm, key, updateFn) {
    this.vm = vm;
    this.key = key;
    this.updateFn = updateFn;

    Dep.target = this;
    this.vm[this.key]; // 触发了getter 依赖收集
    Dep.target = null;
  }
  update() {
    this.updateFn.call(this.vm, this.vm[this.key])
  }
}
compiler.js
js
/**
 * 编译器
 * 递归DOM树
 * 判断节点类型,如果是文本,则判断是否是插值绑定
 * 如果是元素,则遍历其属性判断是否是指令或事件,然后递归子元素
 **/
class Compiler {
  constructor(el, vm){
    this.$vm = vm;
    this.$el = document.querySelector(el);
    if(this.$el) {
      this.compile(this.$el);
    }
  }
  compile(el) {
    Array.from(el.childNodes).forEach(node => {
      // isElement
      if(node.nodeType === 1) {
        // compileElement
        const nodeAttrs = node.attributes;
        Array.from(nodeAttrs).forEach(attr => {
          const attrName = attr.name;
          if(attrName.indexOf('v-') === 0) {
            const dir = attrName.substring(2);
            this.update(node, attr.value, dir)
          }
        })

      }
      // isInter
      else if(node.nodeType === 3 && /\{\{(.*)\}\}/.test(node.textContent)) {
        // compileText
        this.update(node, RegExp.$1, 'text')
      }
      if(node.childNodes) {
        this.compile(node);
      }
    });
  }
  update(node, exp, dir) {
    new Watcher(this.$vm, exp, (val) => {
      const fn = this[`${dir}Update`];
      fn?.(node, val);
    });
  }
  textUpdate(node, value) {
    node.textContent = value;
  }
  htmlUpdate(node, value) {
    node.innerHTML = value;
  }
}
computed简单实现
Vue构造函数增加initComputed(this);- 实现
initComputed()方法
js// Vue构造函数增加 initComputed(this);
function initComputed () {
  const vm = this
  const computed = this.$options.computed
  Object.keys(computed).forEach(key => {
    Object.defineProperty(vm, key, {
      get: typeof computed[key] === 'function' ? computed[key] : computed[key].get,
      set() {}
    })
  })
}
watch 如何实现?
首先了解一下wacher的api 官方文档
这里说一下大致思路
- 它支持
string、function、Object、Array,string找实例的方法string和function都可以转换为Object, 格式形如{immediate: false, deep: false, handler}Object可以转换为Array- 这个方法不难写
- 对watch进行遍历, 伪代码如下
jsconst comp = {
    // ...
}

const keys = Object.keys(comp.watch);
keys.forEach(key => {
    const values = comp.watch[key];
    let oldVal;
    // deep
    values.forEach(one => {
        creteWatcher(comp, key);
        if(one.deep) {
            // 递归watcher
        }
    });
    // immediate: true
    Promise.resolve().then(() => {
        values.forEach(one => one.immediate ?? one.handle())
    })
})
function creteWatcher(comp, key) {
      return new Watcher(comp, key, () => {
        values.forEach(one => {
            const newVal = comp[key];
            one.handler(newVal, oldVal);
            oldVal = newVal;
        })
    })
}
数组响应式实现
补全Observer类
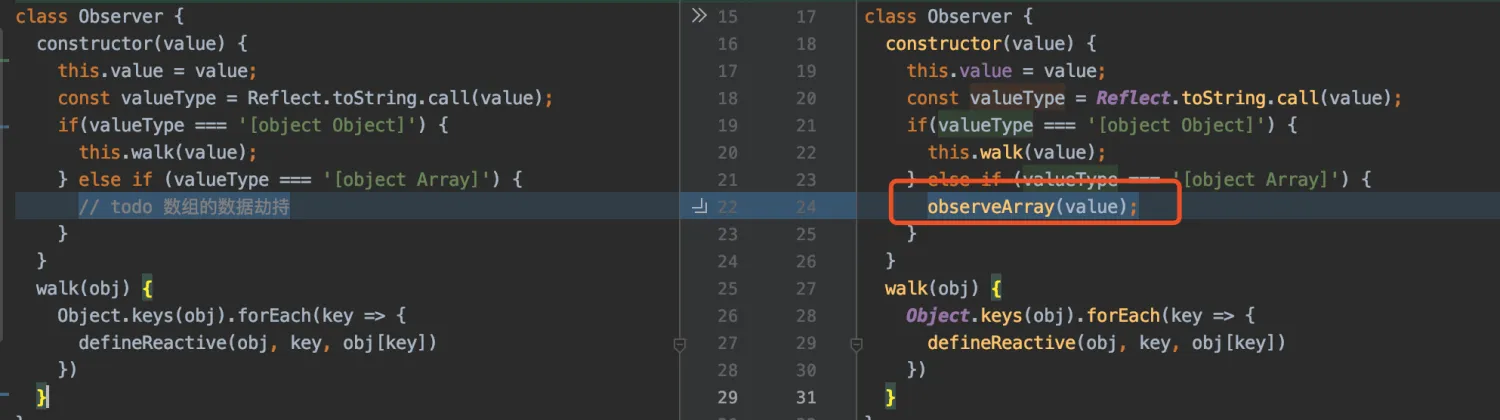
拦截数组方法
jsconst arrayProto = Array.prototype;
const arrayMethods = Object.create(arrayProto);
const methodsToPatch = [
  'push',
  'pop',
  'shift',
  'unshift',
  'splice',
  'sort',
  'reverse'
];
methodsToPatch.forEach(function (method) {
  const original = arrayProto[method]
  Object.defineProperty(arrayMethods, method, {
    value: function (...args) {
      // 执行原始操作
      const result = original.apply(this, args);
      // 子元素增加响应式
      let inserted
      switch (method) {
        case 'push':
        case 'unshift':
          inserted = args
          break
        case 'splice':
          inserted = args.slice(2)
          break
      }
      console.log('array inserted', inserted)
      if (inserted) observeArray(inserted)
      //dep.notify()
      return result
    },
    writable: true,
    configurable: true
  })
});
function observeArray(arr) {
  Object.setPrototypeOf(arr,   arrayMethods);
  arr.forEach(item => {
    observe(arr[item]);
  });
  return arr;
}
虚拟DOM
VDOM即VirtualDOM,它通过JS的Object对象模拟Dom中的节点, 然后通过特定的render方法将其渲染为真实DOM节点

下面是一个虚拟DOM的转成真实DOM的简要Demo
js<!doctype html>
<html lang="zh">
<head>
	<meta charset="UTF-8">
	<title>虚拟dom demo</title>
</head>
<body></body>

<!-- element.js-->
<script>
  // class Element { // script type="module instanceof 检测有问题 先hack一下
  window.Element = class {
	  constructor(type, props, children) {
	    this.type = type
      this.props = props
      this.children = children
    }
	}
	function setAttr(node, key, value) {
		switch (key) {
			case 'value':
			  if(['INPUT', 'TEXTAREA'].includes(node.tagName.toUpperCase())) {
			    node.value = value
				}else {
			    node.setAttribute(key, value)
				}
			  break;
			case 'style':
				node.style.cssText = value
				break
			default:
        node.setAttribute(key, value)
        break;
    }
  }
	function createElement(type, props, children) {
	  return new Element(type, props, children)
	}
	function render (eleObj) {
	  let el = document.createElement(eleObj.type)
		for(let key in eleObj.props) {
		  setAttr(el, key, eleObj.props[key])
		}
    eleObj.children.forEach(child => {
      child = (child instanceof Element) ? render(child): document.createTextNode(child)
			el.appendChild(child)
		})
		return el
	}
  function renderDom(el, target) {
	  target.appendChild(el)
	}
</script>
<script>
	let vertualDom = createElement('ul', {class: 'list'}, [
    createElement('li', {class: 'item'}, ['1']),
		createElement('li', {class: 'item'}, ['2']),
		createElement('li', {class: 'item'}, ['3']),
  ])
  console.log(vertualDom)
  let el = render(vertualDom)
	console.log(el)
	renderDom(el, document.body)
</script>
</html>
DOM Diff
Vue1.0中有细粒度的数据变化侦测,它是不需要虚拟DOM的,但是细粒度造成了大量开销,这对于大型项目来说是不可接受的。- 因此,
Vue 2.0选择了中等粒度的解决方案,每一个组件一个watcher实例,这样状态变化时只能通知到组件,再通过引入VDOM进行比对和渲染。
- what? 利用
patching算法将VDOM转换为DOM - why? 性能、跨平台、兼容性
- where? 数据更新时,对比新旧
DOM找出最小代价更新DOM - how? 怎样执行?
- 从根元素开始“同级比较”、“先序深度优先遍历”
- 通过
JS层面的计算,生成patch对象,即补丁文件 - 再通过特性的操作解析
patch对象,完成页面的重新渲染
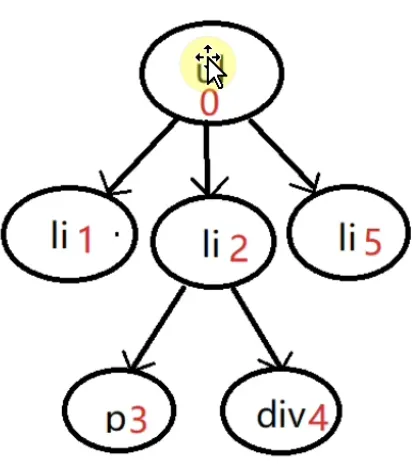
差异计算
先序深度优先遍历
- 用
JavaScript对象模拟DOM - 把此虚拟
DOM转成真实DOM并插入页面中 - 如果有事件发生修改了虚拟
DOM,比较两棵虚拟DOM树的差异,得到差异对象 - 把差异对象应用到真正的
DOM树上
比对规则
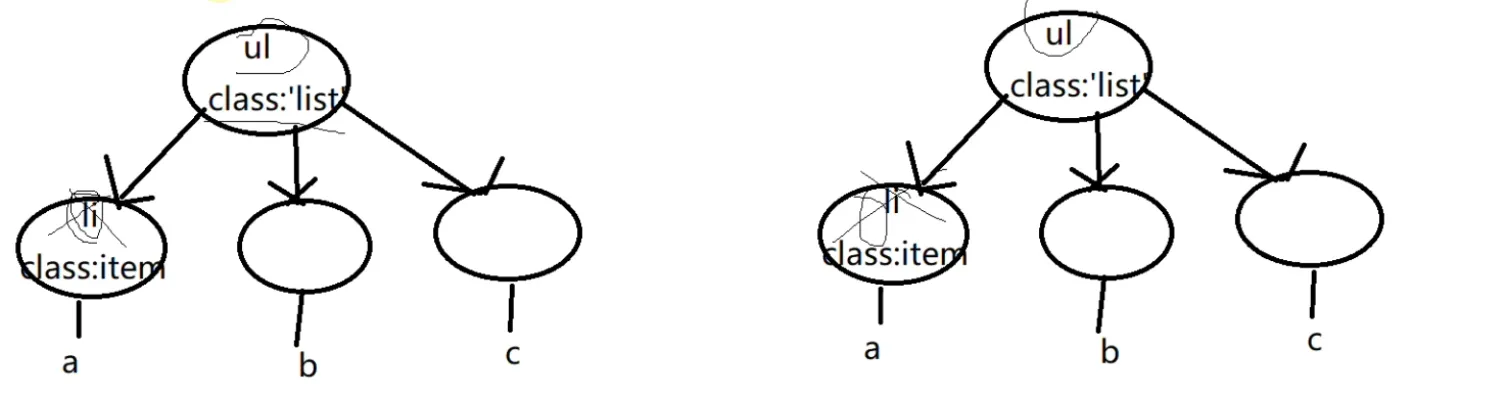
- 当节点类型相同时,看一看属性是否相同,产生一个属性补丁包
{type:' ATTRS', attrs: {class: 'list-group'}} - 旧的
DOM节点不存在{type: 'REMOVE', index: 'XXXX'} - 节点类型不同,直接采用替换模式
{type: 'REPLACE', newNode: newNode} - 文本的变化
{type: 'TEXT', text: 1} - 新增的节点
{type: 'CREATE', newNode: newNode}
- 生成补丁包示例代码
jsfunction diff(oldTree, newTree) {
  const patches = {}
  let index = 0
  // 递归树 比较的结果放入补丁包中
  walk(oldTree, newTree, index, patches);
  return patches;
}
const ATTRS = 'ATTRS'
const TEXT = 'TEXT'
const REMOVE = 'REMOVE'
const REPLACE = 'REPLACE'
// const CREATE = 'CREATE' todo
let Index = 0
function diffAttr (oldAttrs, newAttrs) {
  let patch = {}
  for(let key in oldAttrs) {
    if(oldAttrs[key] !== newAttrs[key]) {
      patch[key] = newAttrs[key];
    }
  }
  for(let key in newAttrs) {
    // 老节点没有新节点的属性
    if(!oldAttrs.hasOwnProperty(key)) {
      patch[key] = newAttrs[key];
    }
  }
  return patch
}
function diffChildren (oldChildren, newChildren, patches) {
  oldChildren.forEach((child, idx) => {
    walk(child, newChildren[idx], ++Index, patches)
  })
  // newChildren.slice(oldChildren.length).forEach((child, idx) => {
  //   walk(null, newChildren[oldChildren.length + idx], ++Index, patches)
  // })
}
function isString(node) {
  return Object.prototype.toString.call(node) === '[object String]'
}
function walk(oldNode, newNode, index, patches) {
  let currentPatch = []
  if (!newNode) {
    currentPatch.push({type: REMOVE, index})
  } /*else if (!oldNode) { // 新增节点 todo
    currentPatch.push({type: CREATE, newNode})
  }*/ else if(isString(oldNode) && isString(newNode)) {
    if(oldNode !== newNode) {
      currentPatch.push({type: TEXT, text: newNode})
    }
  } else if(oldNode.type === newNode.type) {
    let attrs = diffAttr(oldNode.props, newNode.props)
    if(Object.keys(attrs).length) {
      currentPatch.push({type: ATTRS, attrs})
    }
    diffChildren(oldNode.children, newNode.children, patches);
  } else {
    currentPatch.push({type: REPLACE, newNode})
  }
  if(currentPatch.length) {
    // 将元素和补丁对应起来 放到大补丁包中
    patches[index] = currentPatch;
  }
}
export default diff
- 验证diff算法
html<!doctype html>
<html lang="xh">
<head>
	<meta charset="UTF-8">
</head>
<body>
	<script type="module">
    import {createElement, render, renderDom} from './element.js'
    import diff from './diff.js'
    let vertualDom1 = createElement('ul', {class: 'list'}, [
      createElement('li', {class: 'item'}, ['a']),
      createElement('li', {class: 'item'}, ['b']),
      createElement('li', {class: 'item'}, ['c']),
    ])
    let vertualDom2 = createElement('ul', {class: 'list'}, [
      createElement('li', {class: 'item'}, ['1']),
      createElement('li', {class: 'item'}, ['b']),
      createElement('li', {class: 'item'}, ['3']),
    ])

    let patches = diff(vertualDom1, vertualDom2)
    console.log(patches)
    /*
		{
			2:  [{type: "TEXT", text: "1"}]
			6:  [{type: "TEXT", text: "3"}]
		}
		*/
    let vertualDom3 = createElement('ul', {class: 'list-group', style: 'color:red'}, [
      createElement('li', {class: 'item'}, ['1']),
      createElement('div', {class: 'item'}, ['b']),
    ])
    console.log(diff(vertualDom1, vertualDom3))
    /*
		{
			"0": [{"type": "ATTRS", "attrs": { "class": "list-group", "style": "color:red"}}],
			"2": [{"type": "TEXT", "text": "1"}],
			"3": [{"type": "REPLACE","newNode": {"type": "div","props": {"class": "item"}, "children": ["b"]}}],
			"4": [{"type": "REMOVE", "index": 4}]
		}
		*/
	</script>
</body>
</html>
Vue中的DOMDiff
树级别比较
首先进行树级别比较,可能有三种情况:增删改。
new VNode不存在就删;old VNode不存在就增;- 都存在就执行VNode比较
VNode比较
比较两个VNode,包括三种类型操作:属性更新、文本更新、子节点更新
具体规则如下:
- 如果老节点没有子节点而新节点有子节点,先清空老节点的文本内容,然后为其新增子节点。
- 当新节点没有子节点而老节点有子节点的时候,则移除该节点的所有子节点。
- 当新老节点都无子节点的时候,只是文本的替换。
- 新老节点均有
children子节点,则对子节点进行diff操作,调用updateChildren
updateChildren
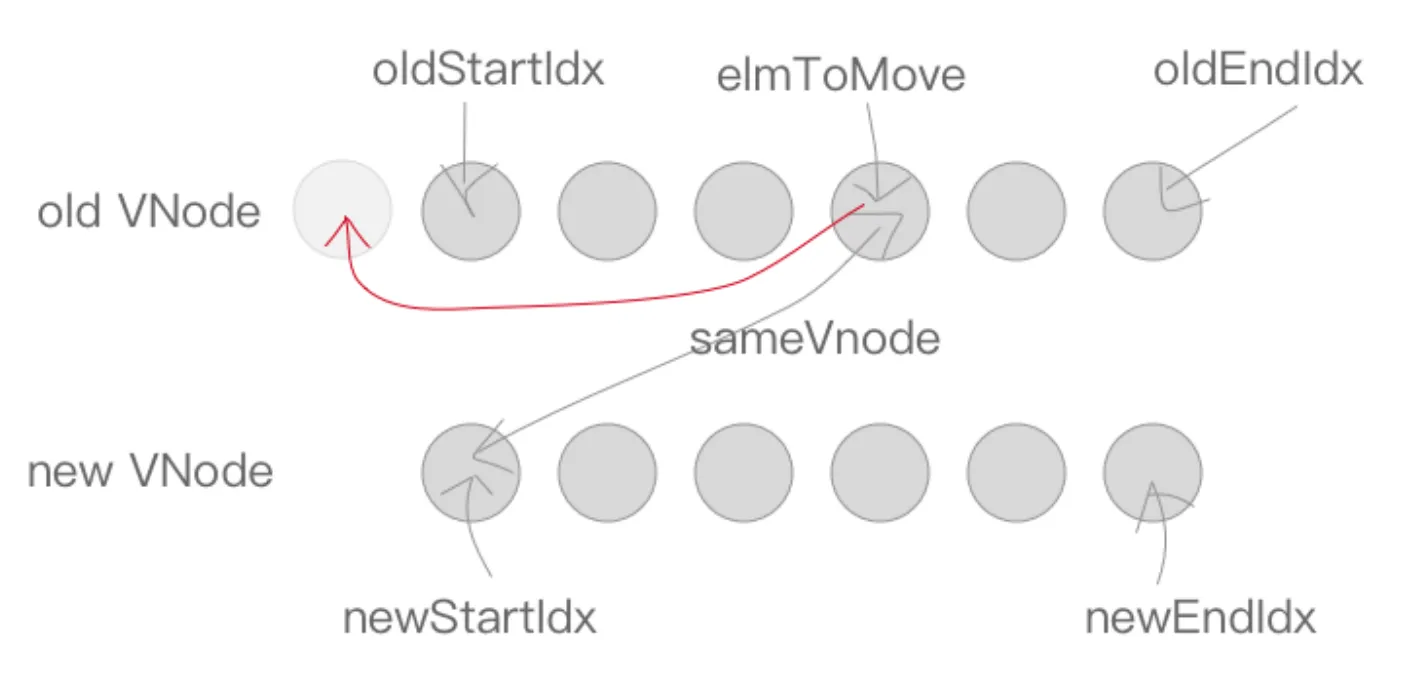
updateChildren主要作用是用一种较高效的方式比对新旧两个VNode的children得出最小操作补丁。执行一个双循环是传统方式,vue中针对web场景特点做了特别的算法优化,我们看图说话:
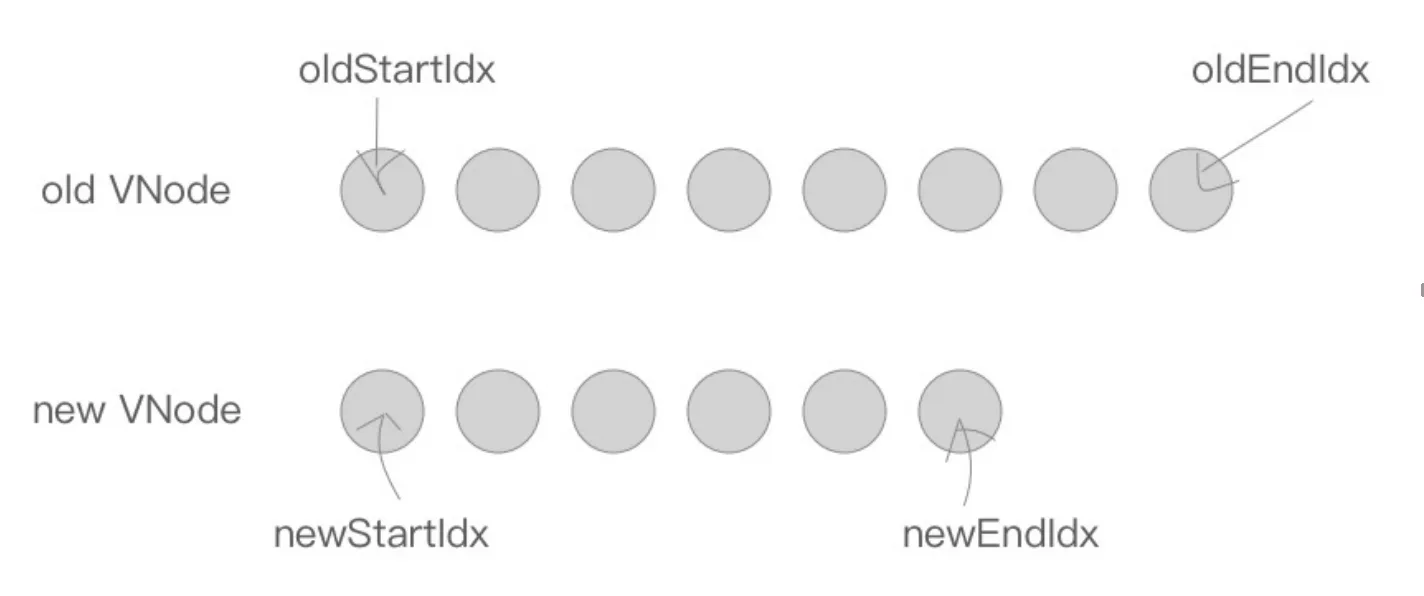 在新老两组
在新老两组VNode节点的左右头尾两侧都有一个变量标记,在遍历过程中这几个变量都会向中间靠拢。
当oldStartIdx > oldEndIdx或者newStartIdx > newEndIdx时结束循环。
下面是遍历规则:
首先,oldStartVnode、oldEndVnode与newStartVnode、newEndVnode两两交叉比较,共有4种比较方法。
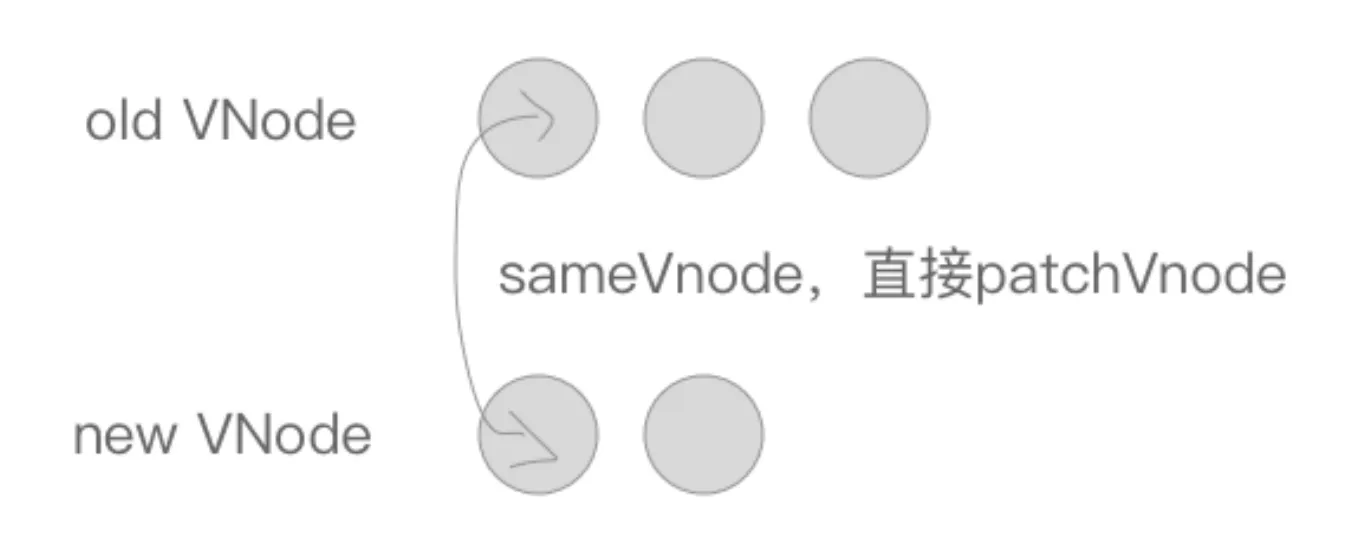
当 oldStartVnode和newStartVnode 或者 oldEndVnode和newEndVnode 满足sameVnode,直接将该VNode节点进行patchVnode即可,不需再遍历就完成了一次循环。如下图
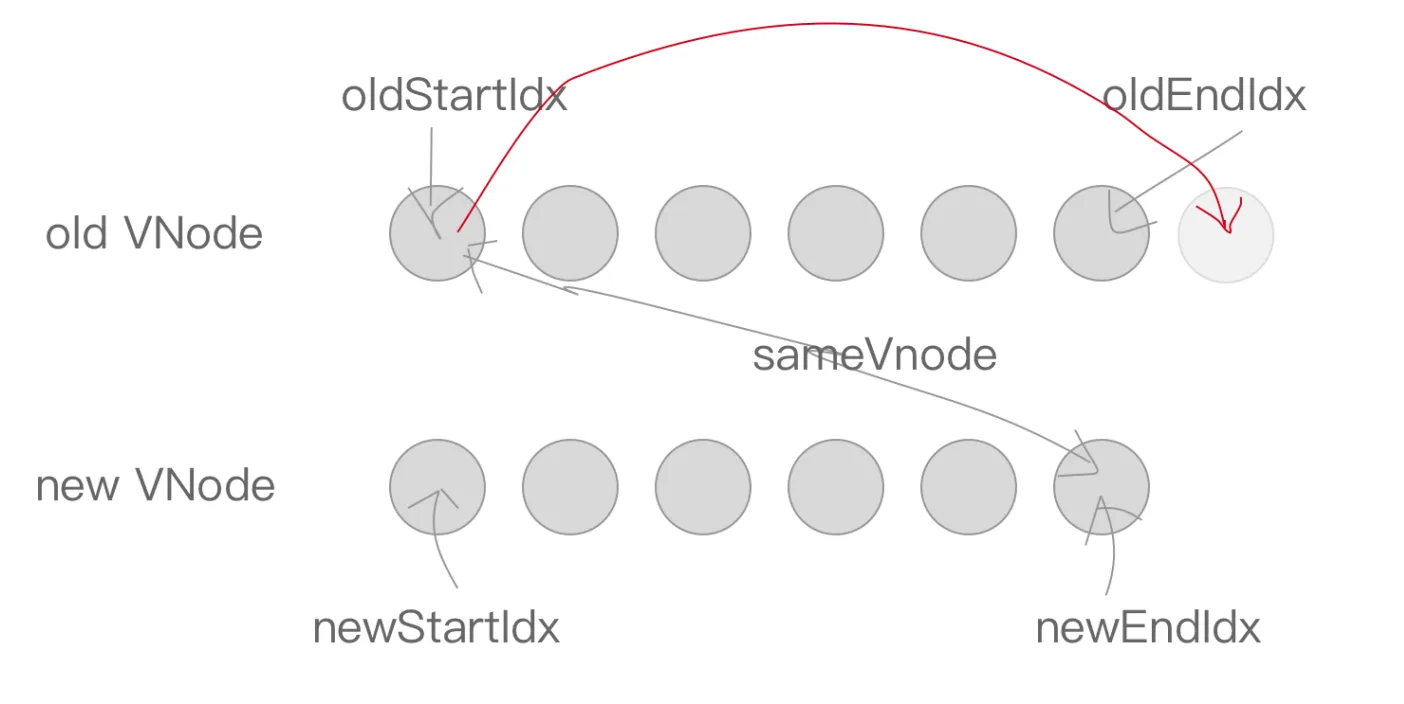
如果oldStartVnode与newEndVnode满足sameVnode。说明oldStartVnode已经跑到了oldEndVnode后面去了,进行patchVnode的同时还需要将真实DOM节点移动到oldEndVnode的后面。
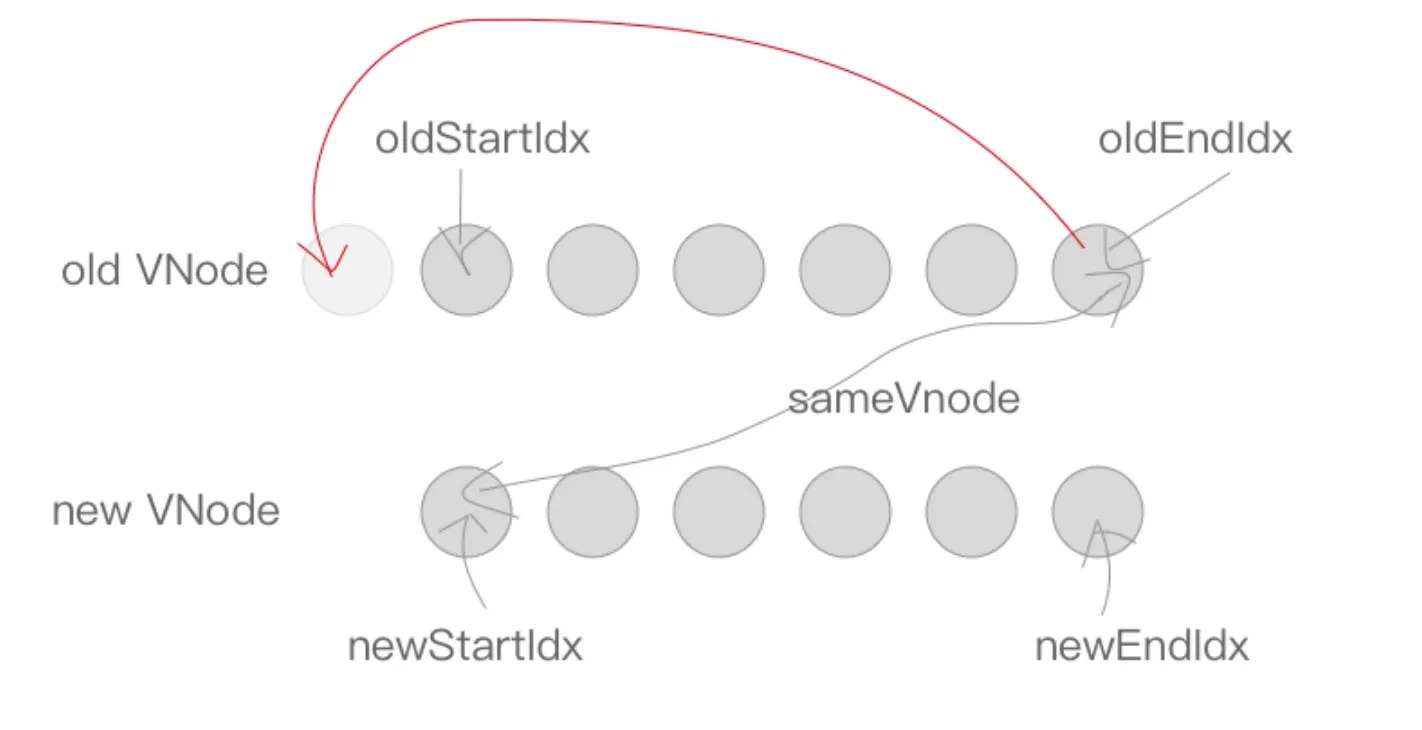
如果oldEndVnode与newStartVnode满足sameVnode,说明oldEndVnode跑到了oldStartVnode的前面,进行patchVnode的同时要将oldEndVnode对应DOM移动到oldStartVnode对应DOM的前面。
如果以上情况均不符合,则在old VNode中找与newStartVnode满足sameVnode的vnodeToMove,若存在执行patchVnode,同时将vnodeToMove对应DOM移动到oldStartVnode对应的DOM的前面。
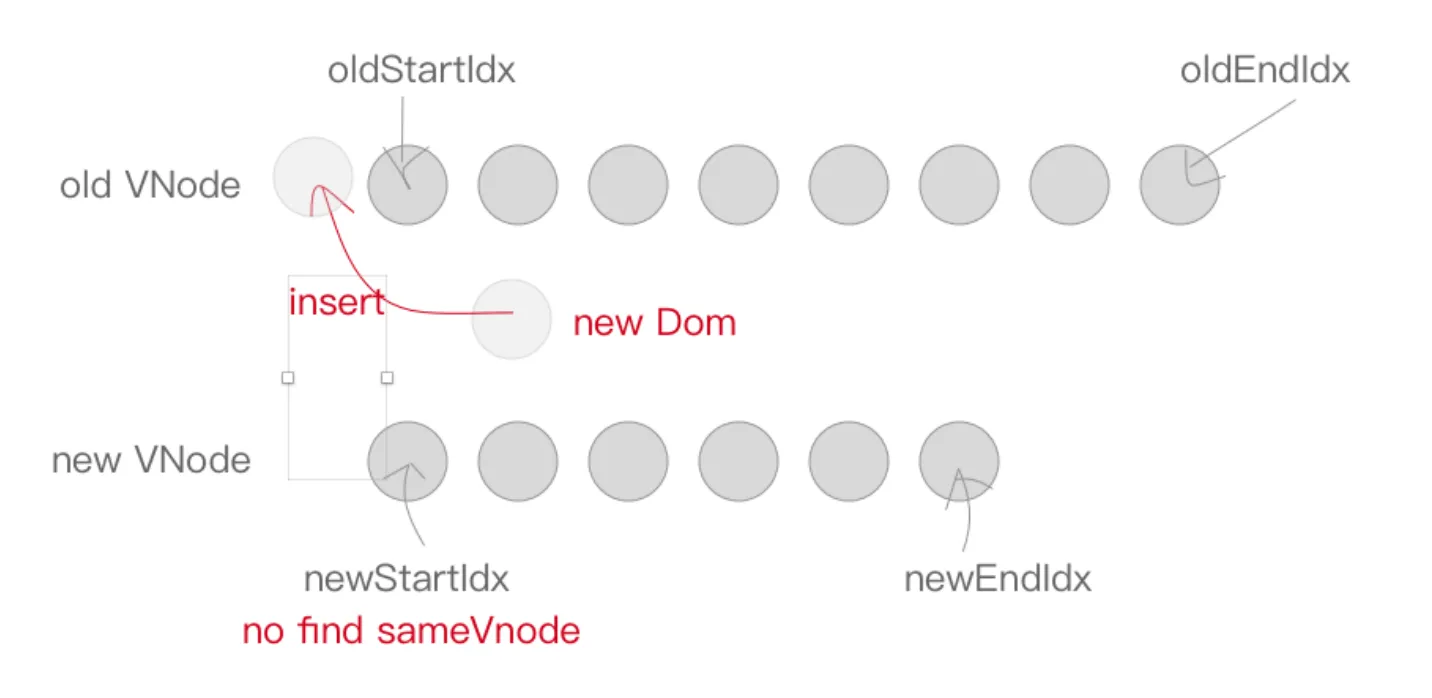
当然也有可能newStartVnode在old VNode节点中找不到一致的key,或者是即便key相同却不是sameVnode,这个时候会调用createElement创建一个新的DOM节点。
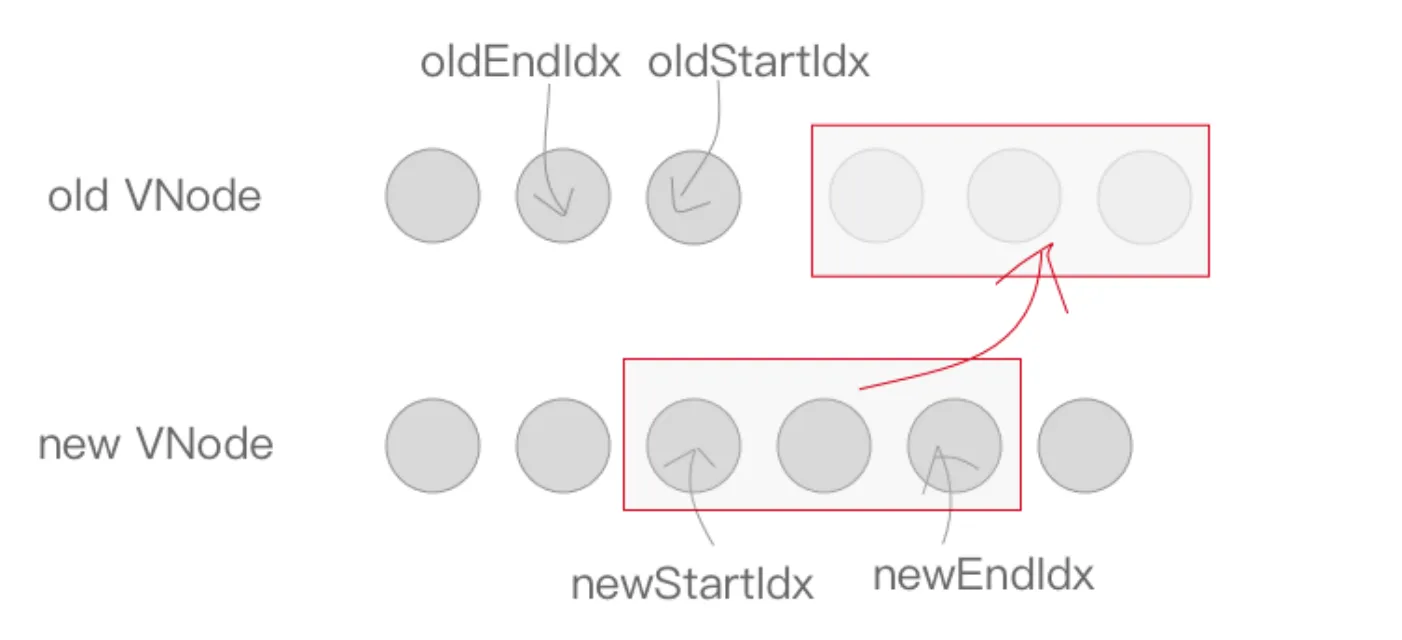
至此循环结束,但是我们还需要处理剩下的节点。
当结束时oldStartIdx > oldEndIdx,这个时候旧的VNode节点已经遍历完了,但是新的节点还没有。说明了新的VNode节点实际上比老的VNode节点多,需要将剩下的VNode对应的DOM插入到真实DOM
中,此时调用addVnodes(批量调用createElement接口)。
但是,当结束时newStartIdx > newEndIdx时,说明新的VNode节点已经遍历完了,但是老的节点还有剩余,需要从文档中将剩余的节点删除。
上述过程翻译成代码如下
jsfunction updateChildren(oldNodes, newNodes) {
  let oldStartIdx = 0, oldEndIdx = oldNodes.length-1,
      newStartIdx = 0, newEndIdx = newNodes.length-1;
  for(;;) {
    // 退出循环条件
    if(oldEndIdx < oldStartIdx) {
      const rest = newNodes.slice(newStartIdx, newEndIdx+1);
      oldNodes = oldNodes.concat(rest);
      break;
    }
    if(newEndIdx < newStartIdx) {
      oldNodes.splice(oldStartIdx, oldEndIdx - oldStartIdx + 1);
      break
    }

    if(oldNodes[oldStartIdx] === newNodes[newStartIdx]) {
      ++oldStartIdx;
      ++newStartIdx;
    } else if(oldNodes[oldEndIdx] === newNodes[newEndIdx]) {
      --oldEndIdx;
      --newEndIdx;
    } else if(oldNodes[oldStartIdx] === newNodes[newEndIdx]) {
      const node = oldNodes.shift();
      oldNodes.push(node);
      --oldEndIdx;
      --newEndIdx;
    } else if(oldNodes[oldEndIdx] === newNodes[newStartIdx]) {
      --oldEndIdx;
      ++newStartIdx;
      const node = oldNodes.pop();
      oldNodes.unshift(node);
    } else { // 找不到与 相同的 newNodes[newStartIdx]相同的node
      // 先拿新的头部一个在oldNodes里面找
      const oldKeytoIdxMap = createKeyToOldIdx(oldNodes, oldStartIdx, oldEndIdx);
      const idxInOld = newNodes[newStartIdx].key
      ? oldKeytoIdxMap[newNodes[newStartIdx].key]
      : findIdxInOld(newNodes[newStartIdx], oldNodes, oldStartIdx, oldEndIdx);
      // 没找到,创建
      if ([null, undefined].includes(idxInOld)) { // New element
        const node = oldNodes.splice(idxInOld, 1);
        oldNodes.unshift(node);
        ++oldStartIdx;
        ++newStartIdx;
      } else {
        // 找到了
        const node = oldNodes[idxInOld];
        oldNodes.unshift(node);
        ++newStartIdx;
        ++oldStartIdx
      }
    }
  }
}

function createKeyToOldIdx(oldNodes, oldStartIdx, oldEndIdx) {
  const list = oldNodes.slice(oldStartIdx, oldEndIdx +1);
  return list.reduce((sum, item, idx) => {
    sum[item.key] = idx + oldStartIdx;
    return sum;
  }, {})
}
function findIdxInOld(newNode, oldNodes, oldStartIdx, oldEndIdx) { // 没有key的情况
  const list = oldNodes.slice(oldStartIdx, oldEndIdx +1);
  const idxInOld = list.findIndex(item => item === newNode)
  return idxInOld === -1 ? null : idxInOld + oldStartIdx;
}
常见问题
diff在比较中直接操作dom吗?
有变化就直接操作dom,dom操作本身不是宏操作是微任务,这些操作是在浏览器刷新之前操作都结束了,可以立刻用微任务方式拿到dom值- 直接操作
dom是批量更新吗?
是的 - 双指针比较?
vue做了假设收尾的判断,期望减少循环次数,在循环中会有四个指针 ,他们向中间去移动 - 除了第一次打补丁是直接删除追加
vdom之外,第二次之后都是操作旧vdom树是吗?
是的。之前有删除情况是刚开始时两颗树级别,可能是因为一开始某颗树不存在导致的删除这种情况,在新旧比较的时候也可能由于某个值变化导致节点被删掉。
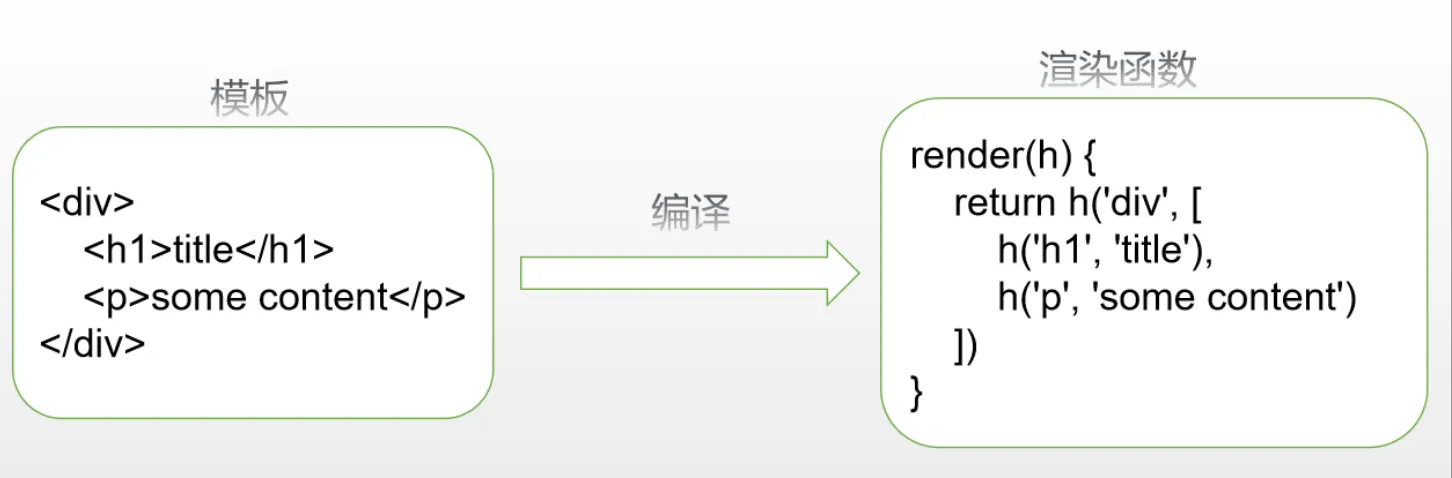
模版编译
模板编译的主要目标是将模板(template)转换为渲染函数(render)
编译过程
编译分为三步:解析、优化和生成,src\compiler\index.js
解析 - parse
解析器将模板解析为抽象语法树,基于AST可以做优化或者代码生成工作。
调试查看得到的AST,/src/compiler/parser/index.js,结构如下:
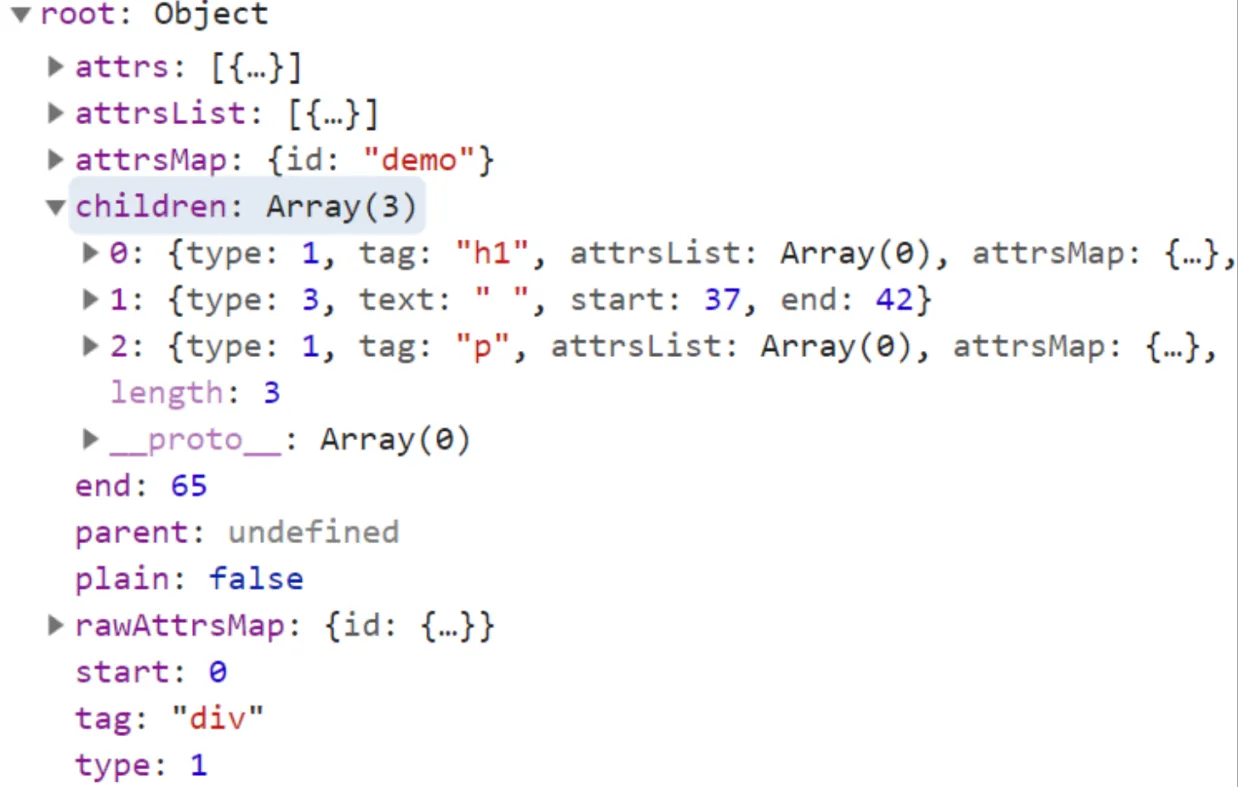
解析器内部分了HTML解析器、文本解析器和过滤器解析器,最主要是HTML解析器(通过正则表达式解析)
tip: 这些正则表达式很耗性能,所以有了runtime包(将模版编译放在编译时)
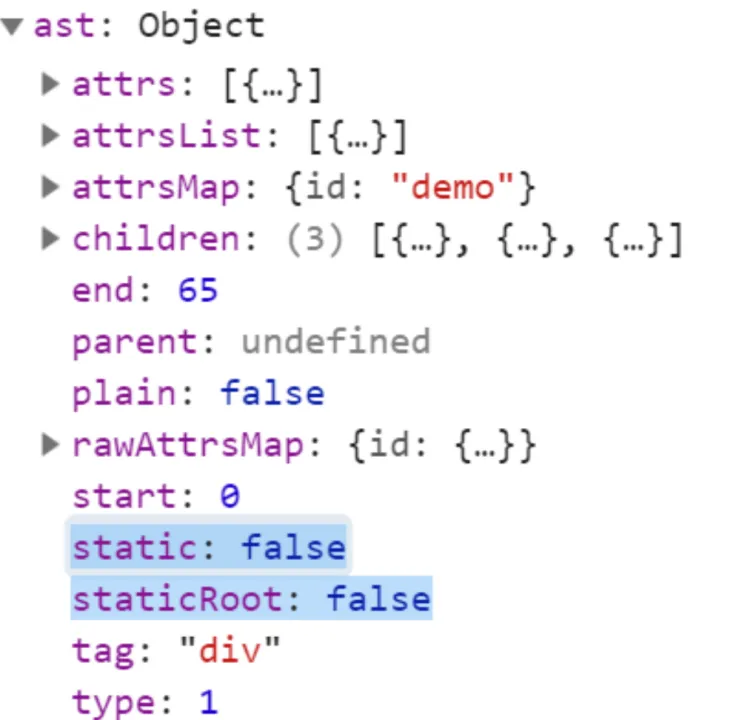
优化 - optimize
优化器的作用是在AST中找出静态子树并打上标记。静态子树是在AST中永远不变的节点,如纯文本节点。
补充说明: 在
vue中 形如<span><span>A</span></span>才是静态节点,而形如<span>A</span>不是静态子树。推测这样设定的目的是出于内存空间与性能之间的权衡考虑。
标记静态子树的好处:
- 每次重新渲染,不需要为静态子树创建新节点
- 虚拟
DOM中patch时,可以跳过静态子树 代码实现,src/compiler/optimizer.js-optimize
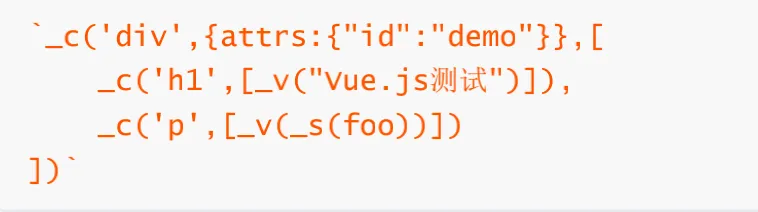
代码生成 - generate
将AST转换成渲染函数中的内容,即代码字符串。
generate方法生成渲染函数代码,src/compiler/codegen/index.js
生成后的代码长这样
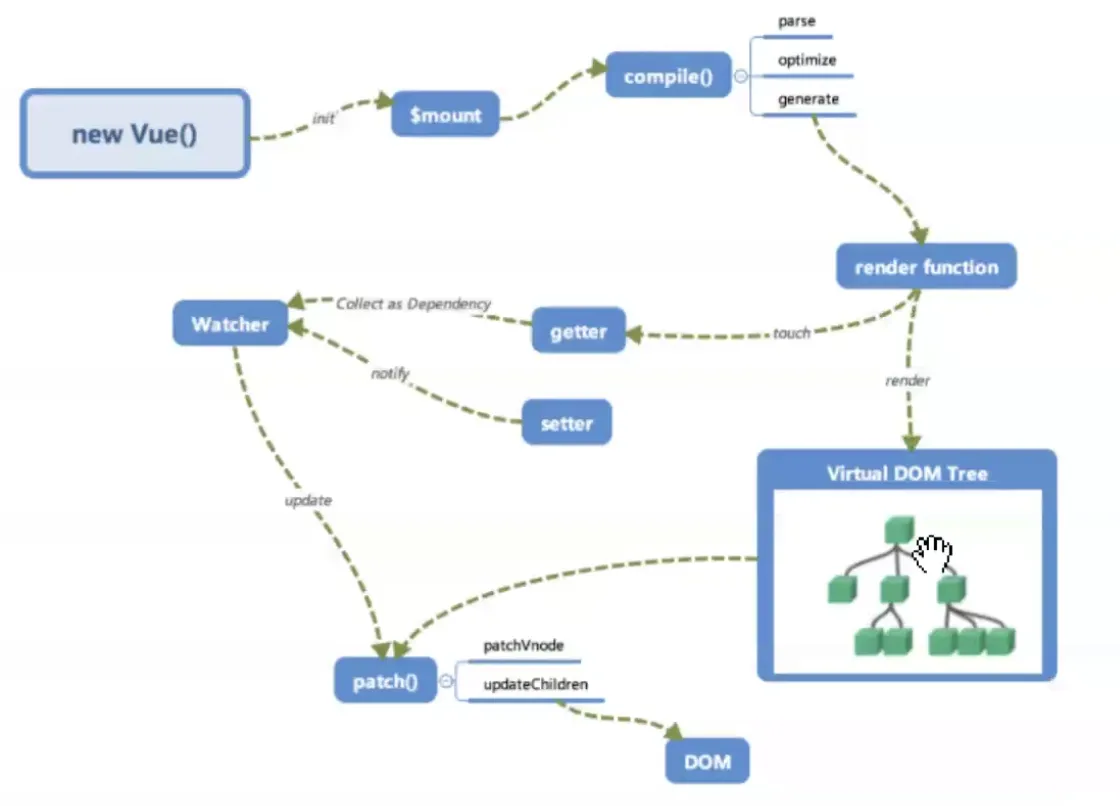
最后Vue的虚拟DOM总结如下图
Vue 源码调试
一切问题都要从源码里找答案
git clone git@github.com:vuejs/vue.gitnpm i && npm run dev- 写一个
html引入dist/vue.js, 在chrome浏览器打开 chrome调试工具添加源码
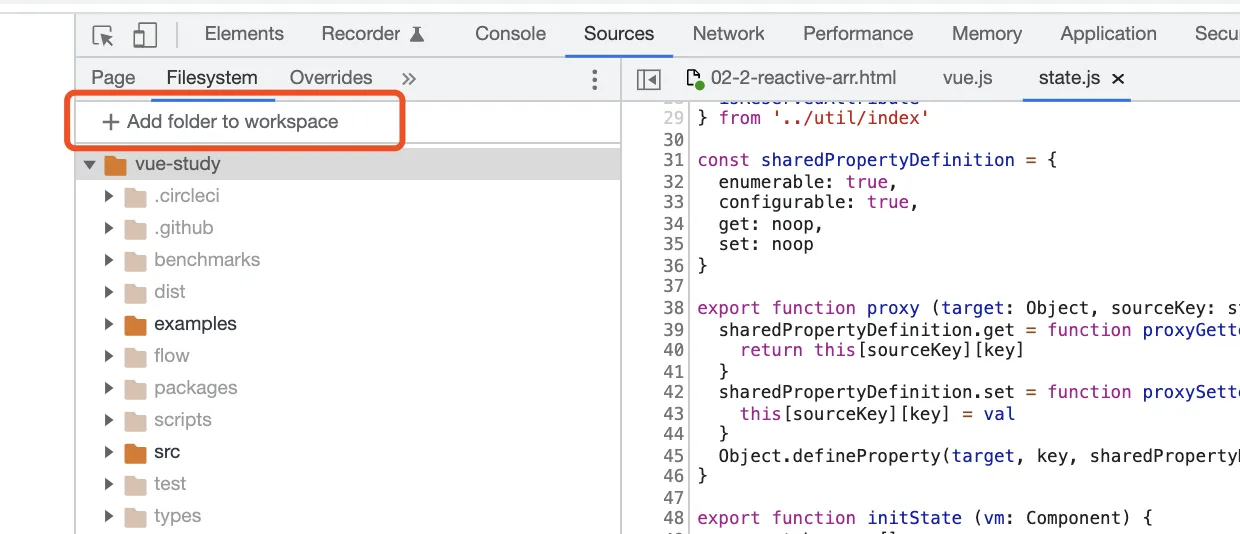
index.html设置断点试试看吧
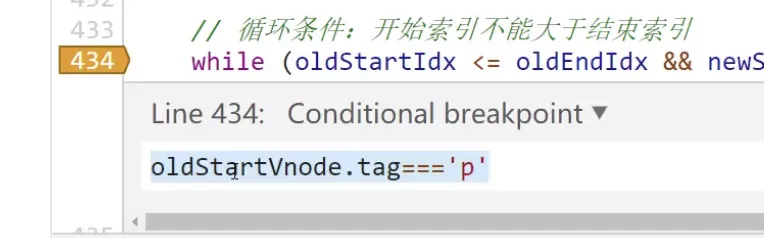
chrome设置条件断点
本文作者:郭敬文
本文链接:
版权声明:本博客所有文章除特别声明外,均采用 BY-NC-SA 许可协议。转载请注明出处!