目录
本文梳理了jest比较核心的知识点 监听模式、配置文件、匹配器、异步函数测试、接口测试、接口mock、内置钩子等内容。
前端测试在前端工程化中的作用毋庸置疑,主流JavaScript框架或类库无一例外都用单元测试。
为什么选择Jest
老牌主流前端框架有
- Jasmine
- Mocha+chai
- Jest 相对而言 从性能、功能、易用性三个角度考虑,Jest更流行一些,但是单元测试框架都差不多,会其中一个其他的框架也基本会了。
Jest的优势
- 速度快
- API简单
- 易配置
- 隔离性好
- 监控模式
- IDE整合
- Snapshot
- 多项目并行
- 覆盖率
- Mock丰富
先看了案例体味一下单元测试
jsfunction add(a, b) {
  return a - b;
}

function test(desc, fn) {
  try {
    fn();
    console.log(`${desc}没有通过测试`);
  } catch (e) {
    console.error(e);
    console.log(`${desc}没有通过测试`);
  }
}

function expect(result) {
  return {
    toBe(actual) {
      if (result !== actual) {
        throw new Error(`预期值与实际值不符合 预期: ${actual} 实际: ${result}`);
      }
    },
  };
}
test("3 + 3 = 6", () => {
  expect(add(3, 3)).toBe(6);
});
入门案例
- jest默认支持CommonJS
npx jest默认执行**/*.test.js文件
来看一个示例
js// math.js
function add (a, b) {
return a+b
}
function minus(a,b) {
return a-b
}
module.exports = {
add,
minus
}
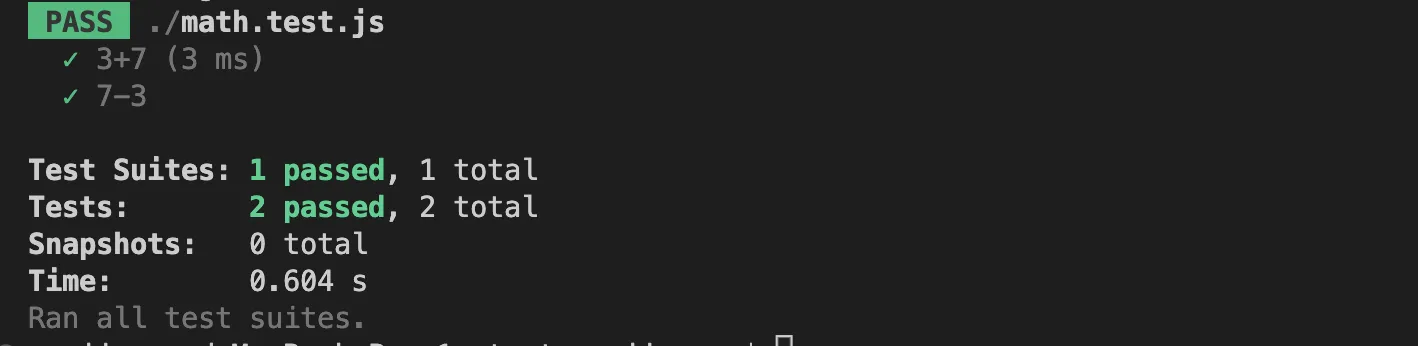
// math.spec.js
const math = require("./math");
const { add, minus } = math;
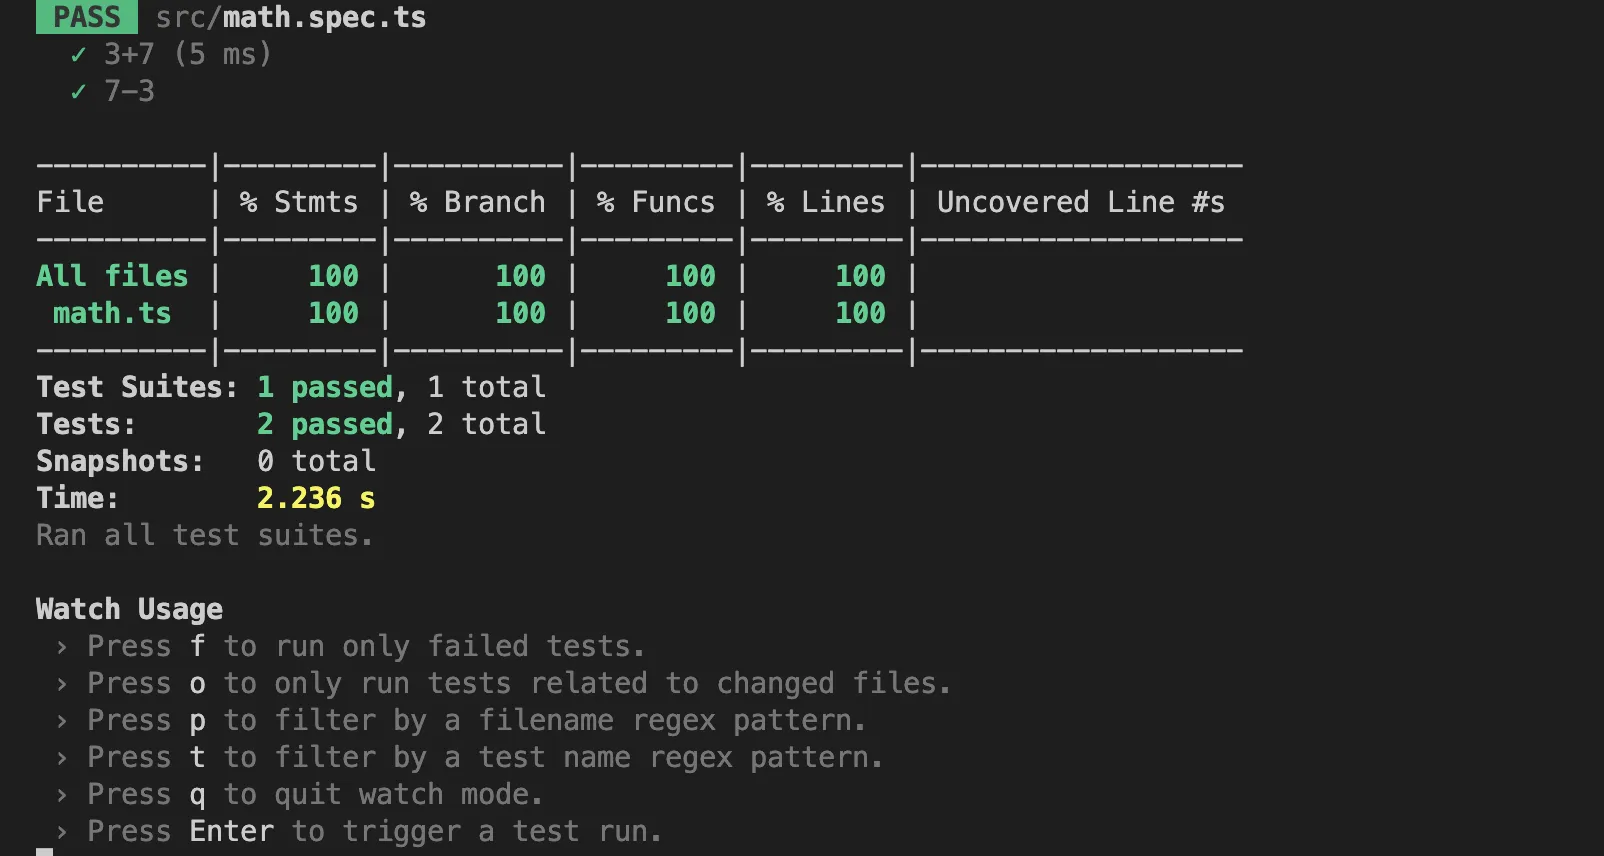
test("3+7", () => {
expect(add(3, 7)).toBe(10);
});
test("7-3", () => {
expect(minus(7, 3)).toBe(4);
});
npm i jest- 执行
npx jest或配置package.json的script字段"test": "jest"执行npm run jest
ESM支持
我如我们编写ESM模块时, 执行npm run jest会报错,jest认识 import、export, 需要配置babel
pnpm i @babel/core @babel/preset-env- 配置
babel.config.js
jsmodule.exports = {
  presets: ["@babel/preset-env"],
};
- 准备代码
math.js
jsexport function add(a, b) {
  return a + b;
}
export function minus(a, b) {
  return a - b;
}
math.spec.js
jsimport { add, minus } from "./math";

test("3+7", () => {
  expect(add(3, 7)).toBe(10);
});
test("7-3", () => {
  expect(minus(7, 3)).toBe(4);
});
再次执行 npm run jest ok
其实jest跟webpack一样,你不写配置文件,它会使用内置的配置文件jest.config.js, 内置配置默认集成了babel-jest, 所以它会寻找babel的配置文件。
配置文件
通过npx jest --init的方式生成配置文件
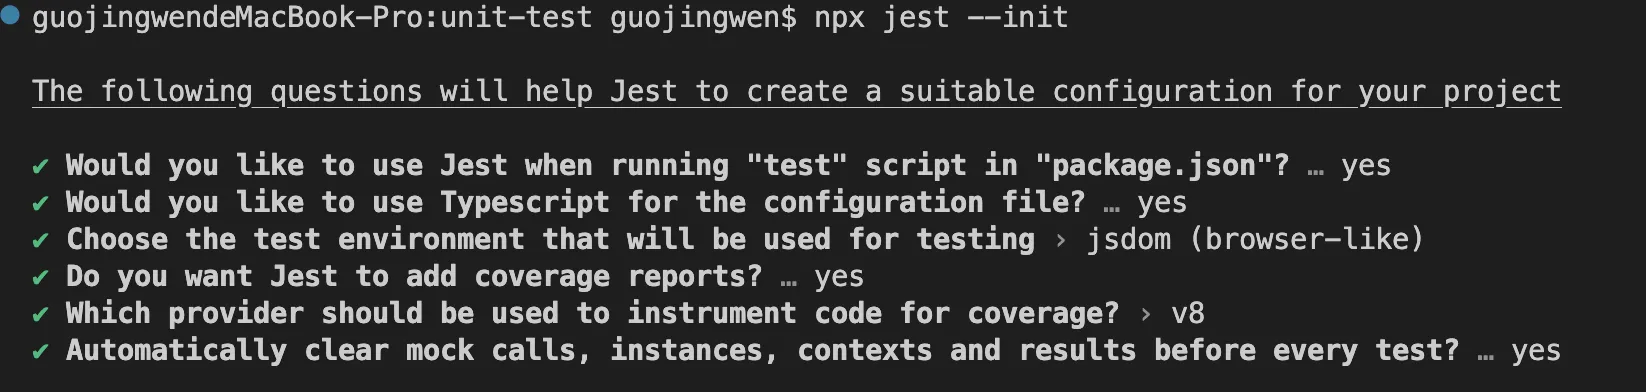 我选择了 浏览器环境、支持TS、需要覆盖率
需要安装一些依赖
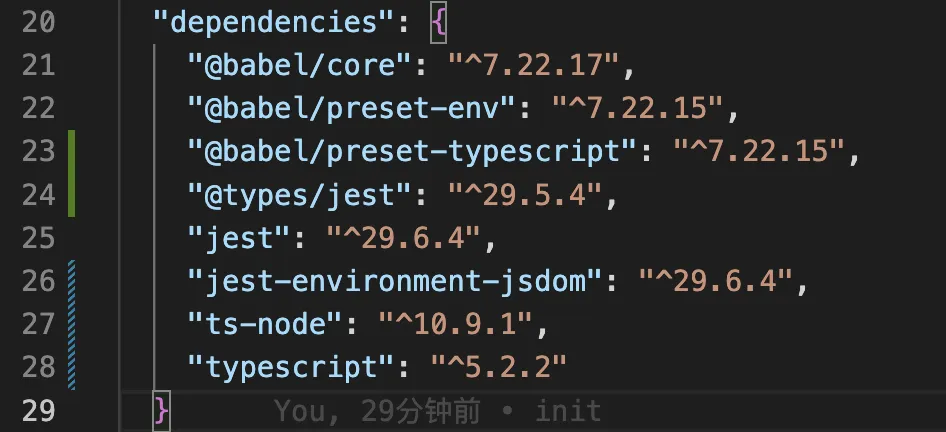
其中jest-environment-jsdom是执行npx jest提示要安装的
babel.config.js配置文件内容如下
jsmodule.exports = {
  presets: ["@babel/preset-env", "@babel/preset-typescript"],
};
将math.js和math.spec.js两个文件更名为ts文件, 执行nxp jest跑通了脚手架
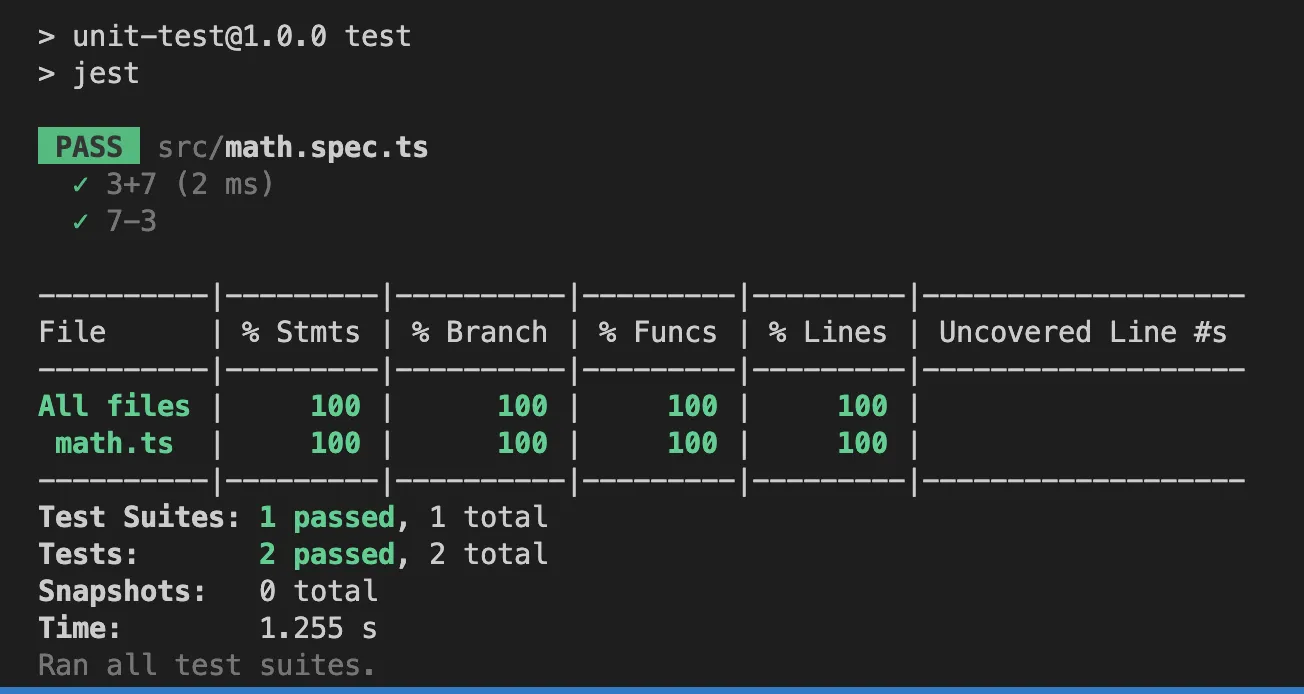
生成覆盖率文件
执行npx jest --coverage 结果与上图相同,还会生成 coverage文件夹, coverage文件夹 是有配置 coverageDirectory 字段决定的
运行 coverage/lcov-report/index.html

配置监听
该一下代码执行一下命令效率太低了,开发模式下可以通过 npx jest --watch or npx jest --watchAll的方式监听文件改动然后执行测试用例。
但是并不顺利

因为监听有个前提,必须是git项目或已使用watchman监听了本项目,
我配置了git, 还是不通, 我尝试通过watachman的方式, 但是监听不了本文件,折腾一番从github issure找到原因,需要将项目移除Document目录和Download目录(两个坑我都踩了😂)。 终于跑起来了。
这里有一些模式
f只执行失败的测试用例o只执行改动的文件相关测试用例 即--watchp根据文件或正则过滤要执行的测试用例t根据根据test名过滤要执行的测试用例a执行所有的测试用例 即--watchAll
一般我们使用npx jest --watch, 如果测试用例比较多, 我们进入f,这些技巧能提高我们的开发效率
匹配器
jstest("toBe匹配器", () => {
  // toBe 相当于 Object.is()
  expect(10).toBe(10);
});

test("toEqual 匹配对象", () => {
  const obj = {
    name: "zs",
  };
  expect(obj).toEqual({
    name: "zs",
  });
});

test("基本类型 匹配", () => {
  expect(null).toBeNull();
  expect(undefined).toBeUndefined();
  expect(1).toBeDefined();
  expect(" ").toBeTruthy(); // 匹配truthy类型
  expect("").toBeFalsy(); // 匹配falsy类型 0 false ''
  expect("").not.toBeTruthy(); // 匹配falsy类型
});

test("数字相关 匹配", () => {
  expect(10).toBeGreaterThan(9);
  expect(11).toBeLessThanOrEqual(11);
  // 因浮点运算愿意 0.1 + 0.2 !== 0.3
  expect(0.1 + 0.2).toBeCloseTo(0.3);
});

test("string相关 匹配", () => {
  expect("asdfdf1122").toMatch("11");
});

// Array Set
test("Array Set 匹配", () => {
  expect([1, 2]).toContain(2);
  const set = new Set([1, 2]);
  expect(set).toContain(1);
});

// 异常
const throwError = () => {
  throw new Error("this is error");
};
test("toThrow 匹配", () => {
  expect(throwError).toThrow();
  //   expect(throwError).not.toThrow();
  expect(throwError).toThrow("this is error");
  expect(throwError).toThrow(/this is error/);
});
// 注意:以上代码没有注释的代码都是测试用例通过的,相反都是不通过的
异步函数测试接口测试
- 准备
async.ts
tsimport axios from "axios";

//  cd api/ && http-server --cors
export const fetchData = (fn) => {
  axios.get("http://localhost:8080/1.json").then((res) => fn(res.data));
};

export const fetchDataPromise = () => {
  return axios.get("http://localhost:8080/1.json").then((res) => res.data);
};
export const fetch404Promise = () => {
  return axios.get("http://localhost:8080/404.json").then((res) => res.data);
};
接口准备
1.json
json{
    "success": true
}
- 命令行执行
cd api/ && http-server --cors
- 异步函数测试的3种方法
jsimport { fetchData, fetch404Promise, fetchDataPromise } from "./async";

// 方法1
test("fetchData", (done) => {
  fetchData((data) => {
    // console.log(data);
    expect(data).toEqual({
      success: true,
    });
    done();
  });
});

// 方法2  async 函数
test("fetchData", async () => {
  const data = await fetchDataPromise();
  expect(data).toEqual({
    success: true,
  });
});

// 方法3  返回一个promise
// 注意要配合expect.assertions 使用,不然没有执行expect也算成功
test("fetchData", async () => {
  expect.assertions(1);
  return fetch404Promise().catch((e) => {
    expect(e.toString().indexOf("404") > -1).toBe(true);
  });
});

test("promise错误可以用try catch捕获", async () => {
  expect.assertions(1);
  try {
    await fetch404Promise();
  } catch (e) {
    expect(e.toString().indexOf("404") > -1).toBe(true);
  }
});

// 补充 一般测试接口需要用到对象匹配器
test("对象匹配器", () => {
  // toMatchObject 只要目标有某种结构就可以
  expect({ name: "zs", success: true }).toMatchObject({ success: true });
});

test("如果期望接口失败的情况", () => {
  return expect(fetch404Promise()).rejects.toThrow();
});
钩子的作用
先来看一下要测试的代码
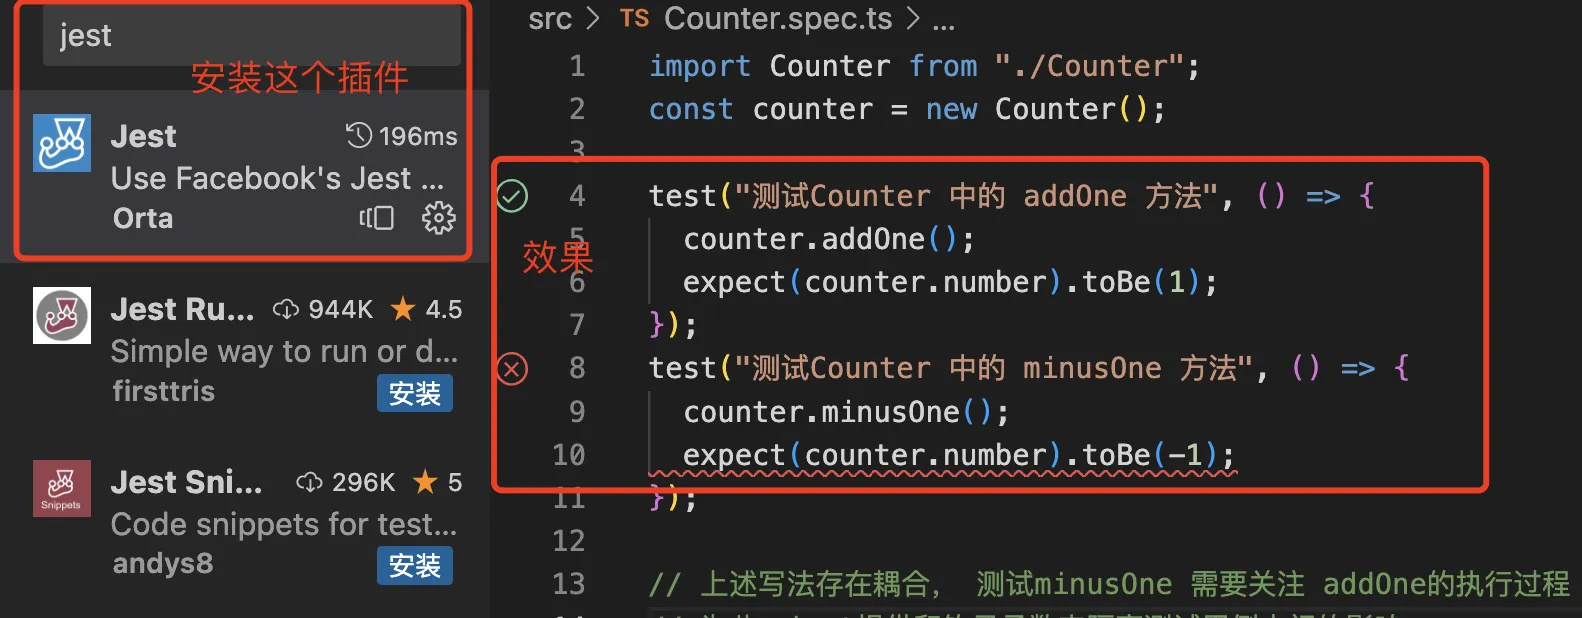
Counter.ts
tsexport default class Counter{
    constructor(public number = 0) {
    }
    addOne() {
        this.number += 1;
    }
    minusOne() {
        this.number -= 1;
    }
}
测试用例编写
Counter.spec.ts
tsimport Counter from "./Conter";
const counter = new Counter();

test("测试Counter 中的 addOne 方法", () => {
  counter.addOne();
  expect(counter.number).toBe(1);
});
test("测试Counter 中的 minusOne 方法", () => {
  counter.minusOne();
  expect(counter.number).toBe(0);
});

// 上述写法存在耦合, 测试minusOne 需要关注 addOne的执行过程
// 为此,jest提供和钩子函数来隔离测试用例中间的影响

let counter2: Counter | null = null;

beforeEach(() => {
  counter2 = new Counter();
});

test("测试Counter 中的 addOne 方法", () => {
  counter2!.addOne();
  expect(counter2!.number).toBe(1);
});
test("测试Counter 中的 minusOne 方法", () => {
  counter2!.minusOne();
  expect(counter2!.number).toBe(-1);
});
Jest中的钩子
-
beforeAll -
beforeEach -
afterEach -
afterAll -
beforeAll和afterAll只执行一次 -
beforeEach和afterEach在每一个test执行前都会执行一次 -
执行顺序就是
beforeAll--> 第一个test中的beforeEach和afterEach--> 第二个test中的beforeEach和afterEach由此类推 -->afterAll
有兴趣可以测一下,我就不写案例了
describe可以对测试用例进行分组
tsdescribe("测试Counter加法", () => {
  test("测试Counter 中的 addOne 方法", () => {
    counter2!.addOne();
    expect(counter2!.number).toBe(1);
  });
  test("测试Counter 中的 addTwo 方法", () => {
    counter2!.addTwo();
    expect(counter2!.number).toBe(1);
  });
});
describe("测试Counter减法", () => {
  // ...
});
钩子的作用域
tsdescribe("describe outer", () => {
    // 作用域当前describe内部的所有 test 和 describe
  beforeEach(() => {
    // ......
  });
  test("xxx", () => {
    // ......
  });
  test("xxx2", () => {
    // ......
  });
  describe("describe inner", () => {
    // 仅作用于当前describe
    beforeEach(() => {
      // ......
    });
  });
});
如果逻辑比较多难以调试, 可以使用test.only()这样其他的test()都被跳过
还有一点要注意: describe中的代码早于beforeEach执行
tsdescribe("describe outer", () => {
  console.log('describe outer')
  beforeEach(() => {
    console.log('beforeEach')
  });
  test("xxx", () => {
    // ......
  });
  describe("describe inner", () => {
    console.log('describe inner')
  });
});
打印顺序为
- 'describe outer'
- 'describe inner'
- 'beforeEach'
Jest中的Mock
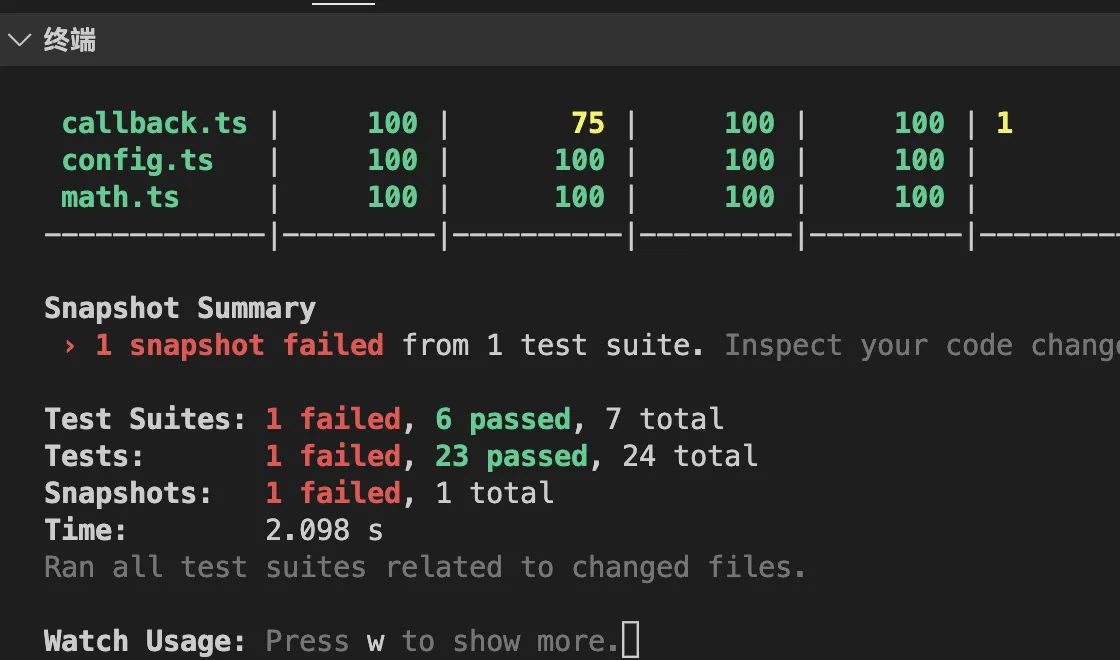
先准备两个函数
callback.ts
tsexport function runCallBack(cb: Function, ...args) {
  cb(...args);
}

export function createObj(classItem: any) {
  new classItem();
}
看一下如何mock 回调函数的调用
callback.spec.ts
tsimport { runCallBack, createObj } from "./callback";

test("测试 回调函数有没有调用", () => {
  // mock一个回调函数
  const fn = jest.fn();
  runCallBack(fn, 1, 2);
  expect(fn).toBeCalled();

  console.log(fn.mock); // 打印内容如下
  /**
   * {
        calls: [ [ 1, 2 ] ],
        contexts: [ undefined ],
        instances: [ undefined ],
        invocationCallOrder: [ 1 ],
        results: [ { type: 'return', value: undefined } ],
        lastCall: [ 1, 2 ]
      }
   */
  // calls 记录被调用的次数及每次调用的参数
  // results每次执行的返回值
  // invocationCallOrder 调用的顺序
  // instances  通过new调用创建的实例

  runCallBack(fn, 3);
  expect(fn.mock.invocationCallOrder.length).toBe(2);

  // 还可以模拟返回值
  fn.mockReturnValueOnce("mockReturn").mockReturnValueOnce("mockReturn2"); // 可以链式调用
});

test("测试 createObject", () => {
  const fn = jest.fn();
  createObj(fn);
  console.log(fn.mock);
  /**
   * {
        calls: [ [] ],
        contexts: [ mockConstructor {} ],
        instances: [ mockConstructor {} ],
        invocationCallOrder: [ 3 ],
        results: [ { type: 'return', value: undefined } ],
        lastCall: []
      }
   */
});

// 其他
test("测试 mockImplementantion", () => {
  const fn = jest.fn();
  // fn.mockImplementantion(()  => 'hello');
  // 等价于 fn = jest.fn(() => 'hello');
  // 它与mockReturnValue类似
});
再来看一下接口mock
tsimport axios from "axios";

export const getData = () => {
  return axios.get("/api").then((res) => res.data);
};

/**
 * 一般前端不针对接口进行测试
 * 一方面方面是因为大量接口异步请求很多很慢,
 * 另一方面是接口测试是后端的工作
 * 前端一般通过mock跳过接口
 * */
jest.mock("axios"); // 会跳过 import axios from "axios";

test("测试 getData", async () => {
  axios.get.mockResolvedValueOnce({ data: "hello" });
  axios.get.mockResolvedValueOnce({ data: "world" });
  await getData().then((data) => {
    expect(data).toBe("hello");
  });
  await getData().then((data) => {
    expect(data).toBe("world");
  });
});
除了mock axios 我们还可以针对api进行mock
比如我们新建一个mock文件
myMockApi.ts
tsfunction getData() {
    return new Promise((resolve) => {
      resolve(123)
    })
}
测试用例调整如下
tsimport {fetchData} from './api'

jest.mock('./myMockApi'); // 它会提前 在import前面

test('fetchData 测试', () => {
  return fetchData().then(data => {
    expect(data).toEqual(123);
  })
})
如果有些接口不希望模拟 可以通过jest.requireActual去规避
tsconst {getNumber} = jest.requireActual('./api');
// 此时getNumber 不再是myMockApi.ts导出的,而是 api.ts 导出的
总结jest.fn的作用
- 捕获函数的调用和返回结果,调用顺序, 以及this
- 可以自由的设置返回结果
- 改变函数的内部实现
vscode jest插件
snapShort
快照通常用于配置文件修改后的确认
比如有一个配置文件
config.ts
tsexport const generateConfig = () => {
  return {
    server: "XXX",
    time: new Date(),
  };
};
- 测试用例
config.spec.ts
tsimport { generateConfig } from "./config";

test("测试 generateConfig 函数", () => {
  expect(generateConfig()).toMatchSnapshot({
    time: expect.any(Date),
  });
});
第一次执行会,生成快照文件

如果我们修改了config.ts
增加配置 port: "8080",
控制台会报错提示我们去确认是否更新快照
按W后
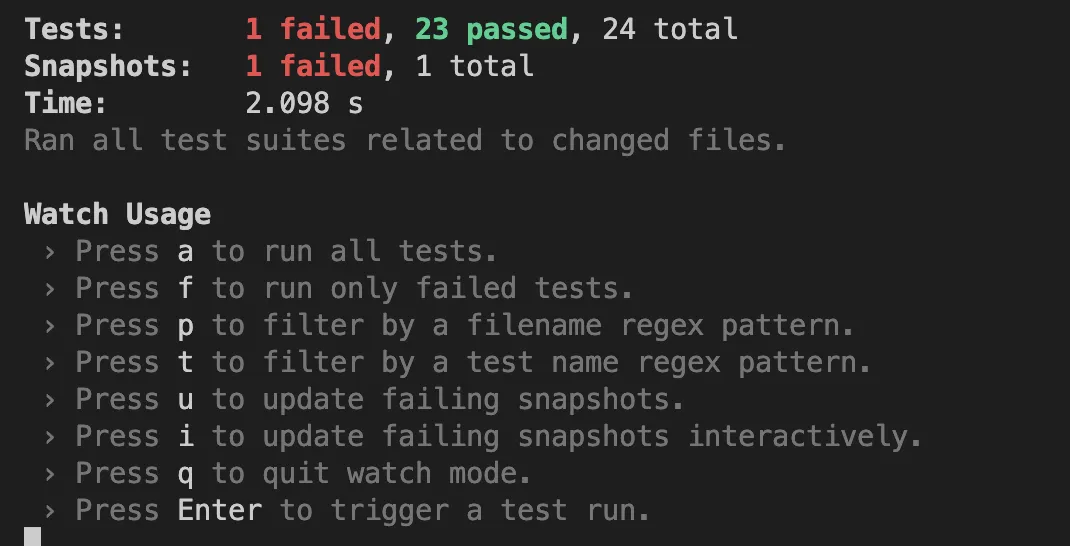
输入u会更新快照
如果有多个快照要确认 可以通过 i模式交互式确认
dom
jest中模拟了一套dom的api,可以直接测试dom
tstest("test dom", () => {
  const div = document.createElement("div");
  document.body.appendChild(div);
  expect(document.body.querySelectorAll("div").length).toBe(1);
});
本文作者:郭敬文
本文链接:
版权声明:本博客所有文章除特别声明外,均采用 BY-NC-SA 许可协议。转载请注明出处!